Difference between revisions of "SpiritRS Setup/en"
(Importing a new version from external source) |
(Importing a new version from external source) |
||
| (27 intermediate revisions by the same user not shown) | |||
| Line 1: | Line 1: | ||
<languages/> | <languages/> | ||
| − | + | All Spirit units can be configured through radio in the full extent without usage of computer. | |
| − | + | You can perform full setup of the Spirit RS, GTR and tune all flight parameters easily in '''Device Explorer''' menu. | |
| − | == | + | == Spirit Integration == |
| − | + | Sprit Integration is interface for configuration of the Spirit unit. All changes related to the Spirit RS, GTR can be done from there. | |
| − | + | You can enter and close it anytime you wish. | |
<p></p> | <p></p> | ||
| Line 15: | Line 15: | ||
=== Opening Spirit menu === | === Opening Spirit menu === | ||
| − | + | To open Spirit setup you can proceed in the following way. | |
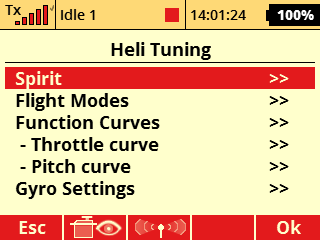
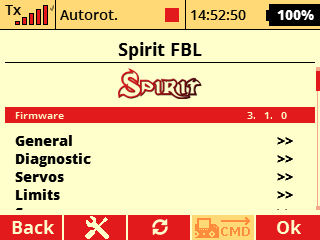
| − | + | Open '''Spirit menu''' in the Model/Heli Tuning. | |
[[File:jeti-spiritmenuop.png]] [[File:jeti-spiritmenu.png]] | [[File:jeti-spiritmenuop.png]] [[File:jeti-spiritmenu.png]] | ||
<p></p> | <p></p> | ||
| − | {{Info|[[File:Info.png|18px|]] In case you are getting error message when opening the integration menu, '''please install the latest JETI integration file''' - available at our web pages.<br/>SPIRIT-3.X.zip archive must be extracted and all the files copied to the Devices directory inside your Radio. Please see following section ''Updating Integration (BIN) files''.}} | + | {{Info|[[File:Info.png|18px|]] In case you are getting error message when opening the integration menu, '''please install the latest JETI integration file''' - available at our [https://spirit-system.com/download.php web pages].<br/>SPIRIT-3.X.zip archive must be extracted and all the files copied to the Devices directory inside your Radio. Please see following section ''Updating Integration (BIN) files''.}} |
<p></p> | <p></p> | ||
| − | ==== | + | ==== Updating Integration (BIN) files ==== |
| − | + | For Integration menu to work properly it is always needed that the file version correspond to firmware version. | |
| − | If you were performing Spirit firmware update or you never used integration before please download the latest Jeti Integration files from Spirit System web page. The file is called '''SPIRIT-3.X.zip'''. | + | If you were performing Spirit firmware update or you never used integration before please download the latest Jeti Integration files from [https://spirit-system.com/download.php Spirit System web page]. The file is called '''SPIRIT-3.X.zip'''. |
Alternative way is to update the files through Jeti-Studio software, but files might not correspond to the latest Spirit firmware. | Alternative way is to update the files through Jeti-Studio software, but files might not correspond to the latest Spirit firmware. | ||
| − | ''' | + | '''Updating procedure:''' |
| − | # | + | #Download JETI Integration ZIP archive from our web page - click at the JETI icon. |
| − | # | + | #Extract the archive to your hard disc. |
| − | # | + | #Connect JETI radio with USB cable to your computer. |
| − | # | + | #Confirm USB connection at the radio. |
| − | # | + | #Copy content of the directory SPIRIT-3.X to '''Devices''' folder in SD Card of your radio. This process must rewrite old files. |
| − | + | After this procedure, you should see '''SPIRIT.bin''', '''REX-RS.bin''' files and '''SPIRIT''' directory located in the '''Devices'''. | |
=== Spirit Settings interface === | === Spirit Settings interface === | ||
| − | + | Spirit menu is almost identical to computer software called Spirit Settings that can be also optionally used. | |
| − | + | You can easily change any parameter and changes are applied immediately. | |
| − | + | But to store any changes do not forget to Save the settings. | |
<p></p> | <p></p> | ||
| − | {{Info|[[File:Info.png|18px|]] | + | {{Info|[[File:Info.png|18px|]] Click at the '''Save Settings''' in the Spirit menu to save all changes you have made in the Spirit RS, GTR settings. Otherwise after re-power changes are returned to the previous values.}} |
<p></p> | <p></p> | ||
| − | === | + | === Closing Spirit menu === |
| − | + | To continue with flying please close the Spirit menu by selecting '''Close the integration menu'''. | |
| − | + | Once this is performed, Status LED of the unit must remain steady On. | |
| − | == | + | == Configuring Receiver part == |
| − | + | To configure E1 telemetry port you can open '''Device Explorer''' and perform settings there. | |
Open Menu and press right button under display. This will open Device Explorer instantly. | Open Menu and press right button under display. This will open Device Explorer instantly. | ||
Alternatively you can go trough Model/Device Explorer menu. | Alternatively you can go trough Model/Device Explorer menu. | ||
| − | + | Then select '''REX-RS''' device. All changes in the settings are saved immediately. | |
[[File:jeti-devrexrs.png]] | [[File:jeti-devrexrs.png]] | ||
| Line 71: | Line 71: | ||
== Spirit setup == | == Spirit setup == | ||
| − | + | To prepare Spirit unit for flight it is necessary to go through '''Setup Wizard''' first. | |
| − | + | This process is required only once, always for a new model. | |
| − | + | You can find the Setup Wizard in the Spirit Integration menu. | |
[[File:jeti-wizard.png]] [[File:jeti-wizard2.png]] | [[File:jeti-wizard.png]] [[File:jeti-wizard2.png]] | ||
| Line 83: | Line 83: | ||
{|style="width: 100%;color: white;" | {|style="width: 100%;color: white;" | ||
|- | |- | ||
| − | | style="width: 33%;"| [[SpiritRS Binding | + | | style="width: 33%;"| [[SpiritRS Binding|← Binding]] |
| − | | style="width: 33%;text-align:center;"| [[#up|↑ | + | | style="width: 33%;text-align:center;"| [[#up|↑Up↑]] |
| − | | style="text-align:right;" | [[SpiritRS Computer | + | | style="text-align:right;" | [[SpiritRS Computer|Configuring from Computer →]] |
|} | |} | ||
---- | ---- | ||
</div> | </div> | ||
Latest revision as of 12:46, 24 January 2023
All Spirit units can be configured through radio in the full extent without usage of computer. You can perform full setup of the Spirit RS, GTR and tune all flight parameters easily in Device Explorer menu.
Contents
1 Spirit Integration
Sprit Integration is interface for configuration of the Spirit unit. All changes related to the Spirit RS, GTR can be done from there. You can enter and close it anytime you wish.
It is highly advised to not enter the setup while flying! If you were performing changes in this menu, always close it according section Closing Spirit menu.
To open Spirit setup you can proceed in the following way.
Open Spirit menu in the Model/Heli Tuning.
In case you are getting error message when opening the integration menu, please install the latest JETI integration file - available at our web pages.
SPIRIT-3.X.zip archive must be extracted and all the files copied to the Devices directory inside your Radio. Please see following section Updating Integration (BIN) files.
1.1.1 Updating Integration (BIN) files
For Integration menu to work properly it is always needed that the file version correspond to firmware version.
If you were performing Spirit firmware update or you never used integration before please download the latest Jeti Integration files from Spirit System web page. The file is called SPIRIT-3.X.zip. Alternative way is to update the files through Jeti-Studio software, but files might not correspond to the latest Spirit firmware.
Updating procedure:
- Download JETI Integration ZIP archive from our web page - click at the JETI icon.
- Extract the archive to your hard disc.
- Connect JETI radio with USB cable to your computer.
- Confirm USB connection at the radio.
- Copy content of the directory SPIRIT-3.X to Devices folder in SD Card of your radio. This process must rewrite old files.
After this procedure, you should see SPIRIT.bin, REX-RS.bin files and SPIRIT directory located in the Devices.
1.2 Spirit Settings interface
Spirit menu is almost identical to computer software called Spirit Settings that can be also optionally used.
You can easily change any parameter and changes are applied immediately. But to store any changes do not forget to Save the settings.
Click at the Save Settings in the Spirit menu to save all changes you have made in the Spirit RS, GTR settings. Otherwise after re-power changes are returned to the previous values.
To continue with flying please close the Spirit menu by selecting Close the integration menu. Once this is performed, Status LED of the unit must remain steady On.
2 Configuring Receiver part
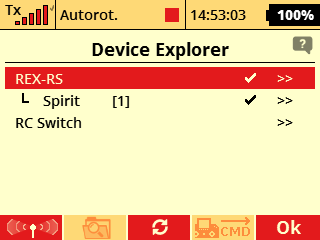
To configure E1 telemetry port you can open Device Explorer and perform settings there.
Open Menu and press right button under display. This will open Device Explorer instantly. Alternatively you can go trough Model/Device Explorer menu.
Then select REX-RS device. All changes in the settings are saved immediately.
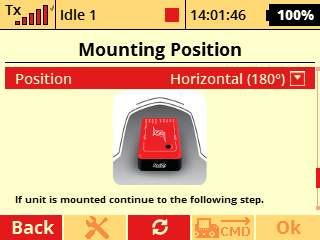
3 Spirit setup
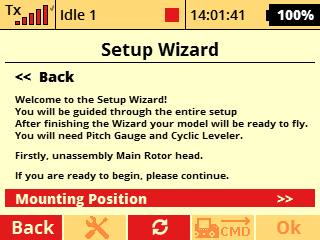
To prepare Spirit unit for flight it is necessary to go through Setup Wizard first. This process is required only once, always for a new model.
You can find the Setup Wizard in the Spirit Integration menu.
