Difference between revisions of "Kontronik Telemetry/cs"
(Created page with "Poté zavřete okno a uložte nastavení ''(CTRL+S)''. Po uložení odpojte baterii.") |
(Created page with "Zapojení") |
||
| Line 24: | Line 24: | ||
Poté zavřete okno a uložte nastavení ''(CTRL+S)''. Po uložení odpojte baterii. | Poté zavřete okno a uložte nastavení ''(CTRL+S)''. Po uložení odpojte baterii. | ||
| − | == | + | == Zapojení == |
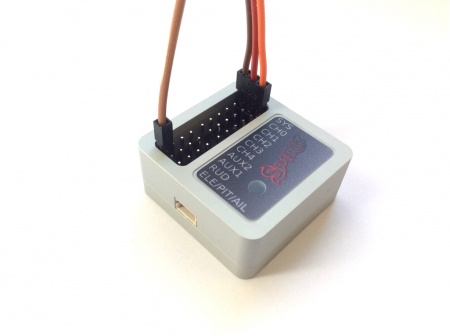
At this step, connect the Telemetry cable according the following photo. | At this step, connect the Telemetry cable according the following photo. | ||
Revision as of 15:06, 21 April 2017
Regulátory Kontronik KOSMIK a JIVE PRO ESC zasílají telemetrii pomocí vyhrazeného portu. Tímto je zprostředkován přenos dat až do jednotky.
S verzí firmware Spirit v2.4 je přenos ESC telemetrie možný pouze s připojením EX Bus. Podpora ostatních typů přenosu bude přidána v dalších verzích.
Contents
1 Telemetrická propojka
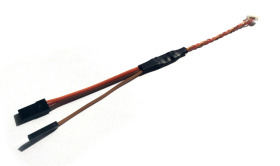
Telemtrické data je možné přenášet skrze speciální propojku Telem KONTRONIK. Je dostupná na našem Eshopu.
2 Spirit Settings
Ze všeho nejdříve připojte baterii k regulátoru. Následně spusťte konfigurační program Spirit Settings běžným způsobem.
2.1 Zapnutí telemetrie
Nastavte ESC telemetrii v programu Spirit Settings.
Přejděte do Pokročilé/Nastavení telemetrie a zvolte možnost Kontronik KOSMIK & JIVE PRO.
Poté zavřete okno a uložte nastavení (CTRL+S). Po uložení odpojte baterii.
3 Zapojení
At this step, connect the Telemetry cable according the following photo.
In this connection SYS port is used. Thus usage of this port for other purposes is limited when the Kontronik telemetry is enabled. Jeti Integration is still available for full configuration of the unit. If you need to use Spirit Settings software, you can deactivate temporarily ESC Telemetry by not turning transmitter on. At this moment normal connection for the USB interface or Wireless connection is established.
ELE pin is utilized for communication purpose of the telemetry interface.
4 Displaying telemetry data
When previous steps were finished, you are ready to power up the battery.
After initialization you can display all telemetry data directly in your radio from now.
How to display the data is described in the integration guide:
5 Supported models
|
Model |
Battery Voltage |
Battery Current |
BEC Voltage |
Consumed Capacity |
ESC Temperature |
|---|---|---|---|---|---|
| JIVE PRO 80+ HV | ✔ | ✔ | ✔ | ✔ | ✔ |
| JIVE PRO 120+ HV | ✔ | ✔ | ✔ | ✔ | ✔ |
| KOSMIK 160 HV | ✔ | ✔ | ✔ | ✔ | ✔ |
| COOL KOSMIK 160 HV | ✔ | ✔ | ✔ | ✔ | ✔ |
| KOSMIK 200 HV | ✔ | ✔ | ✔ | ✔ | ✔ |
| COOL KOSMIK 200+ HV | ✔ | ✔ | ✔ | ✔ | ✔ |
| COOL KOSMIK 200 HV GOLD | ✔ | ✔ | ✔ | ✔ | ✔ |


