Difference between revisions of "SpiritRS Preparation"
(Marked this version for translation) |
|||
| Line 1: | Line 1: | ||
| − | <translate>To operate Spirit RS unit any JETI DUPLEX radio can be used.</translate> | + | <translate><!--T:1--> |
| + | To operate Spirit RS unit any JETI DUPLEX radio can be used.</translate> | ||
| − | <translate>Supported radios are: | + | <translate><!--T:2--> |
| + | Supported radios are: | ||
* DC-14 | * DC-14 | ||
* DC-16 | * DC-16 | ||
| Line 11: | Line 13: | ||
* DS-24</translate> | * DS-24</translate> | ||
| − | <translate>We recommend to start with clear model profile as you will need only few changes. | + | <translate><!--T:3--> |
| + | We recommend to start with clear model profile as you will need only few changes. | ||
| + | <!--T:4--> | ||
Spirit System offer DS-12 radio tailored specially for the Spirit RS. This mean you will be able to utilize completely all features out of the box.</translate> | Spirit System offer DS-12 radio tailored specially for the Spirit RS. This mean you will be able to utilize completely all features out of the box.</translate> | ||
[[File:jeti-ds12.jpg|class=halfwidth]] | [[File:jeti-ds12.jpg|class=halfwidth]] | ||
| − | == <translate>Beginning</translate> == | + | == <translate><!--T:5--> |
| + | Beginning</translate> == | ||
| − | <translate>First from all you should carefully read radio manual. Once you understand all the particulars you can change Mode if needed. This is fully described in the included manual. | + | <translate><!--T:6--> |
| + | First from all you should carefully read radio manual. Once you understand all the particulars you can change Mode if needed. This is fully described in the included manual. | ||
When securing bottom cover after Mode change please pay extra attention that no cable is in way of a screw. | When securing bottom cover after Mode change please pay extra attention that no cable is in way of a screw. | ||
| + | <!--T:7--> | ||
Secondly remove cover made of foil from display.</translate> | Secondly remove cover made of foil from display.</translate> | ||
| − | == <translate>Turning On and Off</translate> == | + | == <translate><!--T:8--> |
| + | Turning On and Off</translate> == | ||
| − | <translate>By pressing Power button you should be able to start the radio. If not, please use supplied charger and charge the battery. | + | <translate><!--T:9--> |
| + | By pressing Power button you should be able to start the radio. If not, please use supplied charger and charge the battery. | ||
By pressing the Power button again, you can turn radio off.</translate> | By pressing the Power button again, you can turn radio off.</translate> | ||
| − | == <translate>New Profile</translate> == | + | == <translate><!--T:10--> |
| + | New Profile</translate> == | ||
| − | <translate>If you are new to the JETI radios, please proceed according following steps. | + | <translate><!--T:11--> |
| + | If you are new to the JETI radios, please proceed according following steps. | ||
| + | <!--T:12--> | ||
Start the radio and press MENU button. Then enter the Model menu by pressing the Rotary knob.</translate> | Start the radio and press MENU button. Then enter the Model menu by pressing the Rotary knob.</translate> | ||
[[File:jeti-menu.png]] | [[File:jeti-menu.png]] | ||
| − | <translate>Select New Model, enter name of the Model and select Heli type. Then continue by pressing right button under display.</translate> | + | <translate><!--T:13--> |
| + | Select New Model, enter name of the Model and select Heli type. Then continue by pressing right button under display.</translate> | ||
[[File:jeti-newmodel.png]] | [[File:jeti-newmodel.png]] | ||
| − | <translate>Model Image & Colors Menu can be optionally configured according your preference. Continue to another page by pressing button under display.</translate> | + | <translate><!--T:14--> |
| + | Model Image & Colors Menu can be optionally configured according your preference. Continue to another page by pressing button under display.</translate> | ||
[[File:jeti-imagecolors.png]] | [[File:jeti-imagecolors.png]] | ||
| − | <translate>In the Basic Properties menu select Heli to Spirit and continue to another page. (Please note transmitter update 5.03 is required for this option).</translate> | + | <translate><!--T:15--> |
| + | In the Basic Properties menu select Heli to Spirit and continue to another page. (Please note transmitter update 5.03 is required for this option).</translate> | ||
[[File:jeti-basicprop.png]] | [[File:jeti-basicprop.png]] | ||
| − | <translate>Confirm until you will be prompted to Create and activate model. Select Yes.</translate> | + | <translate><!--T:16--> |
| + | Confirm until you will be prompted to Create and activate model. Select Yes.</translate> | ||
[[File:jeti-createmodel.png]] | [[File:jeti-createmodel.png]] | ||
| − | == <translate>Basic Helicopter settings</translate> == | + | == <translate><!--T:17--> |
| + | Basic Helicopter settings</translate> == | ||
| − | <translate>Open '''Heli Tuning''' menu - Main Menu/Heli Tuning.</translate> | + | <translate><!--T:18--> |
| + | Open '''Heli Tuning''' menu - Main Menu/Heli Tuning.</translate> | ||
[[File:jeti-helituning.png]] | [[File:jeti-helituning.png]] | ||
| − | === <translate>Flight Modes</translate> === | + | === <translate><!--T:19--> |
| + | Flight Modes</translate> === | ||
| − | <translate>Enter Flight Modes menu and press Yes when prompted "Created flight modes?".</translate> | + | <translate><!--T:20--> |
| + | Enter Flight Modes menu and press Yes when prompted "Created flight modes?".</translate> | ||
[[File:jeti-flightmode.png]] | [[File:jeti-flightmode.png]] | ||
| − | <translate>Assign switch for Autorot. mode - usually it is two-state switch called '''Sc''' at the left front side of the radio. This switch will be used for Throttle Hold/Autorotation. | + | <translate><!--T:21--> |
| + | Assign switch for Autorot. mode - usually it is two-state switch called '''Sc''' at the left front side of the radio. This switch will be used for Throttle Hold/Autorotation. | ||
Also assign switch for all Idle modes - usually it is tri-state switch called '''Sa''' above Sc.</translate> | Also assign switch for all Idle modes - usually it is tri-state switch called '''Sa''' above Sc.</translate> | ||
[[File:jeti-switches.png]] | [[File:jeti-switches.png]] | ||
| − | {{Info|[[File:Info.png]] <translate>Non-Spirit Jeti radio might need to get extension module for Flight modes (from swshop.jetimodel.com). Alternatively you can use only 3 Flight modes.</translate>}} | + | {{Info|[[File:Info.png]] <translate><!--T:22--> |
| + | Non-Spirit Jeti radio might need to get extension module for Flight modes (from swshop.jetimodel.com). Alternatively you can use only 3 Flight modes.</translate>}} | ||
<p></p> | <p></p> | ||
| − | {{Info|[[File:Info.png]] <translate>Instead of Autorot. flight mode you can set Throttle Cut switch.</translate>}} | + | {{Info|[[File:Info.png]] <translate><!--T:23--> |
| + | Instead of Autorot. flight mode you can set Throttle Cut switch.</translate>}} | ||
| − | === <translate>Throttle Curve</translate> === | + | === <translate><!--T:24--> |
| + | Throttle Curve</translate> === | ||
| − | <translate>Open '''Throttle curve''' menu - Main Menu/Heli Tuning/Throttle curve. | + | <translate><!--T:25--> |
| + | Open '''Throttle curve''' menu - Main Menu/Heli Tuning/Throttle curve. | ||
| + | <!--T:26--> | ||
Disarm Throttle Hold and set Throttle curves for all Idle Modes. When you switch Idle modes, curves will change accordingly. For more advanced pilots it is recommended to set Curve type to Constant - especially when you are using Governor.</translate> | Disarm Throttle Hold and set Throttle curves for all Idle Modes. When you switch Idle modes, curves will change accordingly. For more advanced pilots it is recommended to set Curve type to Constant - especially when you are using Governor.</translate> | ||
[[File:jeti-throttle.png]] | [[File:jeti-throttle.png]] | ||
| − | === <translate>Pitch Curve</translate> === | + | === <translate><!--T:27--> |
| + | Pitch Curve</translate> === | ||
| − | <translate>Open '''Pitch curve''' menu - Main Menu/Heli Tuning/Pitch curve. | + | <translate><!--T:28--> |
| + | Open '''Pitch curve''' menu - Main Menu/Heli Tuning/Pitch curve. | ||
| + | <!--T:29--> | ||
In a similar way set Pitch curve - in the most cases no changes are required. It is preconfigured to -100 to 100% linear curve. For beginners Pitch curve such as -20 to 100% is more suitable.</translate> | In a similar way set Pitch curve - in the most cases no changes are required. It is preconfigured to -100 to 100% linear curve. For beginners Pitch curve such as -20 to 100% is more suitable.</translate> | ||
[[File:jeti-pitch.png]] | [[File:jeti-pitch.png]] | ||
| − | === <translate>Gyro Gain</translate> === | + | === <translate><!--T:30--> |
| + | Gyro Gain</translate> === | ||
| − | <translate>Open '''Gyro Settings''' menu - Main Menu/Heli Tuning/Gyro Settings. | + | <translate><!--T:31--> |
| + | Open '''Gyro Settings''' menu - Main Menu/Heli Tuning/Gyro Settings. | ||
By defailt it assigned to tri-state '''Se''' switch. Values are 50%, 0%, -50%. | By defailt it assigned to tri-state '''Se''' switch. Values are 50%, 0%, -50%. | ||
| + | <!--T:32--> | ||
For the beginning you can use these values. Positive value will activate '''Head-Lock''' Gyro mode, while -50% will engage '''Normal (Rate)''' mode. | For the beginning you can use these values. Positive value will activate '''Head-Lock''' Gyro mode, while -50% will engage '''Normal (Rate)''' mode. | ||
| + | <!--T:33--> | ||
For further Gyro Gain tuning you can set 50, 60, 70% gains or assign a rotary knob.</translate> | For further Gyro Gain tuning you can set 50, 60, 70% gains or assign a rotary knob.</translate> | ||
[[File:jeti-gyro.png]] | [[File:jeti-gyro.png]] | ||
Revision as of 11:02, 3 June 2020
To operate Spirit RS unit any JETI DUPLEX radio can be used.
Supported radios are:
- DC-14
- DC-16
- DC-16 II
- DC-24
- DS-12
- DS-14
- DS-16
- DS-24
We recommend to start with clear model profile as you will need only few changes.
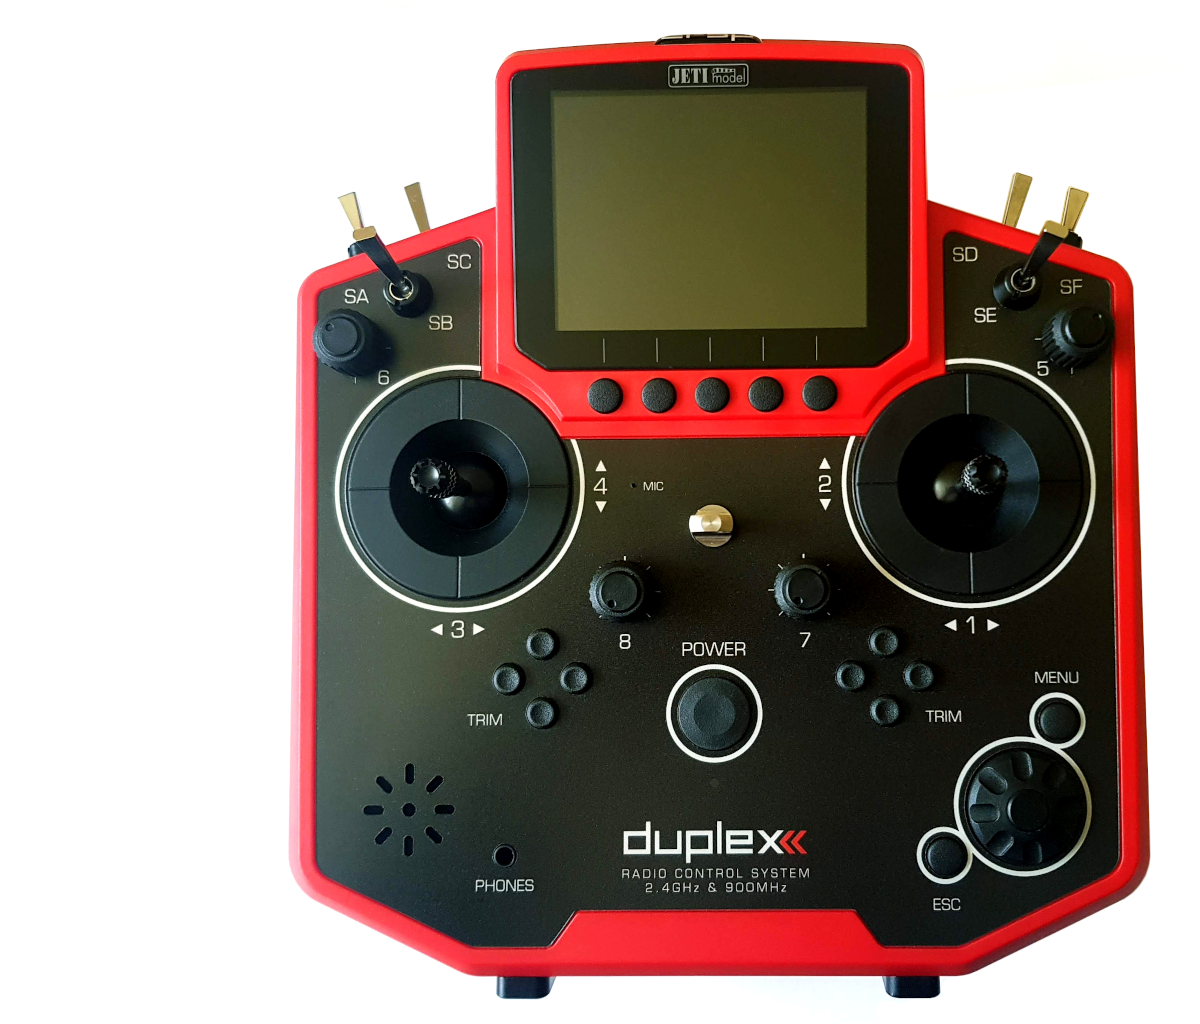
Spirit System offer DS-12 radio tailored specially for the Spirit RS. This mean you will be able to utilize completely all features out of the box.
Contents
1 Beginning
First from all you should carefully read radio manual. Once you understand all the particulars you can change Mode if needed. This is fully described in the included manual. When securing bottom cover after Mode change please pay extra attention that no cable is in way of a screw.
Secondly remove cover made of foil from display.
2 Turning On and Off
By pressing Power button you should be able to start the radio. If not, please use supplied charger and charge the battery. By pressing the Power button again, you can turn radio off.
3 New Profile
If you are new to the JETI radios, please proceed according following steps.
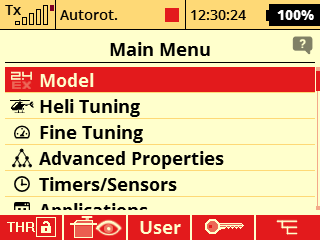
Start the radio and press MENU button. Then enter the Model menu by pressing the Rotary knob.
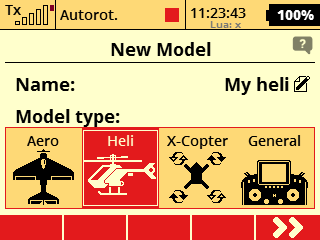
Select New Model, enter name of the Model and select Heli type. Then continue by pressing right button under display.
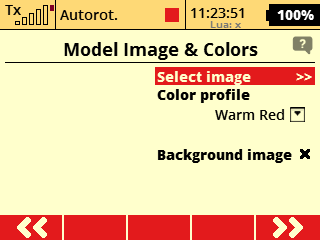
Model Image & Colors Menu can be optionally configured according your preference. Continue to another page by pressing button under display.
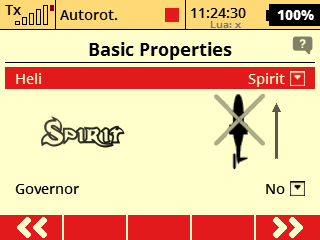
In the Basic Properties menu select Heli to Spirit and continue to another page. (Please note transmitter update 5.03 is required for this option).
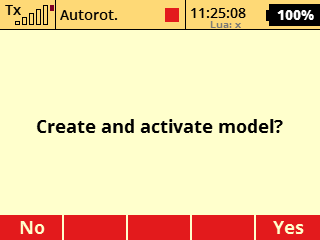
Confirm until you will be prompted to Create and activate model. Select Yes.
4 Basic Helicopter settings
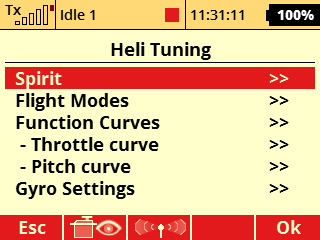
Open Heli Tuning menu - Main Menu/Heli Tuning.
4.1 Flight Modes
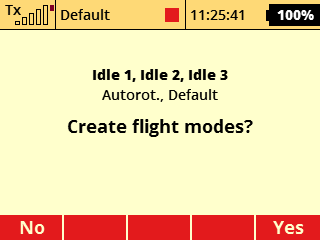
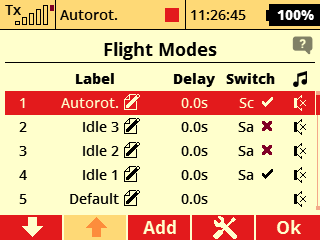
Enter Flight Modes menu and press Yes when prompted "Created flight modes?".
Assign switch for Autorot. mode - usually it is two-state switch called Sc at the left front side of the radio. This switch will be used for Throttle Hold/Autorotation. Also assign switch for all Idle modes - usually it is tri-state switch called Sa above Sc.
Non-Spirit Jeti radio might need to get extension module for Flight modes (from swshop.jetimodel.com). Alternatively you can use only 3 Flight modes.
Instead of Autorot. flight mode you can set Throttle Cut switch.
4.2 Throttle Curve
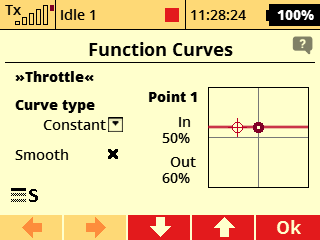
Open Throttle curve menu - Main Menu/Heli Tuning/Throttle curve.
Disarm Throttle Hold and set Throttle curves for all Idle Modes. When you switch Idle modes, curves will change accordingly. For more advanced pilots it is recommended to set Curve type to Constant - especially when you are using Governor.
4.3 Pitch Curve
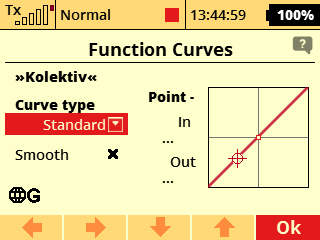
Open Pitch curve menu - Main Menu/Heli Tuning/Pitch curve.
In a similar way set Pitch curve - in the most cases no changes are required. It is preconfigured to -100 to 100% linear curve. For beginners Pitch curve such as -20 to 100% is more suitable.
4.4 Gyro Gain
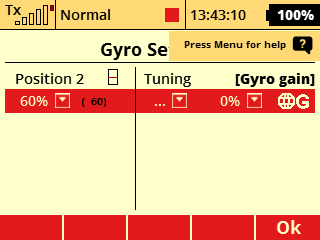
Open Gyro Settings menu - Main Menu/Heli Tuning/Gyro Settings. By defailt it assigned to tri-state Se switch. Values are 50%, 0%, -50%.
For the beginning you can use these values. Positive value will activate Head-Lock Gyro mode, while -50% will engage Normal (Rate) mode.
For further Gyro Gain tuning you can set 50, 60, 70% gains or assign a rotary knob.
