Futaba Telemetria
Dalla versione 2.4.3 è possibile utilizzare il pieno supporto della telemetria Futaba!
Ciò significa che puoi vedere tutte le variabili di telemetria inviate dalle unità Spirit con S.BUS2 (ricevitore FASSTest) in tempo reale.
Contents
1 Requisiti
Per farlo funzionare avrai bisogno di:
- Trasmettitore Futaba: 14SG, 16SZ, 18MZ or 18SZ
- FASSTest receivente : R7003SB, R7006SB, R7008SB, R7014SB or R7018SB.
- Cavo di integrazione FrSky disponibile nei nostri negozi (con una piccola modifica).
- Firmware Futaba: più recente.
- Spirit firmware: 2.4.3.
2 Modifica del cavo
Per consentire la trasmissione della telemetria, il cavo di integrazione FrSky deve essere modificato. A tale scopo avrete bisogno di una spina in plastica per servo (già inclusa con il cavo).
Modifica dell'estremità più lunga
- Usa un ago per liberare il filo rosso dalla plastica.
- Quindi collega il filo rosso dal centro a un servo di plastica separato (nella posizione del segnale).
3 cablaggio
Il cavo di integrazione FrSky è in grado di trasferire tutto, compresi i dati del canale e la telemetria. Ciò significa che non sarà necessario collegare nient'altro tranne questo cavo.
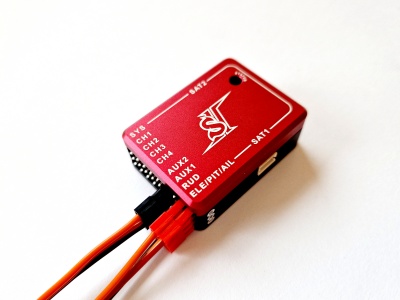
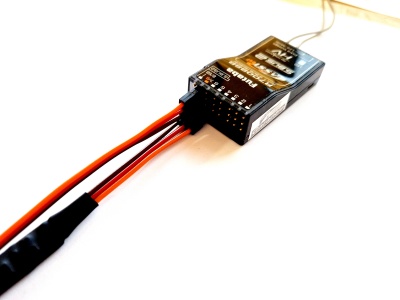
Longer lead of the cable unit - RUD and ELE/PIT/AIL (see the photo) Shorter lead of the cable receiver - S.BUS2
The FrSky Integration cable is not able to carry power to the receiver. For this purpose you will need to add a normal servo cable between receiver and unit to a free port (for example AUX, AUX2 or CH0 port connected with 8/SB). Alternatively you can use one additional wire and connect it to the middle pin of the RUD that is not connected. You can also use a secondary BEC output so no other cable is required.
Make sure that the receiver is bound in the FASSTest mode, otherwise telemetry will not work.
Spirit: If S-BUS Adapter is used with Spirit, then it will be replaced by the FrSky Integration cable.
Spirit Pro & uSpirit: Servo cable that was used for connection between receiver and unit will be replaced by the FrSky Integration cable.
4 Transmitter preparation
4.1 Configuration
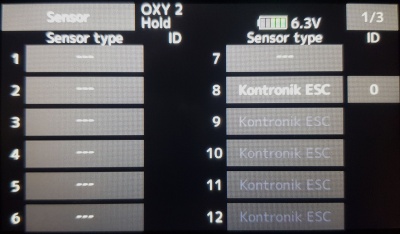
- Power up the transmitter and from the Main screen go to the LINKAGE MENU (LNK button) and then to the SENSOR page.
- For the 8th position Slot select KONTRONIK as the Sensor. This will overwrite automatically next 6 slots.
At this point your transmitter is ready.
5 Telemetry data
Now it is a proper time for configuring the ESC telemetry (if you want to use this feature).
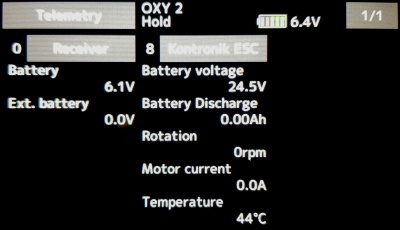
In order to display Telemetry data, go to the LINKAGE MENU and then TELEMETRY page.
It is also possible to display any variable in the TELEMETRY MONITOR accessible by clicking the HOME/EXIT button.
List of available Telemetry variables:
- Rx-BATT [V] - BEC Voltage (provided by the receiver)
- EXT-VOLT [V] - Voltage measured on external wires (optionally connected to the receiver)
- CURRENT [A] - ESC Telemetry | Main Battery current
- VOLTAGE [V] - ESC Telemetry | Main Battery voltage
- DISCHARG [mAh] - ESC Telemetry | Main Battery consumed capacity
- RPM [Head RPM] - RPM provided by RPM sensor or ESC.
- TEMP [°C] - ESC Telemetry | FET temperature of the ESC
- PWM [%] - ESC Telemetry | Throttle percentage (provided by unit)
- BEC CURRENT [%] - Vibration level (0 - 10% is normal level, 1A = 1%, provided by unit)


