Difference between revisions of "Castle Telemetry/de"
(Created page with "Für Experten:") |
(Created page with "Alternativ können Sie Ihr aktuelles Throttle-Kabel modifizieren, indem Sie einen '''10kOhm''' Widerstand zwischen dem weißen ('''Signal''') und dem roten ('''+''') Kabel hin...") |
||
| Line 18: | Line 18: | ||
[[File:telemcc.png|280px]] | [[File:telemcc.png|280px]] | ||
| − | '''Für Experten:''' | + | '''Für Experten:''' Alternativ können Sie Ihr aktuelles Throttle-Kabel modifizieren, indem Sie einen '''10kOhm''' Widerstand zwischen dem weißen ('''Signal''') und dem roten ('''+''') Kabel hinzufügen. In diesem Fall ist das Telemetriekabel nicht erforderlich. |
== Interfacing == | == Interfacing == | ||
Revision as of 14:48, 24 November 2017
Castle Creations ESC hat eine Funktion namens Link Live. Dies ermöglicht eine bidirektionale Datenübertragung über das Throttle-Kabel. Um die ESC-Telemetrie zuzulassen, muss diese Funktion zuerst aktiviert werden. Es ist standardmäßig deaktiviert. Nach der Aktivierung ist es erforderlich, dass ein Gerät, welches die Throttle-Daten sendet (Spirit Unit), auch die Unterstützung für diese Übertragung aktiviert hat. In anderen Fällen wird das Throttle-Signal ignoriert.
Contents
1 ESC-Konfiguration
Wenn Sie das Castle Link-Interface verwenden, starten Sie bitte die Castle Link software, um die Konfigurationseinstellungen Ihres ESC zu öffnen. Dort müssen Sie die Link-Live-Funktion aktivieren.
2 Telemetriekabel
Um die Telemetriedatenübertragung zu ermöglichen ist das Telem CC cable erforderlich. Dieses Kabel ist in unserem Eshop erhältlich.
Für Experten: Alternativ können Sie Ihr aktuelles Throttle-Kabel modifizieren, indem Sie einen 10kOhm Widerstand zwischen dem weißen (Signal) und dem roten (+) Kabel hinzufügen. In diesem Fall ist das Telemetriekabel nicht erforderlich.
3 Interfacing
Connect the Telemetry cable to the AUX(1) port in the unit, where you normally connect the Throttle cable of the ESC. Connect the Throttle cable to the end of the Telem CC cable.
4 Spirit Settings
4.1 Throttle Assignment
Once cable is connected, it is absolutely necessary to assign the Throttle (if not assigned yet).
Power up the ESC and start the Spirit Settings as usually.
Go to the General/Channels and assign a channel to the Throttle.
4.2 Telemetry activation
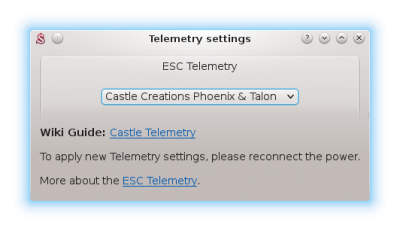
As the last step you have to set the ESC Telemetry in the Spirit Settings software.
Go to the Advanced/Telemetry settings and set the Castle Creations Phoenix & Talon option.
Then close the window and save the settings (CTRL+S). Finally, reconnect battery from the ESC.
From this moment, everything should work.
5 Displaying telemetry data
You can display telemetry data directly in your radio from now.
How to display the data is described in the integration guides:
6 Supported models
|
Model |
Battery Voltage |
Battery Current |
BEC Voltage |
Consumed Capacity |
ESC Temperature |
RPM |
|---|---|---|---|---|---|---|
| Phoenix Edge 50 | ✔ | ✔ | ✔ | ✔ | ✔ | ✔ |
| Phoenix Edge 75 | ✔ | ✔ | ✔ | ✔ | ✔ | ✔ |
| Phoenix Edge 100 | ✔ | ✔ | ✔ | ✔ | ✔ | ✔ |
| Phoenix Edge 130 | ✔ | ✔ | ✔ | ✔ | ✔ | ✔ |
| Phoenix Edge HV 40 | ✔ | ✔ | ✔ | ✔ | ✔ | ✔ |
| Phoenix Edge HV 80 | ✔ | ✔ | ✔ | ✔ | ✔ | ✔ |
| Phoenix Edge HV 120 | ✔ | ✔ | ✔ | ✔ | ✔ | ✔ |
| Phoenix Edge HV 160 | ✔ | ✔ | ✔ | ✔ | ✔ | ✔ |
| Phoenix Edge HVF 160 | ✔ | ✔ | ✔ | ✔ | ✔ | ✔ |
| Phoenix Edge Lite 50 | ✔ | ✔ | ✔ | ✔ | ✔ | ✔ |
| Phoenix Edge Lite 75 | ✔ | ✔ | ✔ | ✔ | ✔ | ✔ |
| Phoenix Edge Lite 100 | ✔ | ✔ | ✔ | ✔ | ✔ | ✔ |
| Phoenix Edge Lite 130 | ✔ | ✔ | ✔ | ✔ | ✔ | ✔ |
| Phoenix Edge Lite HV 40 | ✔ | ✔ | ✔ | ✔ | ✔ | ✔ |
| Phoenix Edge Lite HV 80 | ✔ | ✔ | ✔ | ✔ | ✔ | ✔ |
| Phoenix Edge Lite HV 120 | ✔ | ✔ | ✔ | ✔ | ✔ | ✔ |
| Phoenix Edge Lite HV 160 | ✔ | ✔ | ✔ | ✔ | ✔ | ✔ |
| Phoenix Talon 15 | ✔ | x | ✔ | x | ✔ | ✔ |
| Phoenix Talon 25 | ✔ | x | ✔ | x | ✔ | ✔ |
| Phoenix Talon 35 | ✔ | x | ✔ | x | ✔ | ✔ |
| Phoenix Talon 90 | ✔ | x | ✔ | x | ✔ | ✔ |
| Phoenix Talon HV 120 | ✔ | x | ✔ | x | ✔ | ✔ |
Consumed Capacity is calculated from the Current Consumption.


