Difference between revisions of "Spektrum Integration/it"
(Created page with "Avvia il trasmettitore e sulla schermata principale usa un rullo: ruota verso destra finché non vedrai uno '''Schermata vuota'''.") |
(Created page with "Entrare nel menu") |
||
| Line 89: | Line 89: | ||
Avvia il trasmettitore e sulla schermata principale usa un rullo: ruota verso destra finché non vedrai uno '''Schermata vuota'''. | Avvia il trasmettitore e sulla schermata principale usa un rullo: ruota verso destra finché non vedrai uno '''Schermata vuota'''. | ||
| − | === | + | === Entrare nel menu === |
At this point the integration menu is closed so you can't accidently configure any parameter. | At this point the integration menu is closed so you can't accidently configure any parameter. | ||
Revision as of 19:05, 13 January 2021
Dalla versione 2.4.3 è possibile utilizzare l'integrazione Spektrum!
Ciò significa che puoi configurare completamente le unità Spirit con i trasmettitori Spektrum in tempo reale senza bisogno di un computer.
Contents
1 Requisiti
Per farlo funzionare avrai bisogno di:
- Trasmettitore Spektrum: DX6e, DX6 Gen 2, DX6 Gen 3, DX7 Gen 2, DX8 Gen 2, DX9, DX10T, DX18 Gen 1, DX18 Gen 2, DX18T, DX18QQ, DX20, IX12, IX20
- Ricevitore telemetria seriale: SPM4649T.
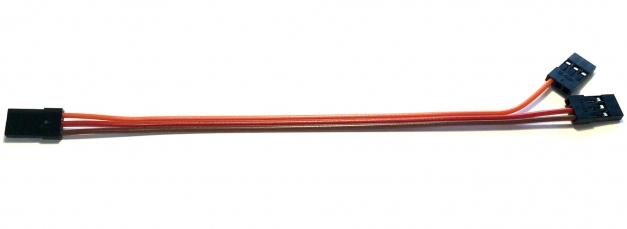
- Cavo di integrazione Jeti disponibile nei nostri negozi (o modifica propria dei fili).
- Spirit firmware: 2.4.3 (con il nuovo Bootloader lampeggiante - vedere la sezione Risoluzione dei problemi)
2 Cablaggio
2.1 SPM4649T ricevitore
Il ricevitore è in grado di trasferire tutto, compresi i dati del canale e la telemetria. Ciò significa che non sarà necessario collegare nient'altro tranne questo.
Utilizzando il cavo di integrazione Jeti non sarà necessaria alcuna modifica aggiuntiva al ricevitore. Nel caso in cui non si disponga di questo cavo, è possibile crearne uno facilmente con un ago e una spina servo di riserva.
Nel caso in cui il tuo ricevitore SPM4649T non sia ancora connesso, puoi farlo da un Bind plug. Collegare il connettore Bind alla presa del servo. Quindi accendere il ricevitore (è possibile utilizzare l'alimentatore BEC e / o la porta libera nell'unità come CH0 o AUX2). I satelliti opzionali possono essere collegati normalmente come descritto in Manuale.
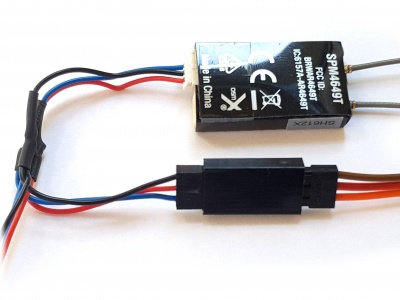
SPM4649T ricevitore Il cavo di integrazione Jeti deve essere collegato alla presa Servo. Questo socket viene utilizzato anche per il binding. Spirit unita' L'altra estremità del cavo di integrazione Jeti deve essere collegata in modo che il filo arancione si trovi nel pin AIL. Spina di alimentazione con fili rosso e marrone nella porta RUD. (vedi foto)
2.2 Satelliti Spektrum (opzionale)
Per migliorare le capacità di ricezione è possibile collegare ulteriori satelliti Spektrum. Quindi la combinazione può essere la seguente:
- Spirit 2 - 1x SPM4649T + 0-2x Spektrum satelliti
- Spirit Pro - 1x SPM4649T + 0-2x Spektrum satelliti
- Spirit - 1x SPM4649T + 0-1x Spektrum satelliti
- µSpirit - 1x SPM4649T + 0-1x Spektrum satelliti
Nel caso in cui venga utilizzato telemetria ESC, il satellite principale non può essere connesso. Per Castle Creations e Kontronik Kosmik / Jive Pro ESC è ancora possibile utilizzare il satellite primario di telemetria.
3 Preparazione del trasmettitore
3.1 Aggiornamento del firmware
Aggiorna il tuo trasmettitore all'ultimo firmware 1.20 dal portale Spektrum Airware. Nel menù IMPOSTAZIONI / AGGIORNAMENTI - AGGIORNAMENTI FIRMWARE troverai il firmware da scaricare. Il file SAX deve essere memorizzato sulla SDCARD e inserito nel trasmettitore. In "Configurazione del sistema / Trasferimento scheda SD" è possibile selezionare Aggiornamento firmware come opzione.
- DX6e non necessita di aggiornamento (la versione 1.00 funzionerà).
3.2 Configurazione
Accendere il trasmettitore e nel Menu principale entrare in Telemetria.
Configura:
- 1: ESC
- 2: Testo Gen
- 3: Pacchetto volo mAh
Quando si aggiunge Text Gen assicurarsi che l'opzione Display sia configurata su Act o Roller (a seconda della radio).
A questo punto il tuo trasmettitore è pronto. Puoi tornare alla schermata principale.
4 Spirit impostazioni
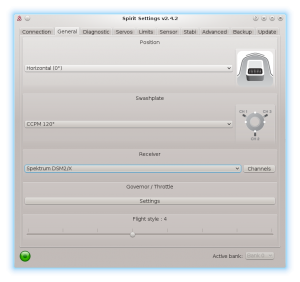
Ora sei pronto per accendere l'unità. Se il tuo alimentatore non è ancora collegato, ti consigliamo di collegarlo alla porta AUX1, AUX2 e / o CH0. Prima di poter utilizzare la connessione di integrazione Spektrum, è importante impostare il tipo di ricevitore Spektrum DSM2 / X nella scheda Generale del software. Si prega di avviare le impostazioni dello spirito e modificare il tipo di ricevitore come mostrato nella foto. Quindi salvare le impostazioni (ad es. Con "CTRL+S") o la "scheda Backup / Unità - Salva" e riavviare l'unità.
5 Menu di integrazione
Ogni volta che l'unità viene inizializzata, è possibile accedere al menu Spektrum Integration o guardare i dati di telemetria.
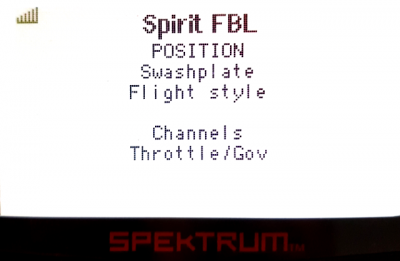
Avvia il trasmettitore e sulla schermata principale usa un rullo: ruota verso destra finché non vedrai uno Schermata vuota.
At this point the integration menu is closed so you can't accidently configure any parameter. To open the menu, move the Rudder stick to the right and Aileron stick to the left and hold for over 2 seconds. Once the menu is opened, you will see <READY> message. Now you can release the sticks and you are ready to set all the parameters.
As soon as you will want to close the Integration menu (when you will want to fly) perform the same procedure with the sticks. Move and hold the sticks (Rudder to the right and Aileron to the left) for over 2 seconds. Menu is closed successfully when <CLOSED> is displayed even if you will return the sticks back to the center. If you will not close the integration menu, it will be temporarily disabled as soon as the Throttle curve will exceed 15%. But to minimize any risk we highly recommend to close it properly.
The Menu Layout is nearly identical with the PC software to have easy navigation.
It is working in the same way as when the PC software is connected. This mean that when Spektrum Integration menu is opened, you can change even the basic parameters that could affect the helicopter significantly.
To navigate in the menu you can use Aileron and Elevator sticks.
- Aileron Left - Back in the menu; Stop edit of a parameter' value.
- Aileron Right - Enter a Submenu; Edit selected parameter.
- Elevator Up - Go up in the menu or submenu; Increase value of selected parameter.
- Elevator Down - Go down in the menu or submenu; Decrease value of selected parameter.
When using the Bank Switching or Real-Time tuning features while the Integration is active, the menu will take full control over it. The unit will not react to a Switch position changes. For the Bank Switching there is a parameter Bank in the main menu where you can manually change the banks.
Do not forget to use the Save Settings when you want to save a changes permanently.
6 Telemetry data
Now it is a proper time for configuring the ESC telemetry (if you want to use this feature).
If the feature is not used, you will still get telemetry variables such as Vibration Level, Throttle percentage and possibly RPM readout as described below. These will be displayed automatically if the Transmitter preparation step was finished.
6.1 Displaying the data
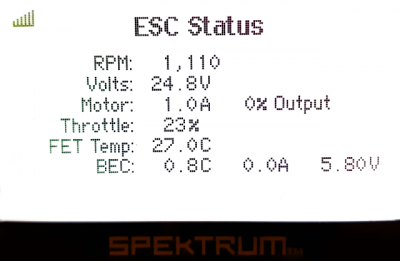
In order to display Telemetry data, move the roller while on the Main screen until you will see ESC Status.
If you can't see the ESC Status, please make sure you have performed necessary configuration.
List of available Telemetry variables:
- RPM [Head RPM] - RPM provided by RPM sensor or ESC.
- Volts [V] - ESC Telemetry | Main Battery voltage
- Motor [A] - ESC Telemetry | Main Battery current
- Throttle [%] - Throttle percentage sent to the ESC
- Output [%] - Vibration level (0 - 10% is normal level
- FET Temp [°C] - ESC Telemetry | FET temperature
- Capacity [mAh] - ESC Telemetry | Main Battery consumed capacity
- BEC [V] - ESC Telemetry | BEC Voltage
7 Troubleshooting
7.1 SPM4649T always in binding mode
This issue can be sorted so that you will re-flash the unit's Bootloader to the latest version. All units that were shipped with firmware older than 2.4.3 will need this.
It can be done easily so that you will perform the flashing process again (with the latest 4df file), but before clicking the Flash button, press CTRL+B keys. Once pressed, you will see Status: Bootloader Overwrite message. Then click the Flash button. The flashing will take little bit longer than usually (done in two stages).
Update the bootloader only if you are certain, that normal firmware flashing is working correctly on your computer.

