Difference between revisions of "Wiring/cs"
(Created page with "– typ přijímače Spektrum DSM2/X") |
(Created page with "– typ přijímače Spektrum DSM2/X") |
||
| Line 112: | Line 112: | ||
<center> | <center> | ||
| − | <span style="color:red">'''''Spirit Pro'''''</span>'' – | + | <span style="color:red">'''''Spirit Pro'''''</span>'' – typ přijímače Spektrum DSM2/X'' |
</center> | </center> | ||
Revision as of 08:06, 16 September 2016
Systém Spirit lze zapojit jako samostatné gyro vrtulky či bezpádlový systém. Zapojení jednotky se odvíjí také od typu přijímače.
POZOR
Spirit je předprogramován na serva s neutrálním impulsem 1520μs a frekvencí 50Hz – prověřte typ všech serv a zjistěte parametry u výrobce.
Pokud je neutrální impuls odlišný, např. 760μs, servo nepřipojujte, dokud není provedeno nastavení v konfiguračním programu!
Některé konektory serv mají nestandardní rozměry, kvůli kterým hrozí, že budou zasahovat do sousedních pozic po zapojení do jednotky. Jako řešení doporučujeme vyměnit je např. za JR či Futaba konektor.
Nikdy nepřipojujte propojky určené k napájení do pozice SYS a ELE/PIT/AIL!
Contents
1 SAMOSTATNÉ GYRO A PÁDLA
Majitelé pádlových helikoptér mohou využít funkce head-lock gyra, což udržuje vrtulku ve směru udaném pákami vysílače i za větru.
Pro zapojení se vyžaduje propojit jednotku Spirit s vrtulkovým servem na konektor CH4. Pokud využíváte klasický přijímač, je potřeba spojit kanál pro nastavení citlivosti senzoru GEAR (příp. AUX) s konektorem AUX na jednotce, kanál pro řízení serva vrtulky RUD s konektorem RUD.
Pokud je model zapojen podle stejného schématu jako bezpádlové vrtulníky, pak je možné využít i v případě pádlové hlavy všechny funkce jednotky. Tj. např. stabilizaci a záchranu. Je pouze nutné v záložce Stabi během procesu konfigurace zatrhnout parametr Pádlová mechanika. Ostatní nastavení je s bezpádlovými vrtulníky shodné.
2 BEZPÁDLO
Majitelé bezpádlových helikoptér mohou využít funkce Head-Lock gyra a zároveň stabilizace cykliky. To činí model stabilnější ve všech osách a navíc je méně náchylný na boční vítr, prodlouží letový čas a učiní model obratnějším. To velmi zpříjemní létání a zároveň dovolí pilotovi i ty nejnáročnější manévry. Bezpádlové helikoptéry mají rotorové listy přímo spojeny se servy cykliky, proto jsou požadavky na serva oproti pádlovým vyšší. Jsou zde nutná rychlejší a silnější serva, aby mohly včas zareagovat na změny.
Také bezpádlové listy mají odlišně situované těžiště, tj. pro lepší letový projev je vhodné jejich použití. V případě zapojení jako bezpádlový systém budou všechna serva zapojená do jednotky Spirit do odpovídajících pozic, viz následující popis.
| Spirit |
| CH1 – servo kolektivu / křidélek |
| CH2 – servo výškovky |
| CH3 – servo křidélek / kolektivu |
| CH4 – servo vrtulky |
| Spirit Pro |
| CH1 – servo kolektivu / křidélek |
| CH2 – servo výškovky |
| CH3 – servo křidélek / kolektivu |
| CH4 – servo vrtulky |
| CH0 – přídavné servo cykliky u CCPM 90 |
POZNÁMKA
Serva na pozici CH1 a CH3 se připojí v závislsoti na typu desky cykliky. Servo kolektivu je ve většině případů na levé straně modelu a servo křidélek na pravé straně.
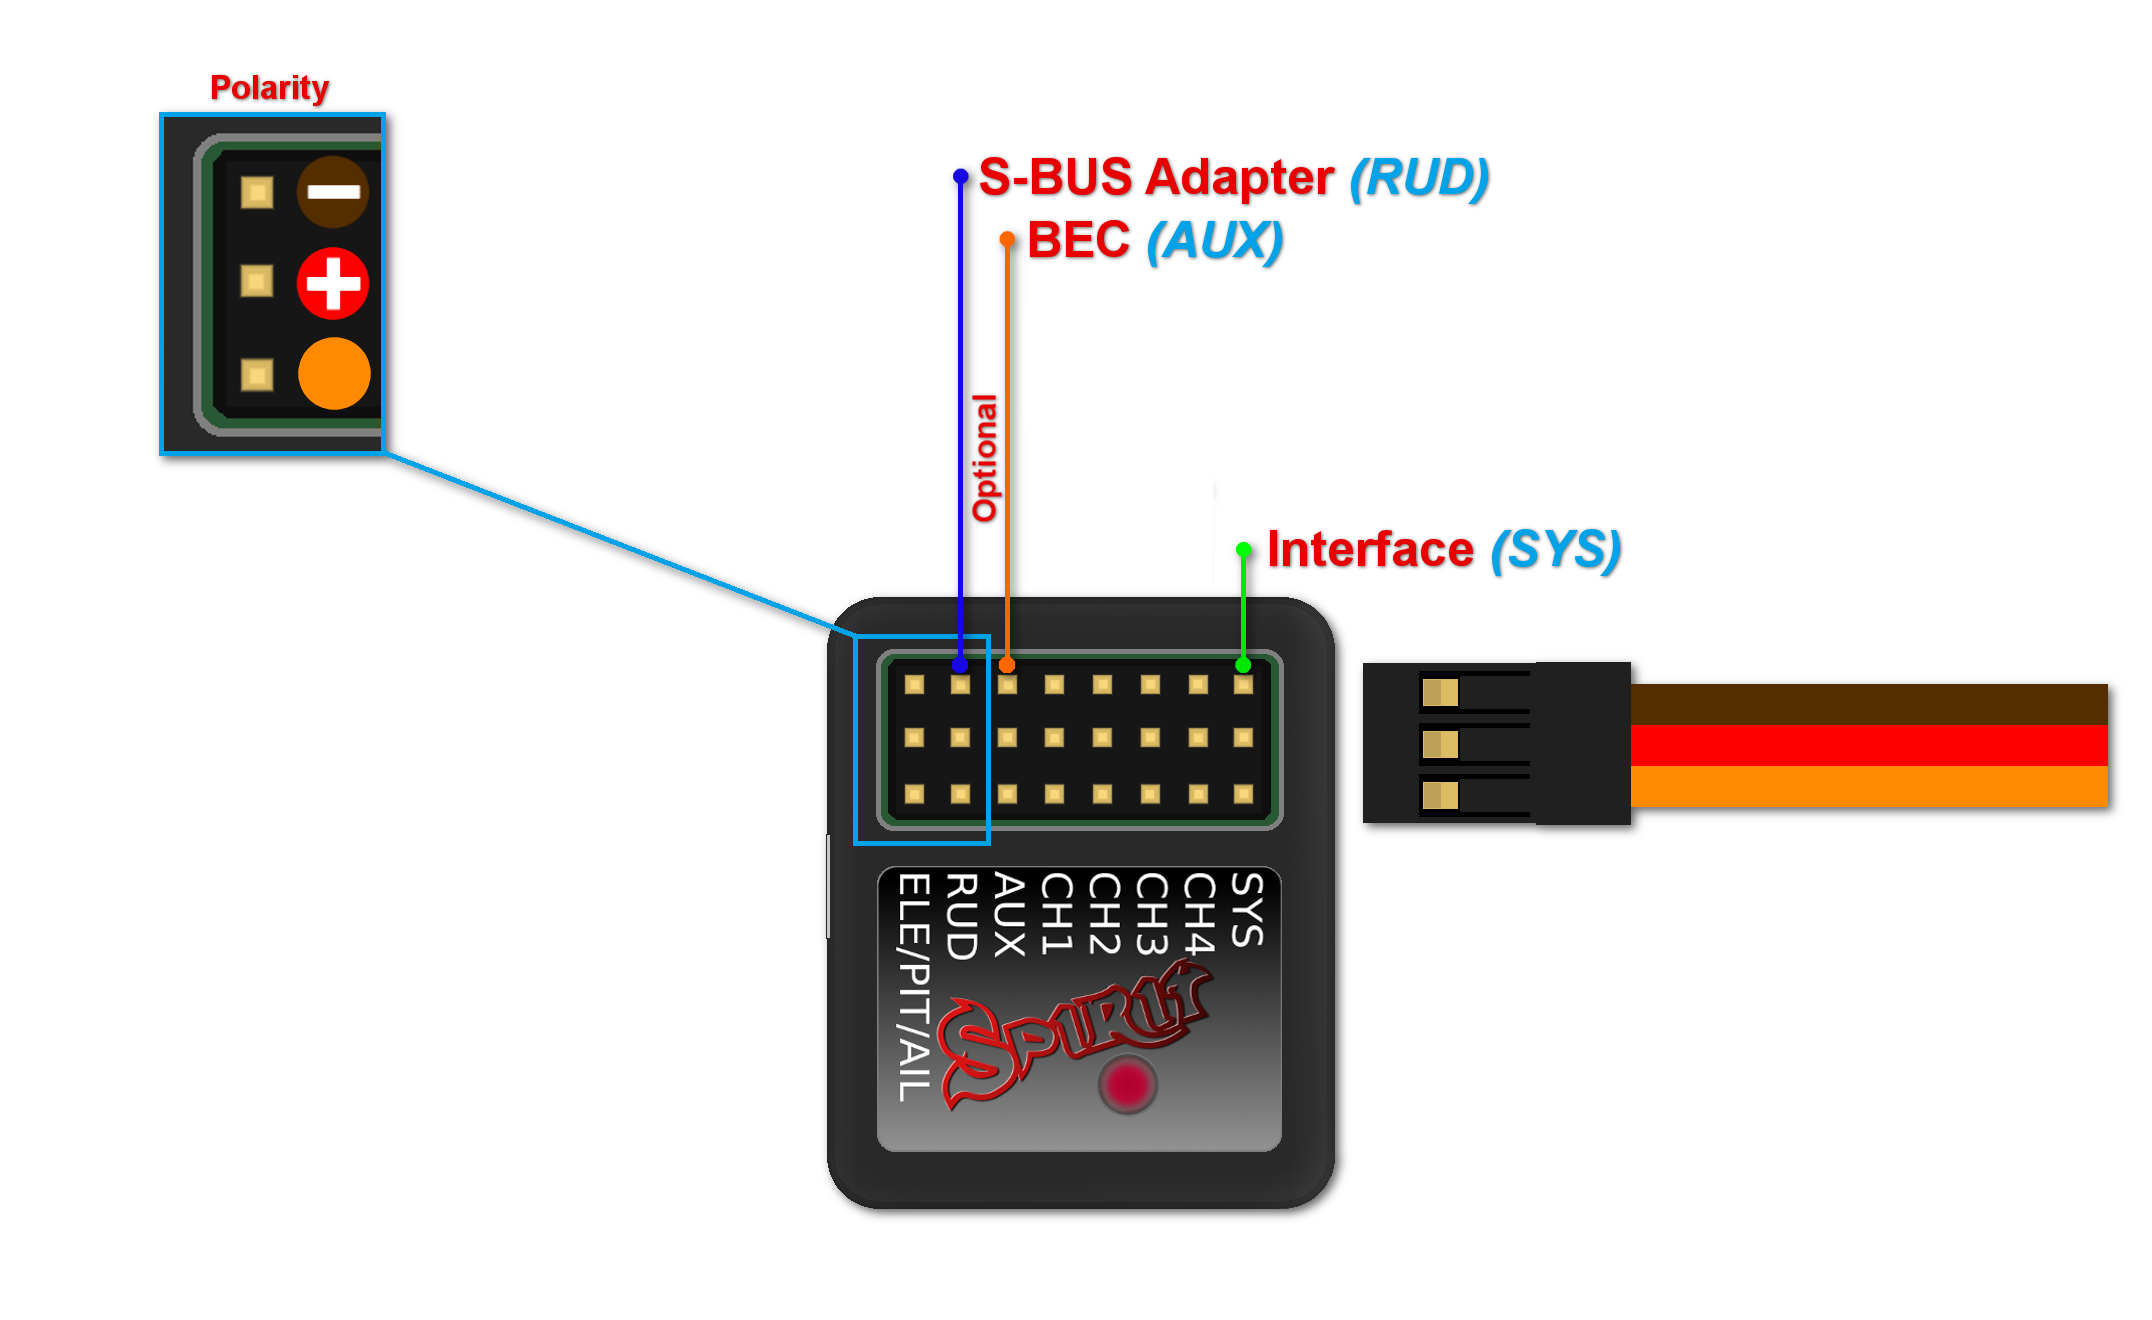
3 ZAPOJENÍ KLASICKÉHO PŘIJÍMAČE (s PWM modulací)
Spirit – typ přijímače PWM
Spirit Pro – typ přijímače PWM
V případě propojení s klasickým přijímačem využijte speciální propojku, kde tři konektory připojíte do přijímače a jeden do jednotky.
Jednotka je napájena pomocí dvou propojek z přijímače připojených do pozice AUX a RUD. Kanál plynu by měl být připojen přímo do přijímače.
Doporučujeme začít s připojováním kanálu vrtulky – v jednotce pozice RUD. Poté AUX, který slouží pro příjem zisku gyra z přijímače. Nakonec připojte kanály křidélek, výškovky a kolektivu – Aileron, Elevator, Pitch. Mezi těmito kroky se můžete kdykoli ujistit, zda je funkce správná. Nápomocná bude také záložka Diagnostika v konfiguračním software.
Nikdy nepřipojujte propojky určené k napájení do pozice SYS a ELE/PIT/AIL!
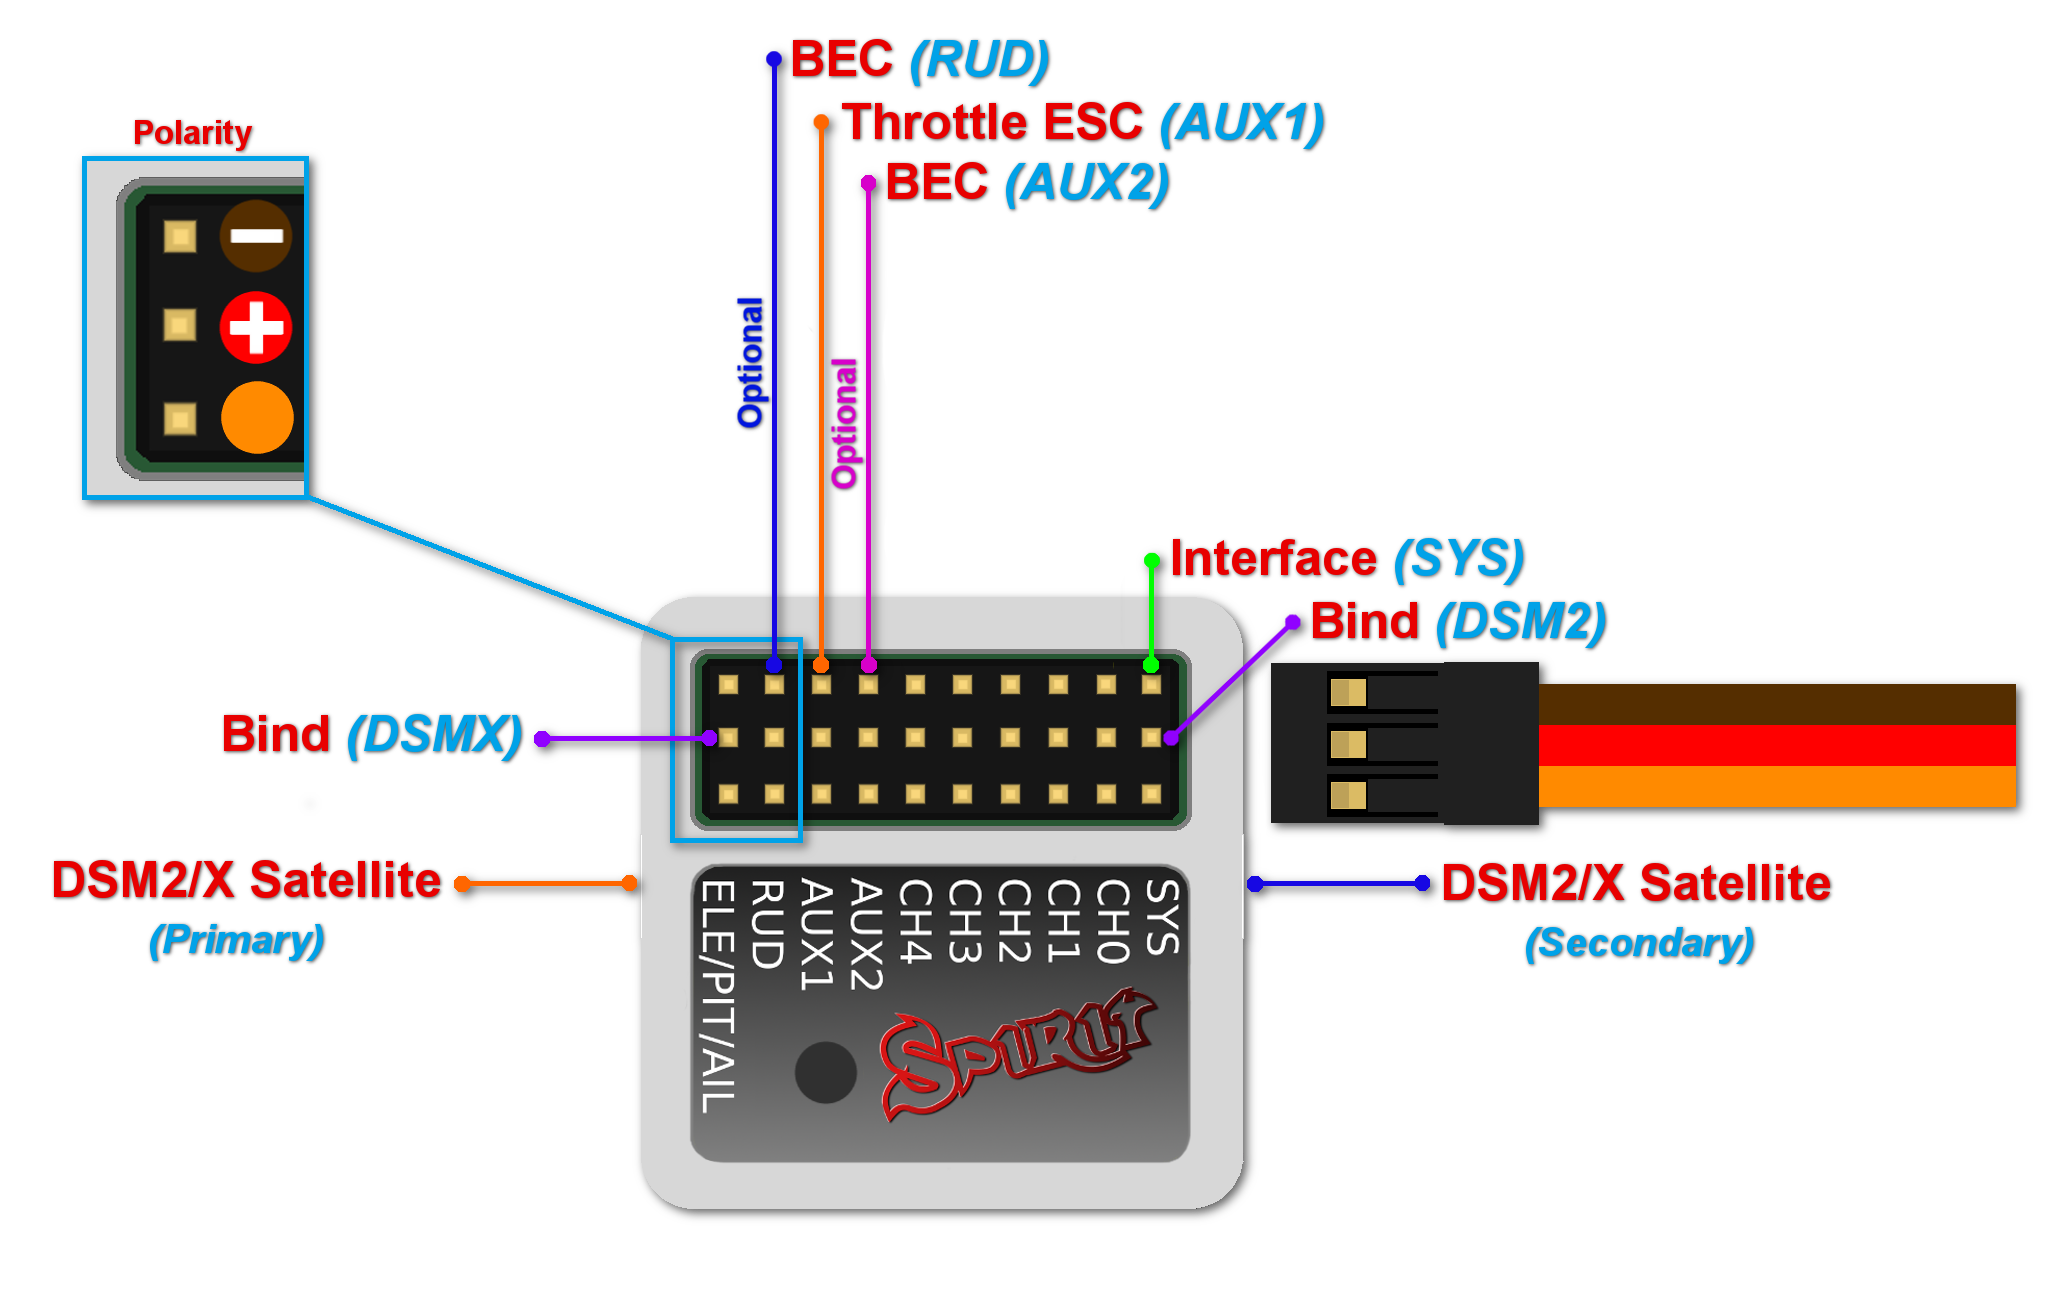
4 ZAPOJENÍ SPEKTRUM DSM2/X SATELITŮ
Spirit – typ přijímače Spektrum DSM2/X
Spirit Pro – typ přijímače Spektrum DSM2/X
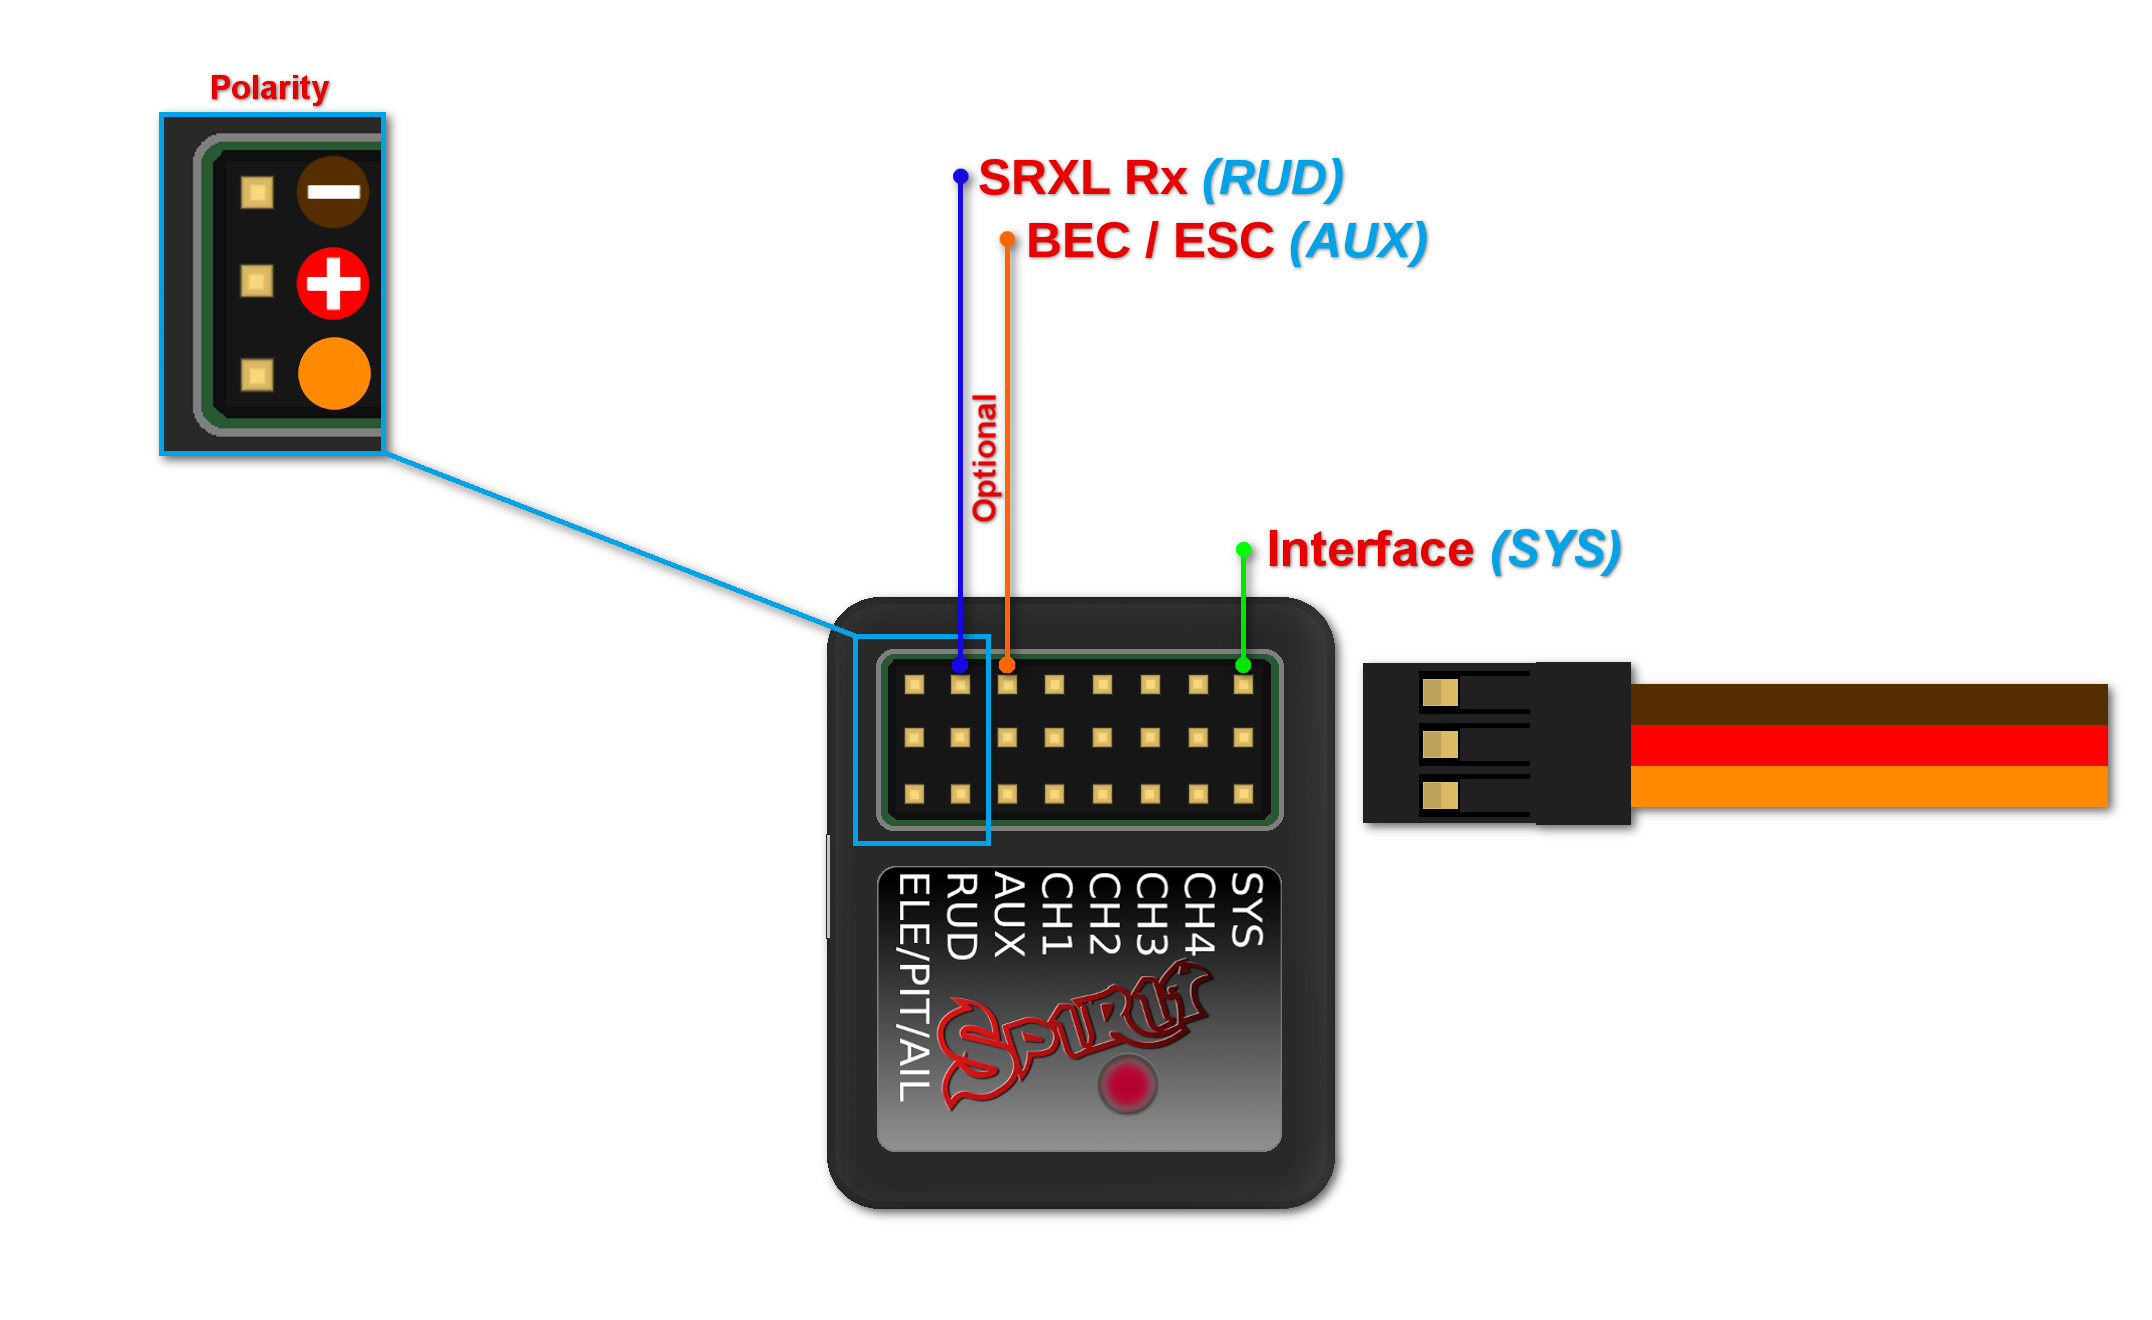
Connection to a BEC is optional. If the model is powered by an external BEC, this must be connected to the RUD port. Also the power lead from the ESCs internal BEC must be disconnected.
To bind the satellites, insert a bind plug in the SYS port for DSM2 satellites or the ELE/PIT/AIL port for DSMX satellites. Power cycling the Spirit start the bind process. Once successfully bound, the STATUS LED will go out and the satellite LED will come on.
If the second satellite fails to bind, swap the satellites and repeat the bind process.
Be sure Receiver type in the software is configured to Spektrum DSM2/X or else binding process will not work. Never plug a connector for powering the unit to SYS or ELE/PIT/AIL positions.
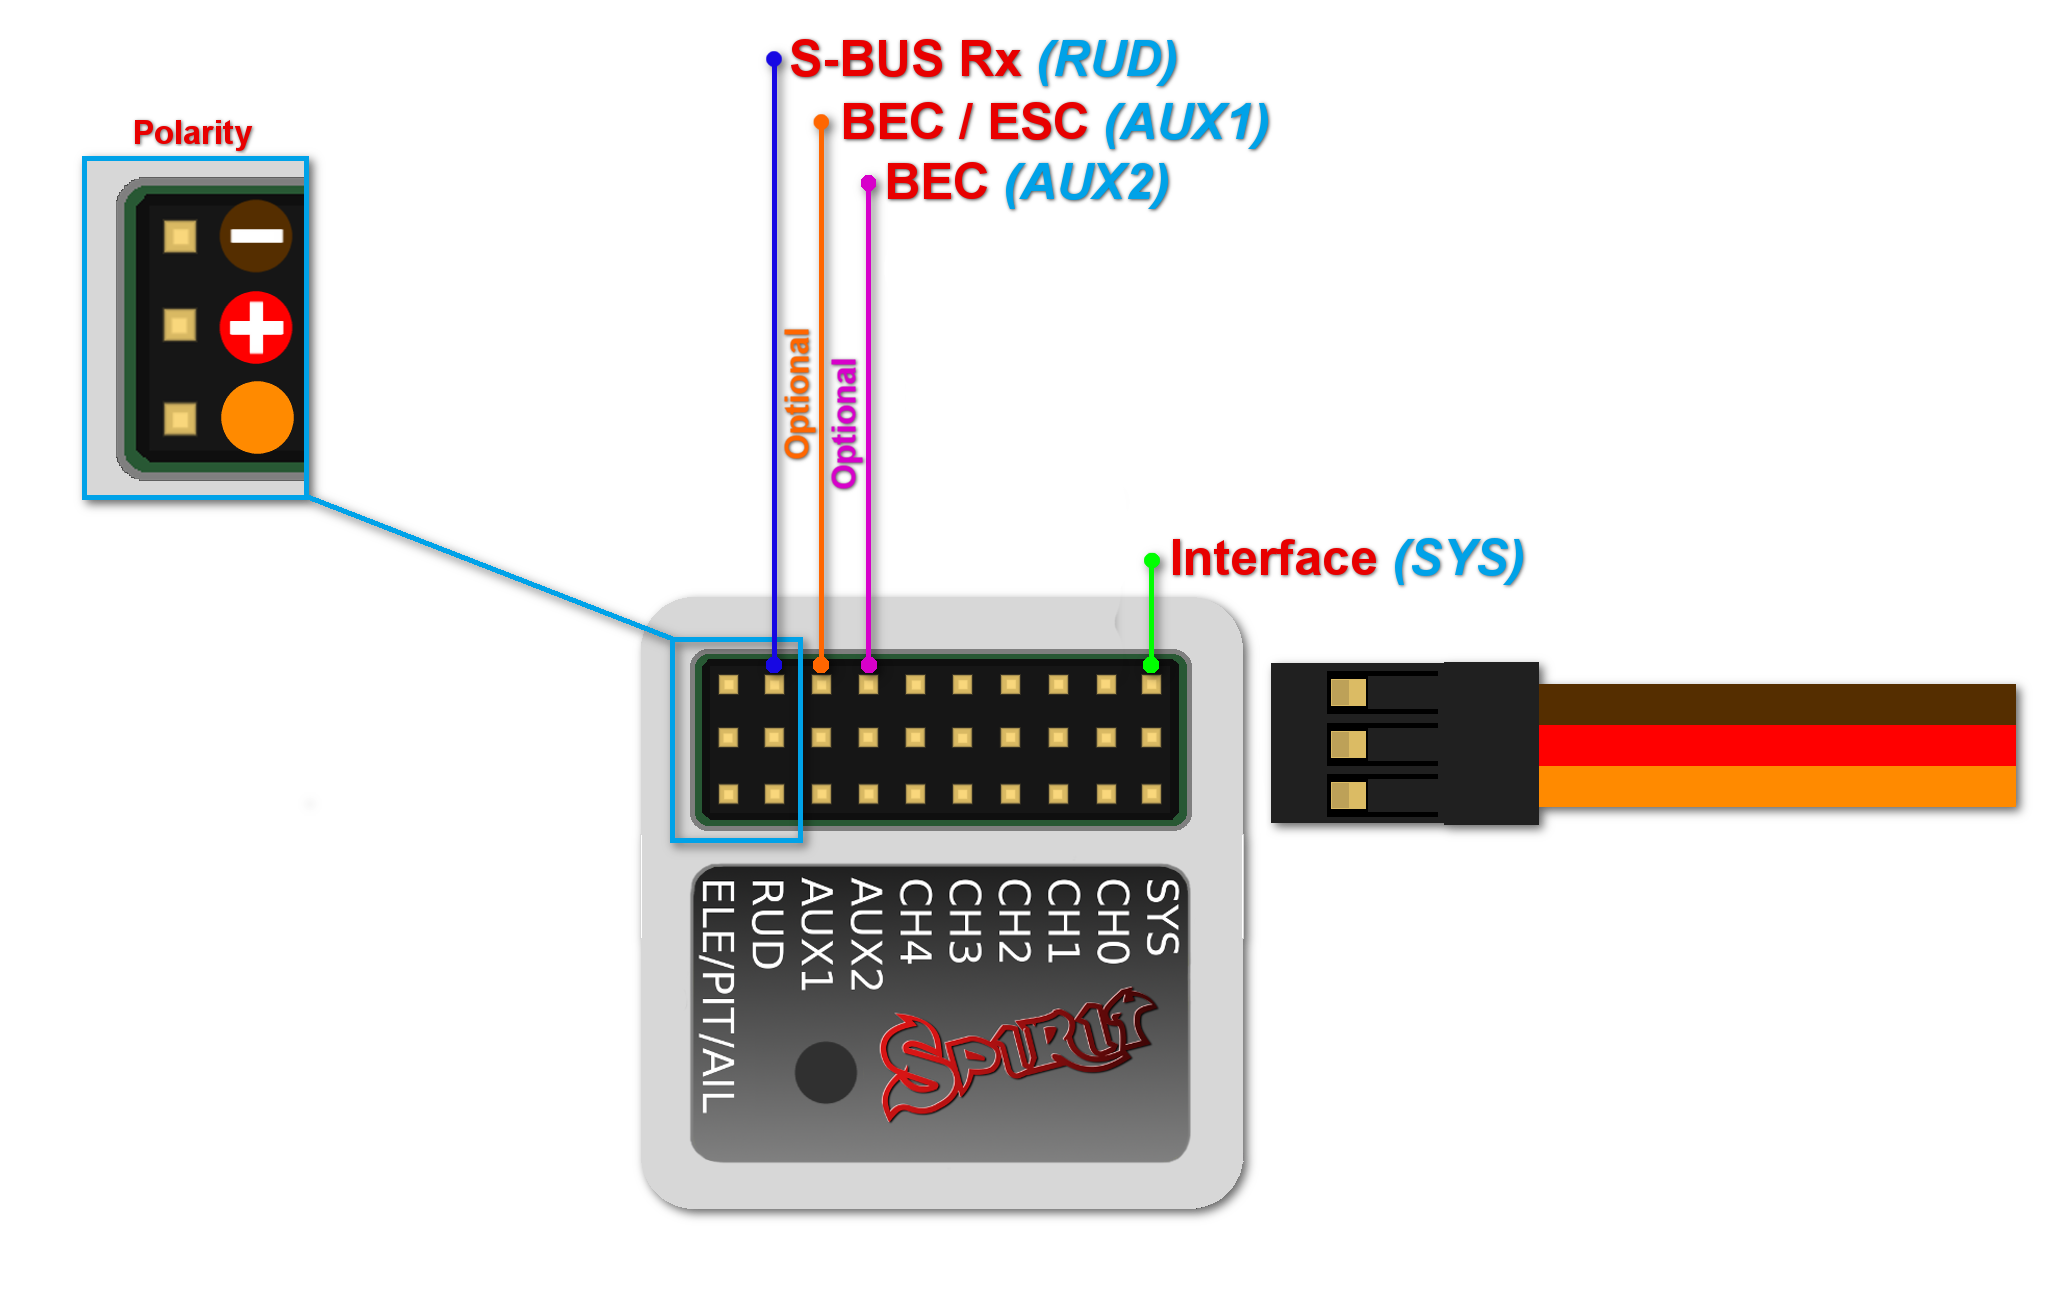
5 CONNECTION OF FUTABA S-BUS RECEIVER
Spirit – receiver type: Futaba S-BUS
Spirit Pro – receiver type: Futaba S-BUS
Connection to a BEC is optional. For models of 500 size and larger it is recommended to use dual power supply cables due to the increased power consumption. That means besides the S-BUS cable, an additional power supply cable should be connected to the AUX port.
When using this type of receiver you can connect the throttle cable directly to the receiver. Alternatively, you can assign the throttle channel in the software and use the AUX as throttle output from the unit.
Never plug a connector for powering the unit to SYS or ELE/PIT/AIL ports.
6 CONNECTION OF PPM RECEIVER
Spirit – receiver type: PPM
Spirit Pro – receiver type: PPM
NOTE
Connection to a BEC is optional. For models of 500 size and larger it is recommended to use dual power supply cables due to the increased power consumption. That means besides the communication cable, an additional power supply cable should be connected to the AUX port.
When using this type of receiver you can connect the throttle cable directly to the receiver. Alternatively, you can assign the throttle channel in the software and use the AUX as throttle output from the unit.
Never plug a connector for powering the unit to SYS or ELE/PIT/AIL ports.
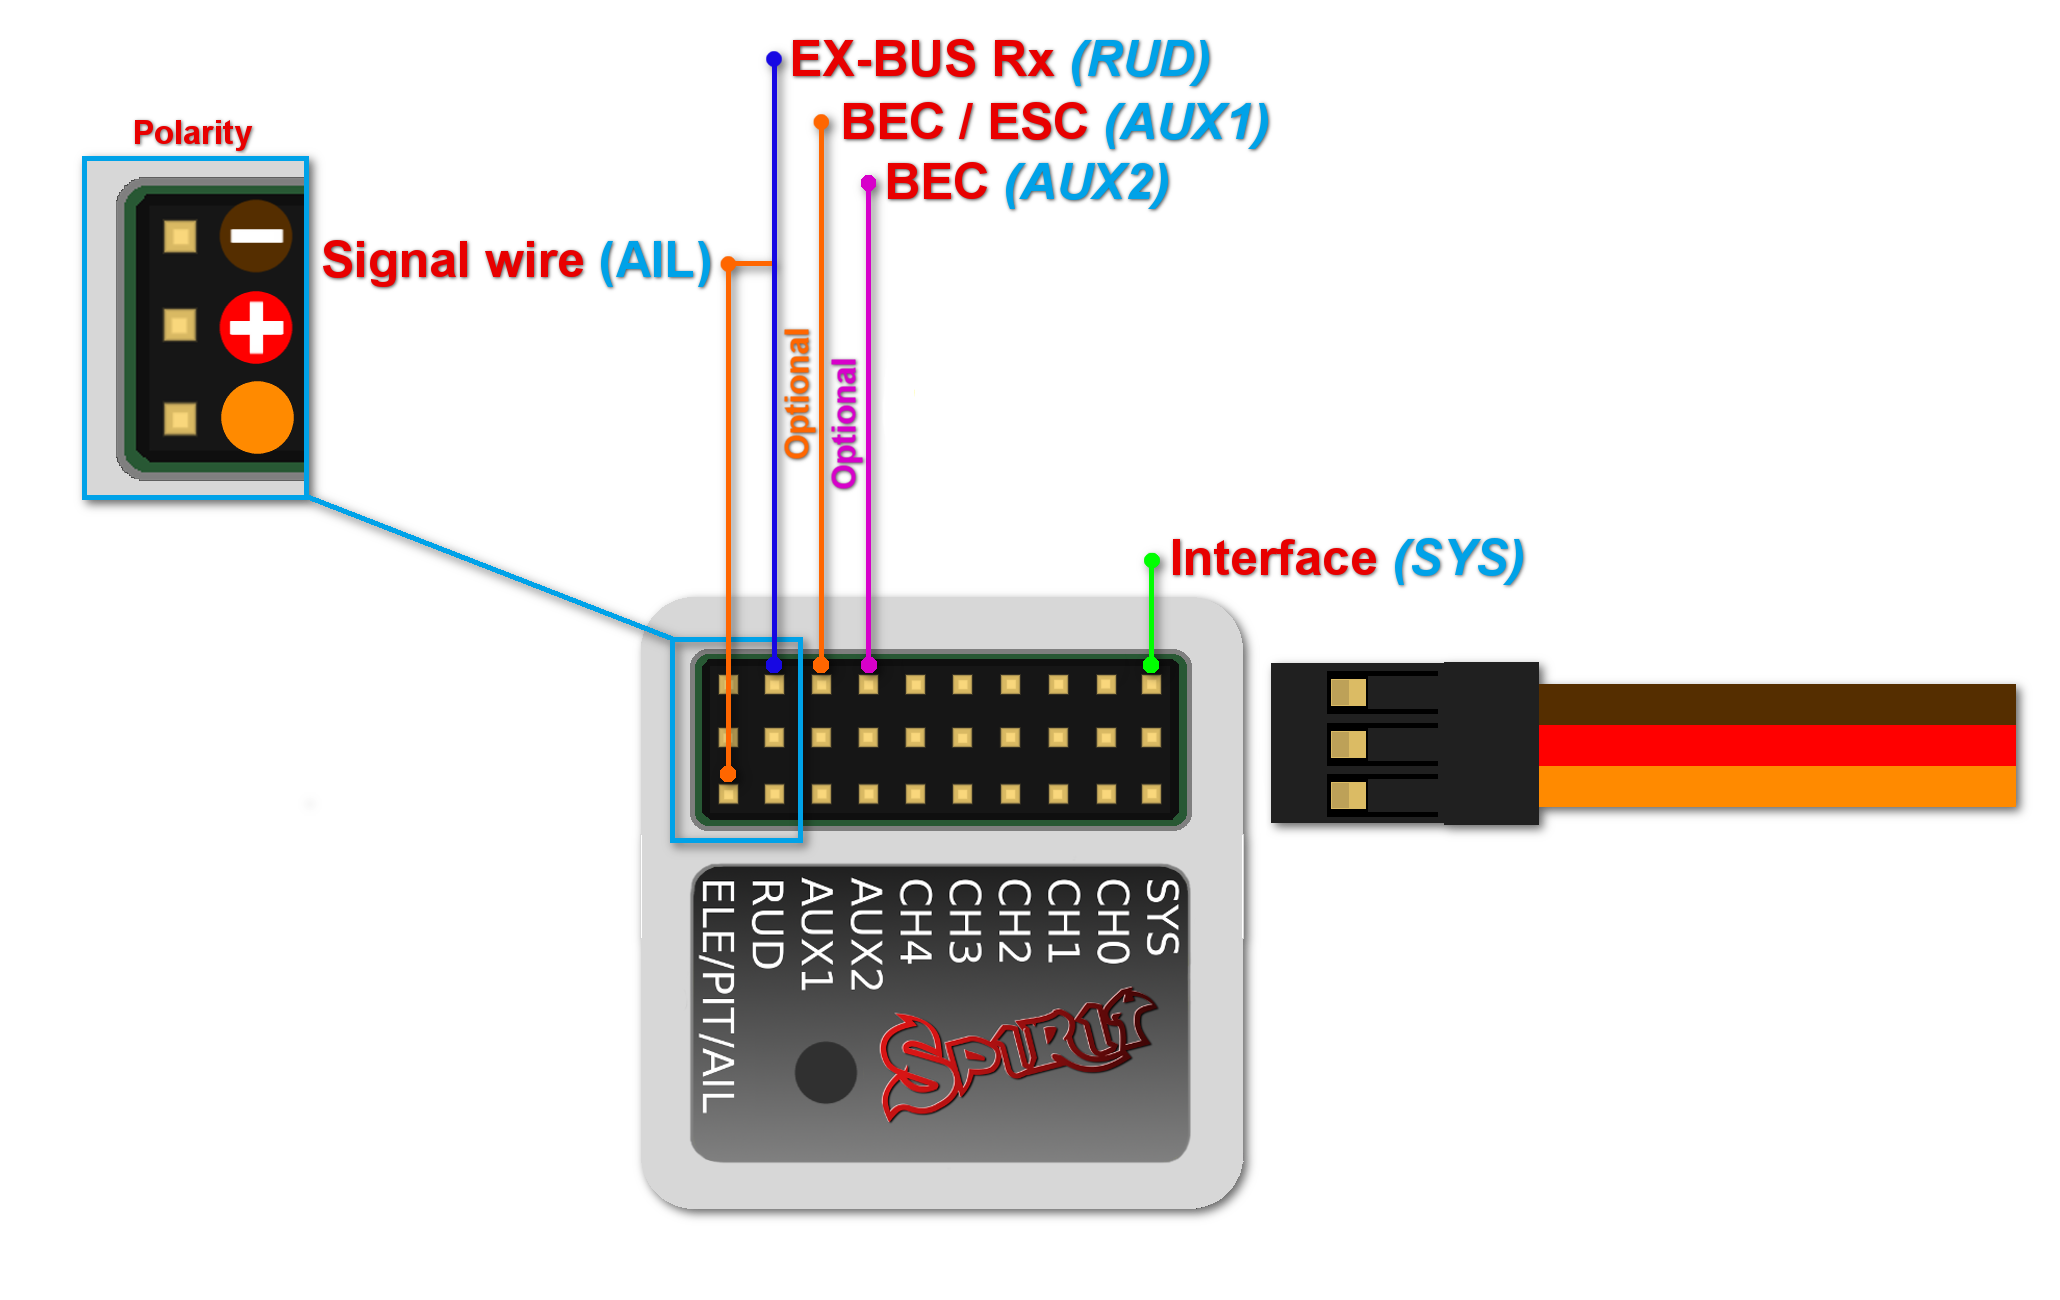
7 CONNECTION OF JETI EX BUS RECEIVER
Spirit – receiver type: Jeti EX Bus
Spirit Pro – receiver type: Jeti EX Bus
This connection type now supports the new integration with JETI Model transmitters. You can now fully configure the Spirit unit remotely through the JETI Model transmitter.
Remember to configure the receiver type through the software or the integration will not work. Also, it is necessary to download Spirit.bin file from the website. Move the file to the Devices directory in the SD card of your transmitter.
NOTE
Connection to a BEC is optional. For models of 500 size and larger it is recommended to use dual power supply cables due to the increased power consumption. That means besides the EX Bus cable, an additional power supply cable should be connected to the AUX port.
When using this type of receiver you can connect the throttle cable directly to the receiver. Alternatively, you can assign the throttle channel in the software and use the AUX as throttle output from the unit.
A special cable is needed to enable this communication.
Never plug a connector for powering the unit to SYS or ELE/PIT/AIL ports.
8 CONNECTION OF SRXL/SUMD RECEIVER
Spirit – receiver type: SRXL/SUMD
Spirit Pro – receiver type: SRXL/SUMD
NOTE
Connection to a BEC is optional. For models of 500 size and larger it is recommended to use dual power supply cables due to the increased power consumption. That means besides the communication cable, an additional power supply cable should be connected to the AUX port.
This protocol family can work with a wide range of receivers.
Thus you can use Multiplex SRXL, BeastX SRXL, Graupner SUMD, Jeti UDI, Spektrum SRXL and more.
When using this type of receiver you can connect the throttle cable directly to the receiver. Alternatively, you can assign the throttle channel in the software and use the AUX as throttle output from the unit.
Never plug a connector for powering the unit to SYS or ELE/PIT/AIL ports.
9 CONNECTOR ORIENTATION
All cables connected to the unit must be oriented so that the signal wire (Lightest color wire) is closer to the connector pin label, towards the center of the unit. This orients the negative (darkest color wire) toward the edge of the unit.


