Difference between revisions of "Castle Telemetry/cs"
(Created page with "Pro velmi pokročilé:") |
(Created page with "Propojku je možné vyrobit úpravou kabelu plynu - přidáním '''10kOhm''' odporu mezi bílý ('''signál''') vodič a červený ('''+''') vodič.") |
||
| Line 17: | Line 17: | ||
[[File:telemcc.png|280px]] | [[File:telemcc.png|280px]] | ||
| − | '''Pro velmi pokročilé:''' | + | '''Pro velmi pokročilé:''' Propojku je možné vyrobit úpravou kabelu plynu - přidáním '''10kOhm''' odporu mezi bílý ('''signál''') vodič a červený ('''+''') vodič. |
== Interfacing == | == Interfacing == | ||
Revision as of 14:01, 21 April 2017
Regulátory Castle Creations podporují tzv. Link Live. Tato funkce umožňuje obousměrný přenos dat pomocí kablíku plynu. Aby mohla telemetrie fungovat, je nezbytné tuto funkci zapnout. Ve výchozím nastavení je vypnuta. Jakmile se povolí, musí také zařízení, které do regulátoru posílá výchylku plynu, tuto funkci podporovat. V tomto případě se musí zapnout na straně jednotky Spirit. V opačném případě by nefungovalo ani řízení plynu.
Contents
1 Nastavení regulátoru
Spojte regulátor s Castle Link interface a spusťte konfigurační program Castle Link. Zde je zapotřebí povolit Link Live funkci.
2 Telemetrická propojka
Pro přenos dat je nutná speciální propojka Telem CC. Je dostupná na našem Eshopu.
Pro velmi pokročilé: Propojku je možné vyrobit úpravou kabelu plynu - přidáním 10kOhm odporu mezi bílý (signál) vodič a červený (+) vodič.
3 Interfacing
Connect the Telemetry cable to the AUX(1) port in the unit, where you normally connect the Throttle cable of the ESC. Connect the Throttle cable to the end of the Telem CC cable.
4 Spirit Settings
4.1 Throttle Assignment
Once cable is connected, it is absolutely necessary to assign the Throttle (if not assigned yet).
Power up the ESC and start the Spirit Settings as usually.
Go to the General/Channels and assign a channel to the Throttle.
4.2 Telemetry activation
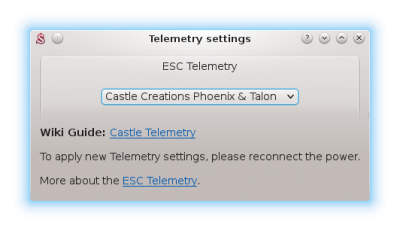
As the last step you have to set the ESC Telemetry in the Spirit Settings software.
Go to the Advanced/Telemetry settings and set the Castle Creations Phoenix & Talon option.
Then close the window and save the settings (CTRL+S). Finally, reconnect battery from the ESC.
From this moment, everything should work.
5 Displaying telemetry data
You can display telemetry data directly in your radio from now.
How to display the data is described in the integration guides:
6 Supported models
|
Model |
Battery Voltage |
Battery Current |
BEC Voltage |
Consumed Capacity |
ESC Temperature |
|---|---|---|---|---|---|
| Phoenix Edge 50 | ✔ | ✔ | ✔ | ✔ | ✔ |
| Phoenix Edge 75 | ✔ | ✔ | ✔ | ✔ | ✔ |
| Phoenix Edge 100 | ✔ | ✔ | ✔ | ✔ | ✔ |
| Phoenix Edge 130 | ✔ | ✔ | ✔ | ✔ | ✔ |
| Phoenix Edge HV 40 | ✔ | ✔ | ✔ | ✔ | ✔ |
| Phoenix Edge HV 80 | ✔ | ✔ | ✔ | ✔ | ✔ |
| Phoenix Edge HV 120 | ✔ | ✔ | ✔ | ✔ | ✔ |
| Phoenix Edge HV 160 | ✔ | ✔ | ✔ | ✔ | ✔ |
| Phoenix Edge HVF 160 | ✔ | ✔ | ✔ | ✔ | ✔ |
| Phoenix Edge Lite 50 | ✔ | ✔ | ✔ | ✔ | ✔ |
| Phoenix Edge Lite 75 | ✔ | ✔ | ✔ | ✔ | ✔ |
| Phoenix Edge Lite 100 | ✔ | ✔ | ✔ | ✔ | ✔ |
| Phoenix Edge Lite 130 | ✔ | ✔ | ✔ | ✔ | ✔ |
| Phoenix Edge Lite HV 40 | ✔ | ✔ | ✔ | ✔ | ✔ |
| Phoenix Edge Lite HV 80 | ✔ | ✔ | ✔ | ✔ | ✔ |
| Phoenix Edge Lite HV 120 | ✔ | ✔ | ✔ | ✔ | ✔ |
| Phoenix Edge Lite HV 160 | ✔ | ✔ | ✔ | ✔ | ✔ |
| Phoenix Talon 15 | ✔ | x | ✔ | x | ✔ |
| Phoenix Talon 25 | ✔ | x | ✔ | x | ✔ |
| Phoenix Talon 35 | ✔ | x | ✔ | x | ✔ |
| Phoenix Talon 90 | ✔ | x | ✔ | x | ✔ |
| Phoenix Talon HV 120 | ✔ | x | ✔ | x | ✔ |
Consumed Capacity is calculated from the Current Consumption.


