Difference between revisions of "Kontronik Telemetry/it"
(Created page with "Cavo di telemetria") |
(Updating to match new version of source page) |
||
| (29 intermediate revisions by one other user not shown) | |||
| Line 1: | Line 1: | ||
<languages /> | <languages /> | ||
| + | |||
| + | {{Quote|'''This telemetry is DEPRECATED and no longer recommended. Use Telme Telemetry instead for all recent Kontronik ESCs. Wiring is easier and offer higher precision and telemetry data quality. Please note - Kontronik TelMe module is not needed.'''}} | ||
| + | <p></p> | ||
Kontronik KOSMIK e JIVE PRO ESC hanno funzionalità di telemetria integrate nella porta di telemetria dedicata. Ciò consente la trasmissione dei dati di telemetria all'unità. | Kontronik KOSMIK e JIVE PRO ESC hanno funzionalità di telemetria integrate nella porta di telemetria dedicata. Ciò consente la trasmissione dei dati di telemetria all'unità. | ||
{{Quote|'''Questa telemetria è disponibile solo per l'integrazione Jeti (Jeti EX Bus), l'integrazione Spektrum e Futaba con il firmware Spirit v2.4 +. Nelle versioni future dovrebbe funzionare anche con altri.'''}} | {{Quote|'''Questa telemetria è disponibile solo per l'integrazione Jeti (Jeti EX Bus), l'integrazione Spektrum e Futaba con il firmware Spirit v2.4 +. Nelle versioni future dovrebbe funzionare anche con altri.'''}} | ||
| + | <p></p> | ||
| + | {{Quote|'''Do not connect the Telem KONTRONIK cable when ESC telemetry is Disabled in the software.'''}} | ||
<p></p> | <p></p> | ||
== Cavo di telemetria == | == Cavo di telemetria == | ||
| − | + | Per consentire la trasmissione dei dati di telemetria è necessario il '''Cavo Telem KONTRONIK'''. Questo cavo è disponibile nel nostro [http://store.spirit-system.com/en/accessories/35-telemkontronik-cable.html Eshop]. | |
[[File:telemkontronik.png|280px]] | [[File:telemkontronik.png|280px]] | ||
| Line 12: | Line 17: | ||
== Spirit Settings == | == Spirit Settings == | ||
| − | + | Prima di tutto, accendi l'ESC e avvia le impostazioni dello spirito come al solito. | |
| − | === | + | === Attivazione della telemetria === |
| − | + | Impostare la telemetria ESC nel software Impostazioni spirit. | |
| − | + | Vai a '''Impostazioni avanzate / telemetria''' e imposta l'opzione '''Kontronik KOSMIK & JIVE PRO'''. | |
[[File:esc-telem-kontronik.png|400px]] | [[File:esc-telem-kontronik.png|400px]] | ||
| − | + | Quindi chiudere la finestra e salvare le impostazioni ''(CTRL + S)''. Ora scollega la batteria. | |
| − | == | + | == Interfaccia == |
| − | + | A questo punto, collega il cavo di telemetria secondo la foto seguente. | |
[[File:unit-telemkontronik.jpg|450px]] | [[File:unit-telemkontronik.jpg|450px]] | ||
| − | {{Info|[[File:info.png]] In | + | {{Info|[[File:info.png]] In questa connessione viene utilizzata la '''porta SYS'''. Pertanto, l'utilizzo di questa porta per altri scopi è limitato quando la telemetria Kontronik è abilitata. |
| − | + | Integration with a radios is still available for full configuration of the unit. | |
If you need to use Spirit Settings software, you can deactivate temporarily ESC Telemetry by not turning transmitter on. At this moment normal connection for the USB interface or Wireless connection is established. | If you need to use Spirit Settings software, you can deactivate temporarily ESC Telemetry by not turning transmitter on. At this moment normal connection for the USB interface or Wireless connection is established. | ||
<br/>'''ELE pin''' is utilized for communication purpose of the telemetry interface.}} | <br/>'''ELE pin''' is utilized for communication purpose of the telemetry interface.}} | ||
| Line 37: | Line 42: | ||
[[File:esc-kontronik.jpg|350px]] | [[File:esc-kontronik.jpg|350px]] | ||
| − | == | + | == Visualizzazione dei dati di telemetria == |
| − | + | Una volta terminati i passaggi precedenti, sei pronto per accendere la batteria. | |
| − | + | Dopo l'inizializzazione è possibile visualizzare da ora tutti i dati di telemetria direttamente nella radio. | |
| − | + | La modalità di visualizzazione dei dati è descritta nelle guide all'integrazione: | |
| − | *[[Jeti_Integration | + | *[[Jeti_Integration/it|Jeti Integration]] |
| − | *[[Spektrum_Integration|Spektrum Integration]] | + | *[[Spektrum_Integration/it|Spektrum Integration]] |
| − | *[[Futaba Telemetry|Futaba Telemetry]] | + | *[[Futaba Telemetry/it|Futaba Telemetry]] |
| − | == | + | == Modelli supportati == |
{| class="servolist" | {| class="servolist" | ||
! | ! | ||
| − | + | Modelli | |
! | ! | ||
| − | + | Voltaggio batteria | |
! | ! | ||
| − | + | Corrente della batteria | |
! | ! | ||
| − | BEC | + | Tensione BEC |
! | ! | ||
| − | + | Capacità consumata | |
! | ! | ||
| − | ESC | + | ESC Temperatura |
! | ! | ||
RPM | RPM | ||
Latest revision as of 19:46, 15 May 2024
This telemetry is DEPRECATED and no longer recommended. Use Telme Telemetry instead for all recent Kontronik ESCs. Wiring is easier and offer higher precision and telemetry data quality. Please note - Kontronik TelMe module is not needed.
Kontronik KOSMIK e JIVE PRO ESC hanno funzionalità di telemetria integrate nella porta di telemetria dedicata. Ciò consente la trasmissione dei dati di telemetria all'unità.
Questa telemetria è disponibile solo per l'integrazione Jeti (Jeti EX Bus), l'integrazione Spektrum e Futaba con il firmware Spirit v2.4 +. Nelle versioni future dovrebbe funzionare anche con altri.
Do not connect the Telem KONTRONIK cable when ESC telemetry is Disabled in the software.
Contents
1 Cavo di telemetria
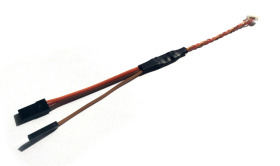
Per consentire la trasmissione dei dati di telemetria è necessario il Cavo Telem KONTRONIK. Questo cavo è disponibile nel nostro Eshop.
2 Spirit Settings
Prima di tutto, accendi l'ESC e avvia le impostazioni dello spirito come al solito.
2.1 Attivazione della telemetria
Impostare la telemetria ESC nel software Impostazioni spirit.
Vai a Impostazioni avanzate / telemetria e imposta l'opzione Kontronik KOSMIK & JIVE PRO.
Quindi chiudere la finestra e salvare le impostazioni (CTRL + S). Ora scollega la batteria.
3 Interfaccia
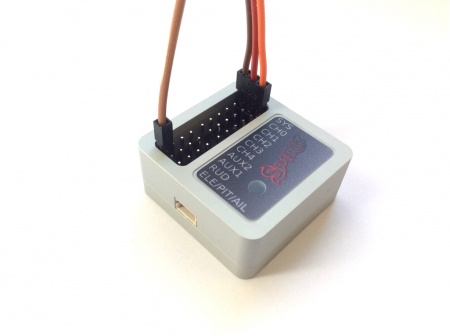
A questo punto, collega il cavo di telemetria secondo la foto seguente.
In questa connessione viene utilizzata la porta SYS. Pertanto, l'utilizzo di questa porta per altri scopi è limitato quando la telemetria Kontronik è abilitata. Integration with a radios is still available for full configuration of the unit. If you need to use Spirit Settings software, you can deactivate temporarily ESC Telemetry by not turning transmitter on. At this moment normal connection for the USB interface or Wireless connection is established.
ELE pin is utilized for communication purpose of the telemetry interface.
4 Visualizzazione dei dati di telemetria
Una volta terminati i passaggi precedenti, sei pronto per accendere la batteria.
Dopo l'inizializzazione è possibile visualizzare da ora tutti i dati di telemetria direttamente nella radio.
La modalità di visualizzazione dei dati è descritta nelle guide all'integrazione:
5 Modelli supportati
|
Modelli |
Voltaggio batteria |
Corrente della batteria |
Tensione BEC |
Capacità consumata |
ESC Temperatura |
RPM |
|---|---|---|---|---|---|---|
| JIVE PRO 80+ HV | ✔ | ✔ | ✔ | ✔ | ✔ | ✔ |
| JIVE PRO 120+ HV | ✔ | ✔ | ✔ | ✔ | ✔ | ✔ |
| KOSMIK 160 HV | ✔ | ✔ | ✔ | ✔ | ✔ | ✔ |
| COOL KOSMIK 160 HV | ✔ | ✔ | ✔ | ✔ | ✔ | ✔ |
| KOSMIK 200 HV | ✔ | ✔ | ✔ | ✔ | ✔ | ✔ |
| COOL KOSMIK 200+ HV | ✔ | ✔ | ✔ | ✔ | ✔ | ✔ |
| COOL KOSMIK 200 HV GOLD | ✔ | ✔ | ✔ | ✔ | ✔ | ✔ |


