Difference between revisions of "Wiring/zh-hant"
(Created page with "如果你的模型直升機是有副翼的,你可以用使用陀螺儀裡的鎖尾(Heading hold) 功能,這功能將不管風或任何外力的影響都將其模型尾部鎖...") |
(Created page with "連接尾舵機到陀螺儀的“CH4”插口。 如果您還是使用標準接收器,則需要將GEAR(或AUX)從接收器連接到Spirit裝置上的AUX插口。 此外...") |
||
| Line 20: | Line 20: | ||
如果你的模型直升機是有副翼的,你可以用使用陀螺儀裡的鎖尾(Heading hold) 功能,這功能將不管風或任何外力的影響都將其模型尾部鎖定在遙控器給定的方向上。 | 如果你的模型直升機是有副翼的,你可以用使用陀螺儀裡的鎖尾(Heading hold) 功能,這功能將不管風或任何外力的影響都將其模型尾部鎖定在遙控器給定的方向上。 | ||
| − | + | 連接尾舵機到陀螺儀的“CH4”插口。 | |
| − | + | 如果您還是使用標準接收器,則需要將GEAR(或AUX)從接收器連接到Spirit裝置上的AUX插口。 | |
| − | + | 此外,您還需要將接收器RUD插口連接到Spirit設備上的RUD插口裡。 | |
Even if you do have a flybarred model, you can also connect the unit in the same way as a you would a flybarless one. This allows you to use the full potential of the unit including Stabilization and Rescue mode. In order for this to work correctly, it is necessary to tick the ''Flybar mechanic'' parameter in the Stabi tab during setup. All other parameters can be configured just the same as with a flybarless head. | Even if you do have a flybarred model, you can also connect the unit in the same way as a you would a flybarless one. This allows you to use the full potential of the unit including Stabilization and Rescue mode. In order for this to work correctly, it is necessary to tick the ''Flybar mechanic'' parameter in the Stabi tab during setup. All other parameters can be configured just the same as with a flybarless head. | ||
Revision as of 14:07, 17 May 2017
Spirit可以用作獨立的尾部陀螺儀,也可以用作無副翼系統使用。 布線取決於使用的接收器的類型。
Spirit的伺服器預設中位脈沖值為1520μs和50Hz頻率 - 請確保您具有由伺服器製造商指定的正確參數。
如果您的伺服器的中位脈沖值為上述不同,如760μs,請務必不要先連接此伺服器,否則可能會損壞伺服器。
某些連接器具有非標準尺寸,在插入陀螺儀後可能會干擾相鄰的連接器。解決方案是我們建議使用JR或Futaba類型替換這些連接頭。
切勿插入供電的連接頭到SYS或ELE / PIT / AIL位置,否則可能會損壞陀螺儀。
Contents
1 獨立的陀螺儀和副翼
如果你的模型直升機是有副翼的,你可以用使用陀螺儀裡的鎖尾(Heading hold) 功能,這功能將不管風或任何外力的影響都將其模型尾部鎖定在遙控器給定的方向上。
連接尾舵機到陀螺儀的“CH4”插口。 如果您還是使用標準接收器,則需要將GEAR(或AUX)從接收器連接到Spirit裝置上的AUX插口。 此外,您還需要將接收器RUD插口連接到Spirit設備上的RUD插口裡。
Even if you do have a flybarred model, you can also connect the unit in the same way as a you would a flybarless one. This allows you to use the full potential of the unit including Stabilization and Rescue mode. In order for this to work correctly, it is necessary to tick the Flybar mechanic parameter in the Stabi tab during setup. All other parameters can be configured just the same as with a flybarless head.
2 FLYBARLESS
Flybarless helicopters can take advantage of the full capabilities of the Spirit unit. The Spirit will stabilize the model on all axes and also make it less affected by wind, extend flight times and increase the agility of your model. When properly set up, flight characteristics should be more stable which will give you the confidence to carry out even the most challenging maneuvers.
Flybarless rotor blades are also different from blades designed for flybarred models. For optimum flight characteristics it is recommended to use them. When using the Spirit unit as a flybarless system, all servos should be connected in the corresponding positions:
| μSpirit |
| CH1 – Pitch / Aileron servo |
| CH2 – Elevator servo |
| CH3 – Aileron / Pitch servo |
| CH4 – Rudder servo / Rudder ESC |
| Spirit |
| CH1 – Pitch / Aileron servo |
| CH2 – Elevator servo |
| CH3 – Aileron / Pitch servo |
| CH4 – Rudder servo |
| Spirit Pro |
| CH1 – Pitch / Aileron servo |
| CH2 – Elevator servo |
| CH3 – Aileron / Pitch servo |
| CH4 – Rudder servo |
| CH0 – auxiliary (optional) cyclic servo for CCPM 90 swashplate type. |
Servos at positions CH1 and CH3 are dependent on the Swashplate settings. Aileron servo on the model is mostly positioned on the right side while pitch on the left side.
3 CONNECTION OF STANDARD RECEIVER (PWM)
μSpirit – receiver type: PWM
Spirit – receiver type: PWM
Spirit Pro – receiver type: PWM
For standard receivers it is necessary to use two normal and one special cable. Three connectors from the special cable should be plugged into the receiver and the end of these cables to the unit.
The unit is powered by two cables from the receiver. These are connected to the AUX and RUD positions. The Throttle (ESC or Throttle servo) should be connected to the receiver.
The easiest way you can start is to connect a cable between the RUD port with Rudder output of the receiver. Then continue with the AUX port which should be connected to the Gyro Gain channel output of the receiver. Next, connect the Aileron, Elevator and Pitch channels. If you are not sure whether you have the correct output or not, you can plug in one servo and power the unit to verify that your connection is correct. This can be repeated for each servo. The Diagnostic tab in the software is very helpful too, because you can see whether the connection is correct even without connected servos.
For Spektrum receivers you can view the Spektrum PWM connection scheme.
Spirit Pro
The unit is able to control Bank Switching by 7th channel of the receiver. Connect the cable to the AUX2 port and allow Bank Switching in the software.
Never plug a connector for powering the unit to SYS or ELE/PIT/AIL ports.
4 CONNECTION OF SPEKTRUM DSM2/X SATELLITE
μSpirit – receiver type: Spektrum DSM2/X
Spirit – receiver type: Spektrum DSM2/X
Spirit Pro – receiver type: Spektrum DSM2/X
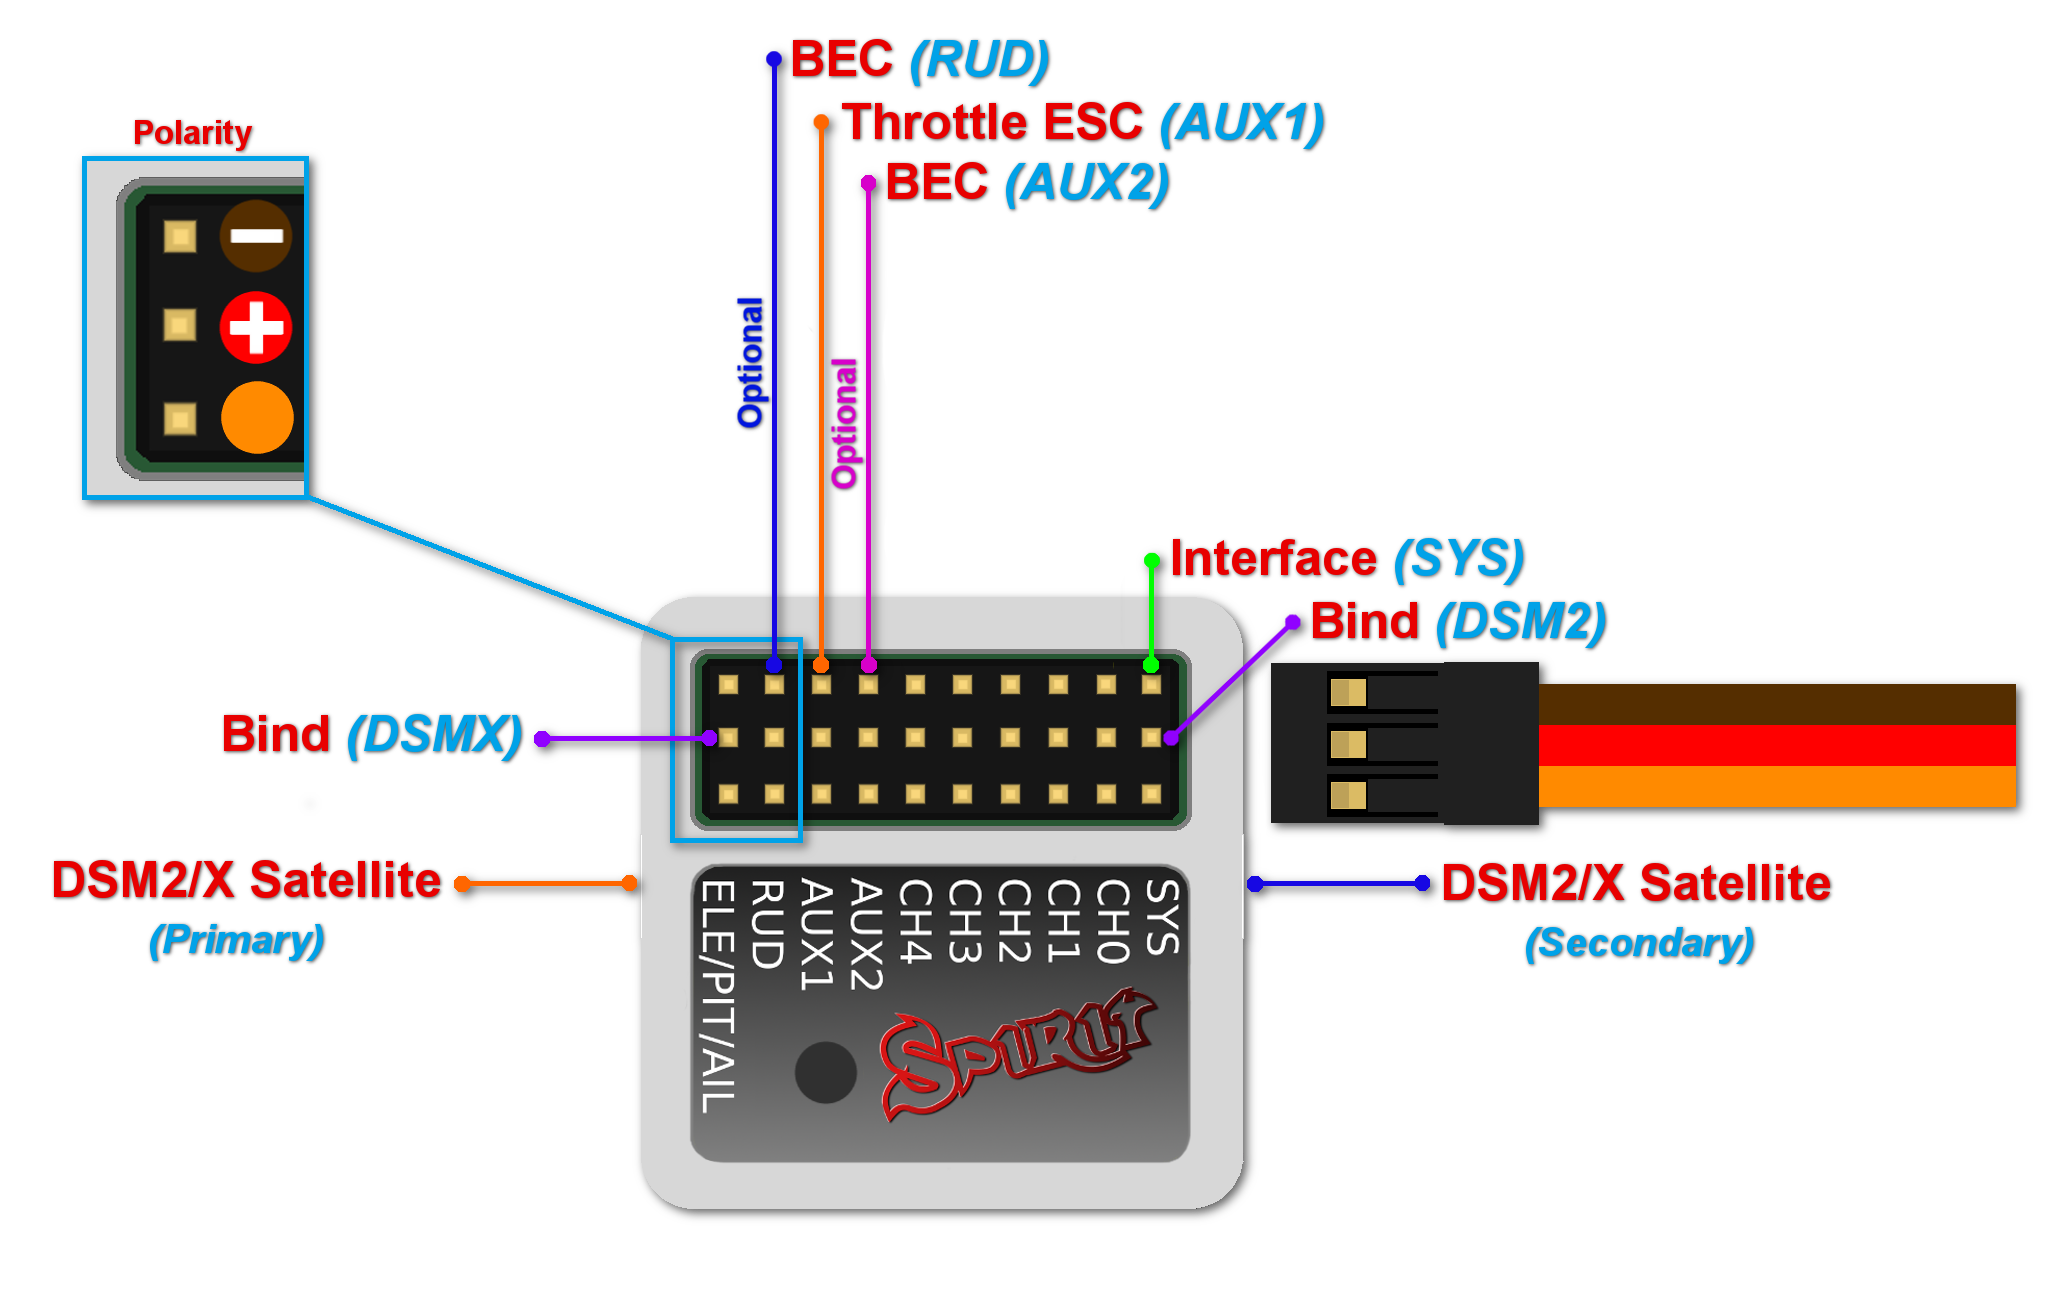
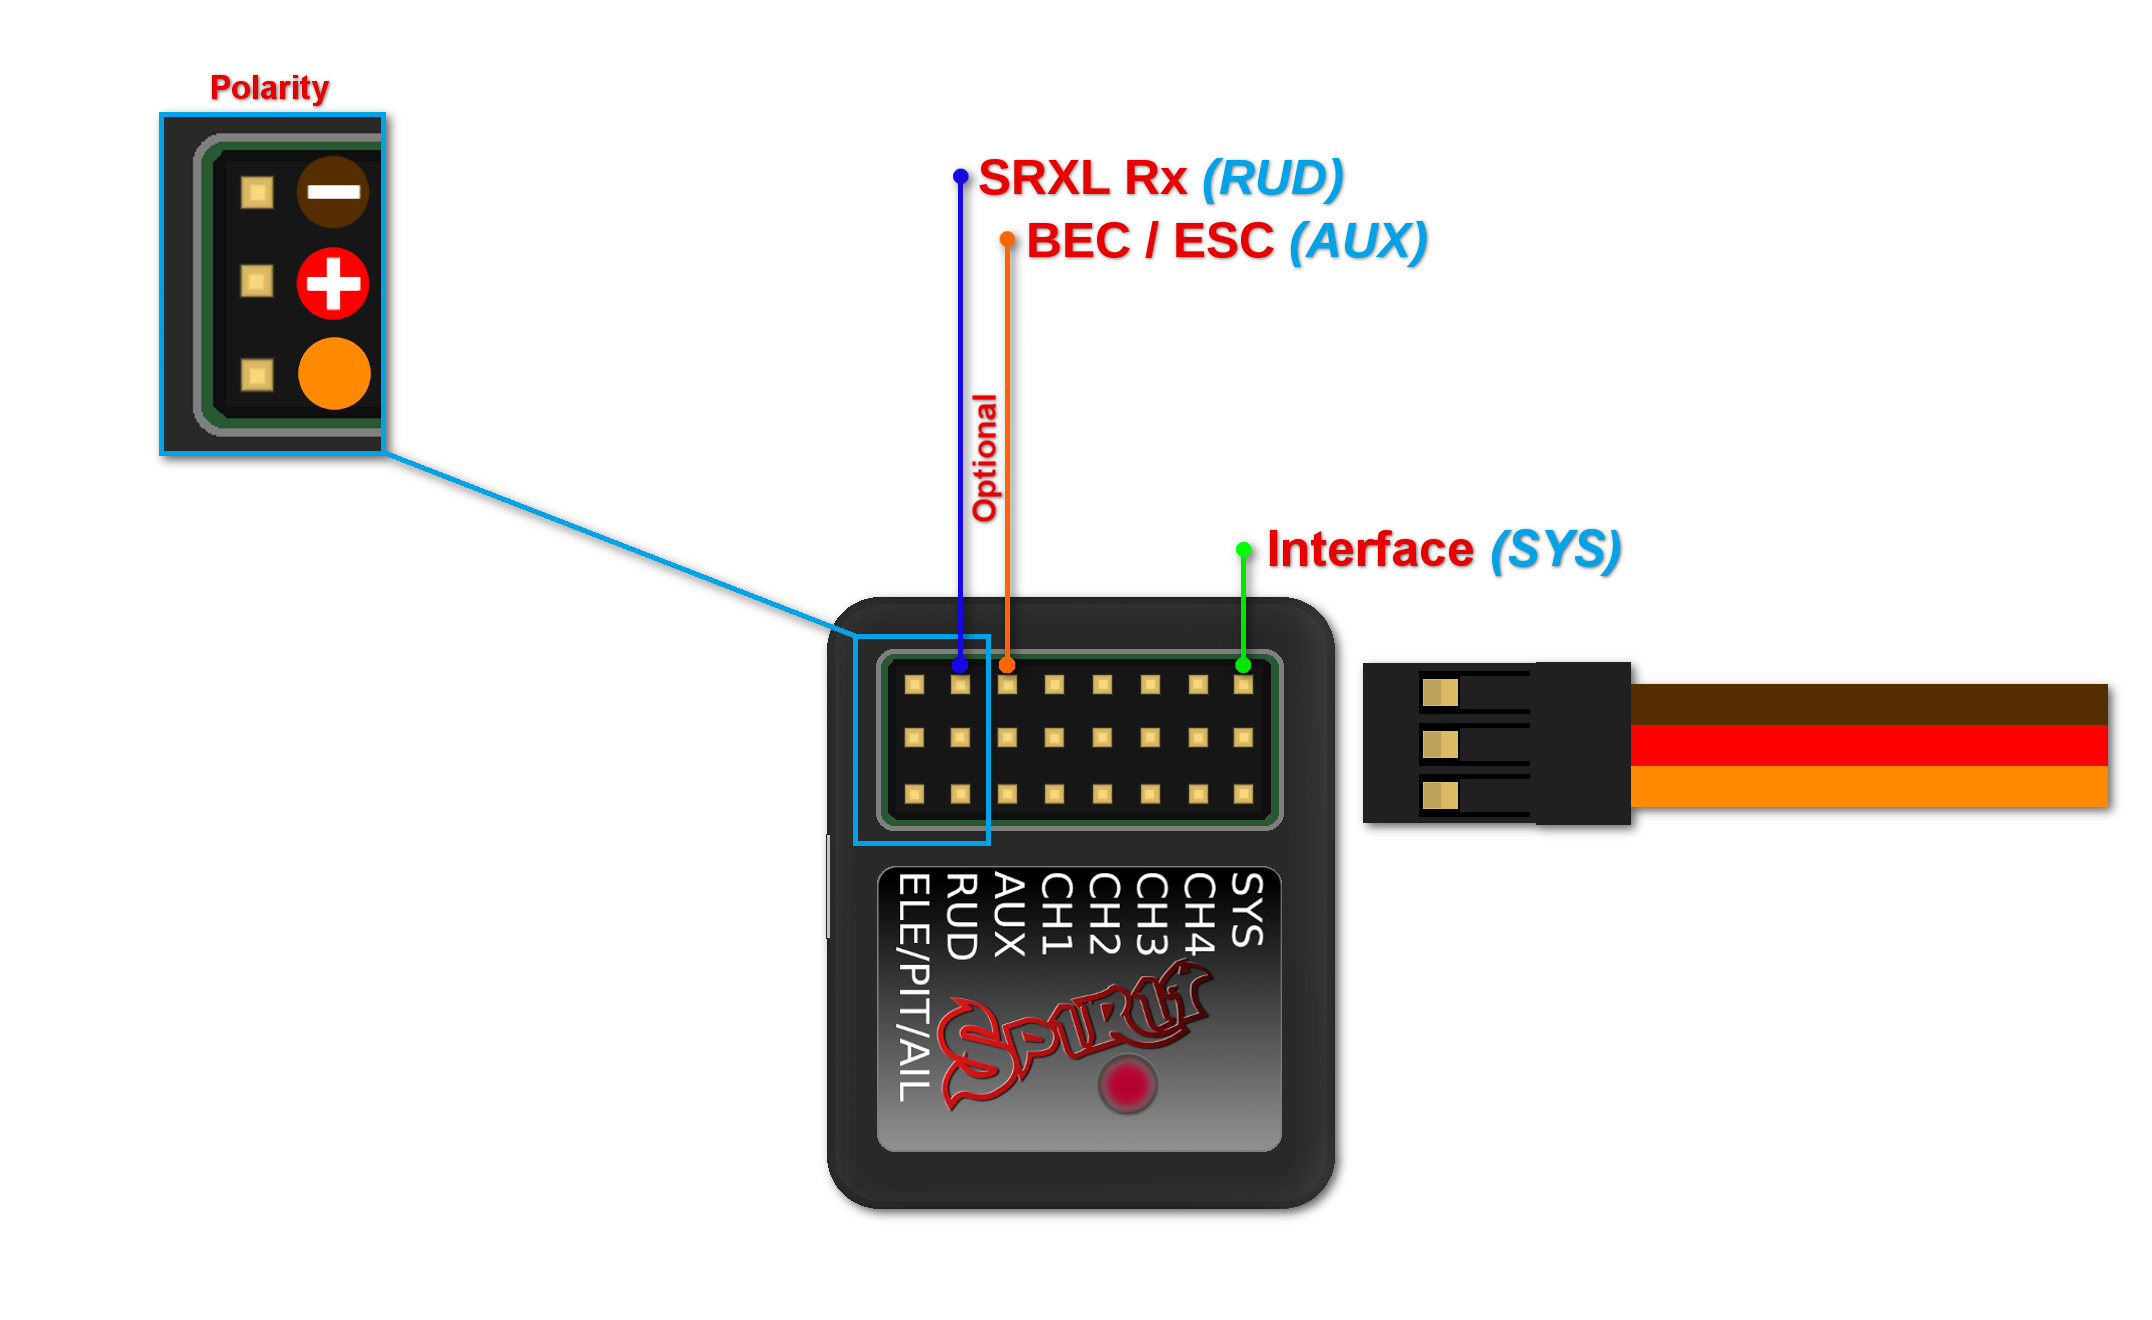
Connection to a BEC is optional. If the model is powered by an external BEC, this must be connected to the RUD port. Also the power lead from the ESCs internal BEC must be disconnected.
Spirit
A second satellite can be connected, but this can only be achieved via a special adapter connected to the RUD port. This adapter can be purchased separately. Before satellites can be used they must be bound to your transmitter, taking into account any failsafes that need to be set. To use both, two satellites and an external BEC, be sure to use a Y-harness made from large gauge wire to supply the high current that is needed.
Spirit Pro
The Pro version allows you to connect two satellites directly to the unit. If you want to use only one satellite, you have to use the Primary connector.
To bind the satellites, insert a bind plug in the SYS port for DSM2 satellites or the ELE/PIT/AIL port for DSMX satellites. Power cycling the Spirit start the bind process. Once successfully bound, the STATUS LED will go out and the satellite LED will come on.
If the second satellite fails to bind, swap the satellites and repeat the bind process.
Be sure Receiver type in the software is configured to Spektrum DSM2/X or else binding process will not work. Never plug a connector for powering the unit to SYS or ELE/PIT/AIL positions.
5 CONNECTION OF FUTABA S-BUS RECEIVER
μSpirit – receiver type: Futaba S-BUS
Spirit – receiver type: Futaba S-BUS
Spirit Pro – receiver type: Futaba S-BUS
Spirit
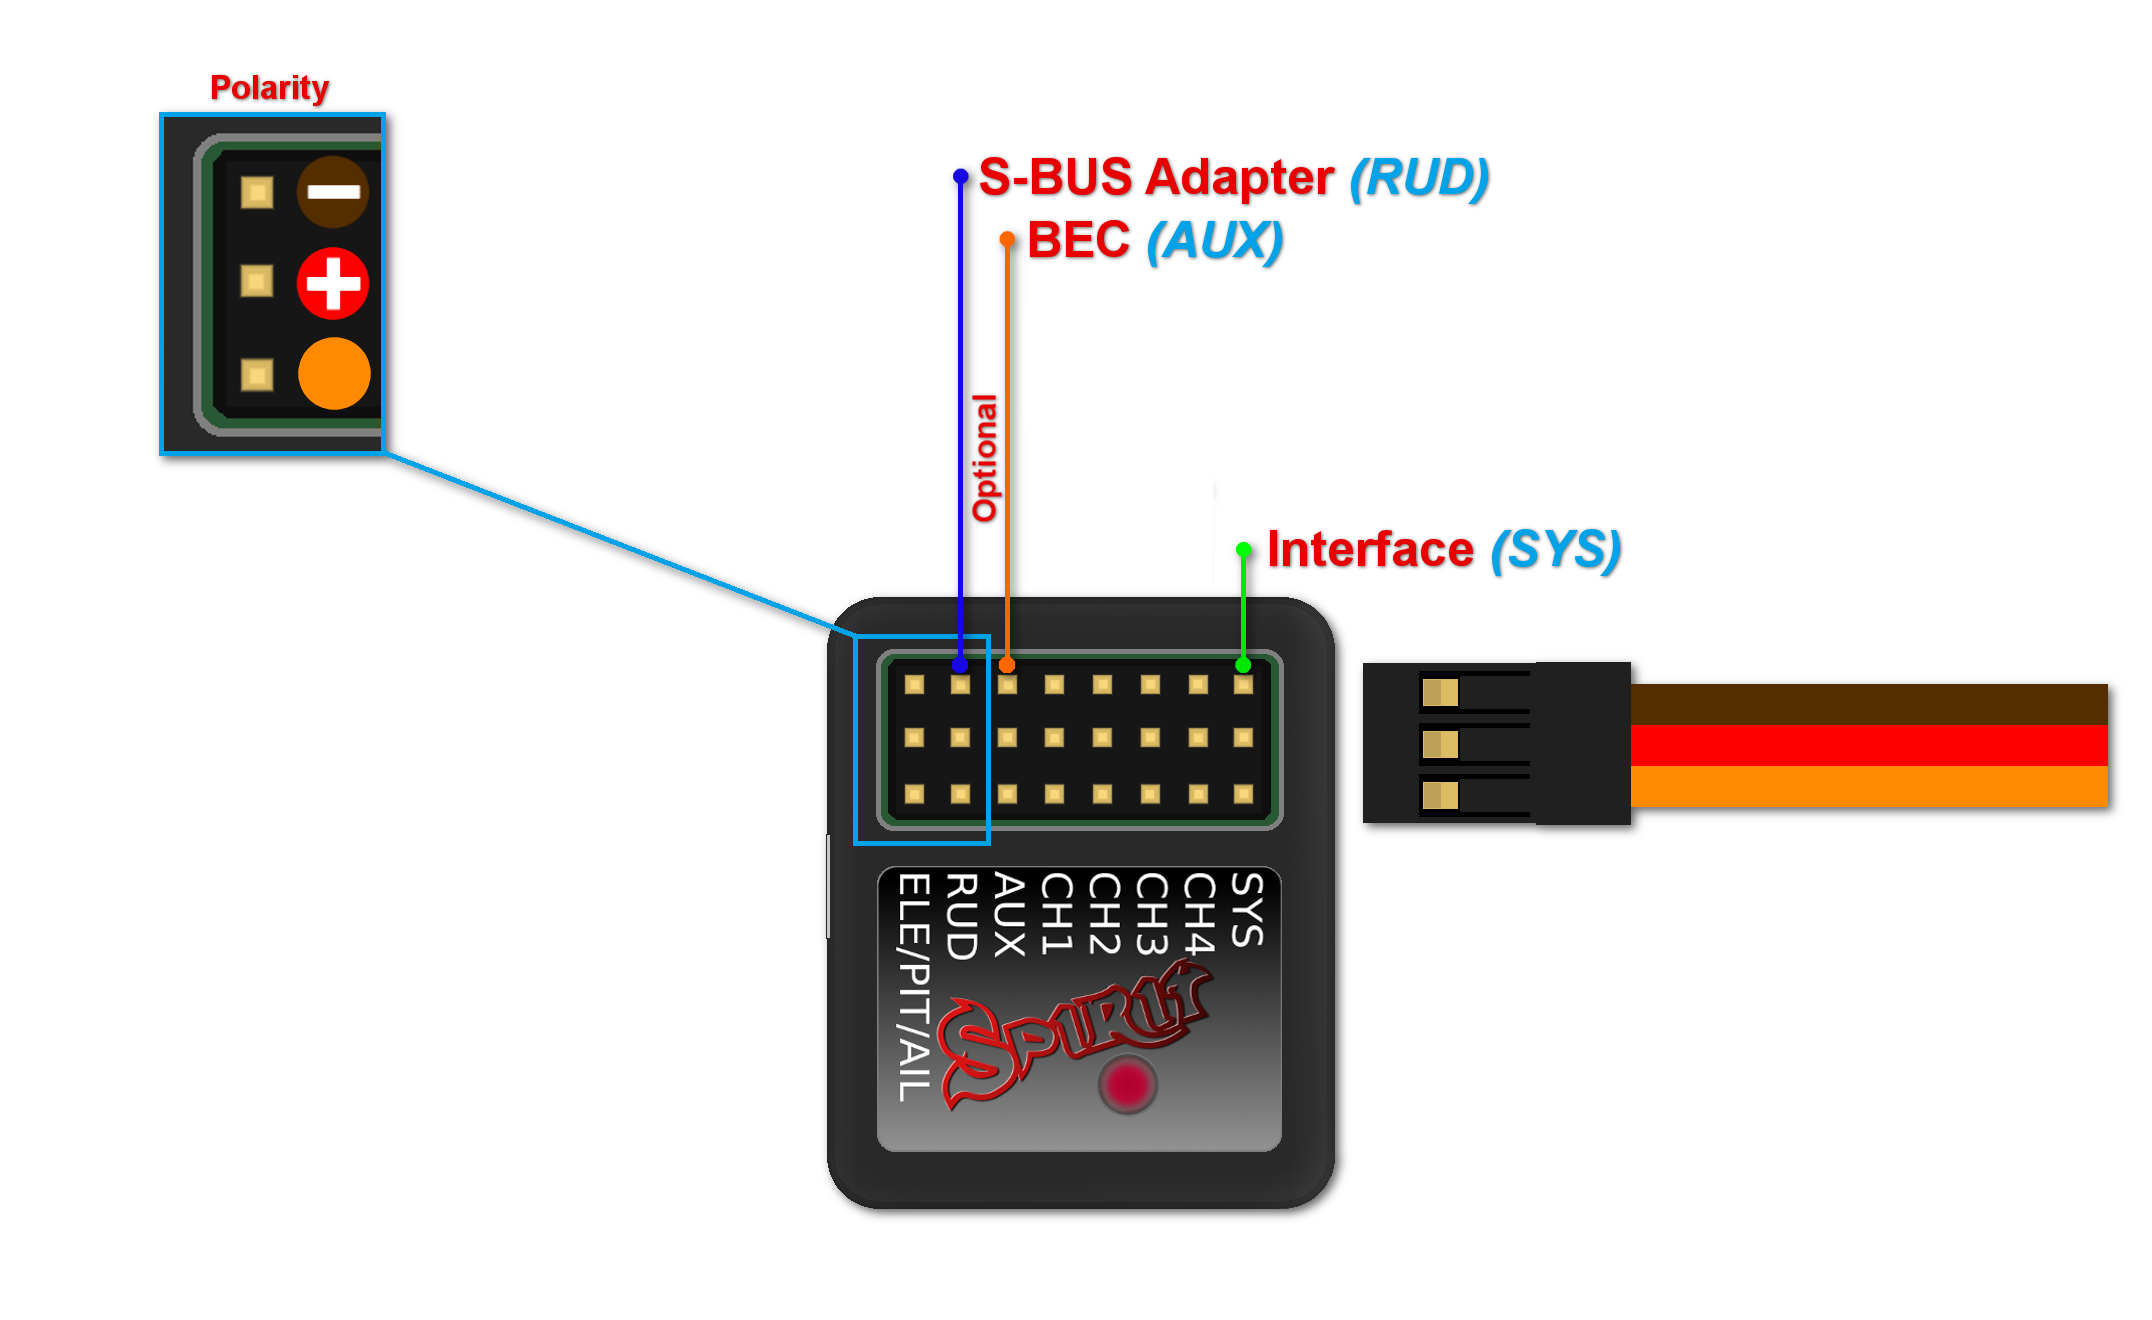
When using S-BUS it is necessary to use an inverter that replaces the cable between the receiver and the Spirit unit's RUD port. This inverter cable can be purchased separately. The inverter cable have to be connected in the way, that longer end is directed to the unit and shorter to the receiver.
Spirit Pro
Connect the receiver with the unit by normal patch cable to the RUD port. You can use cable that is included in the package.
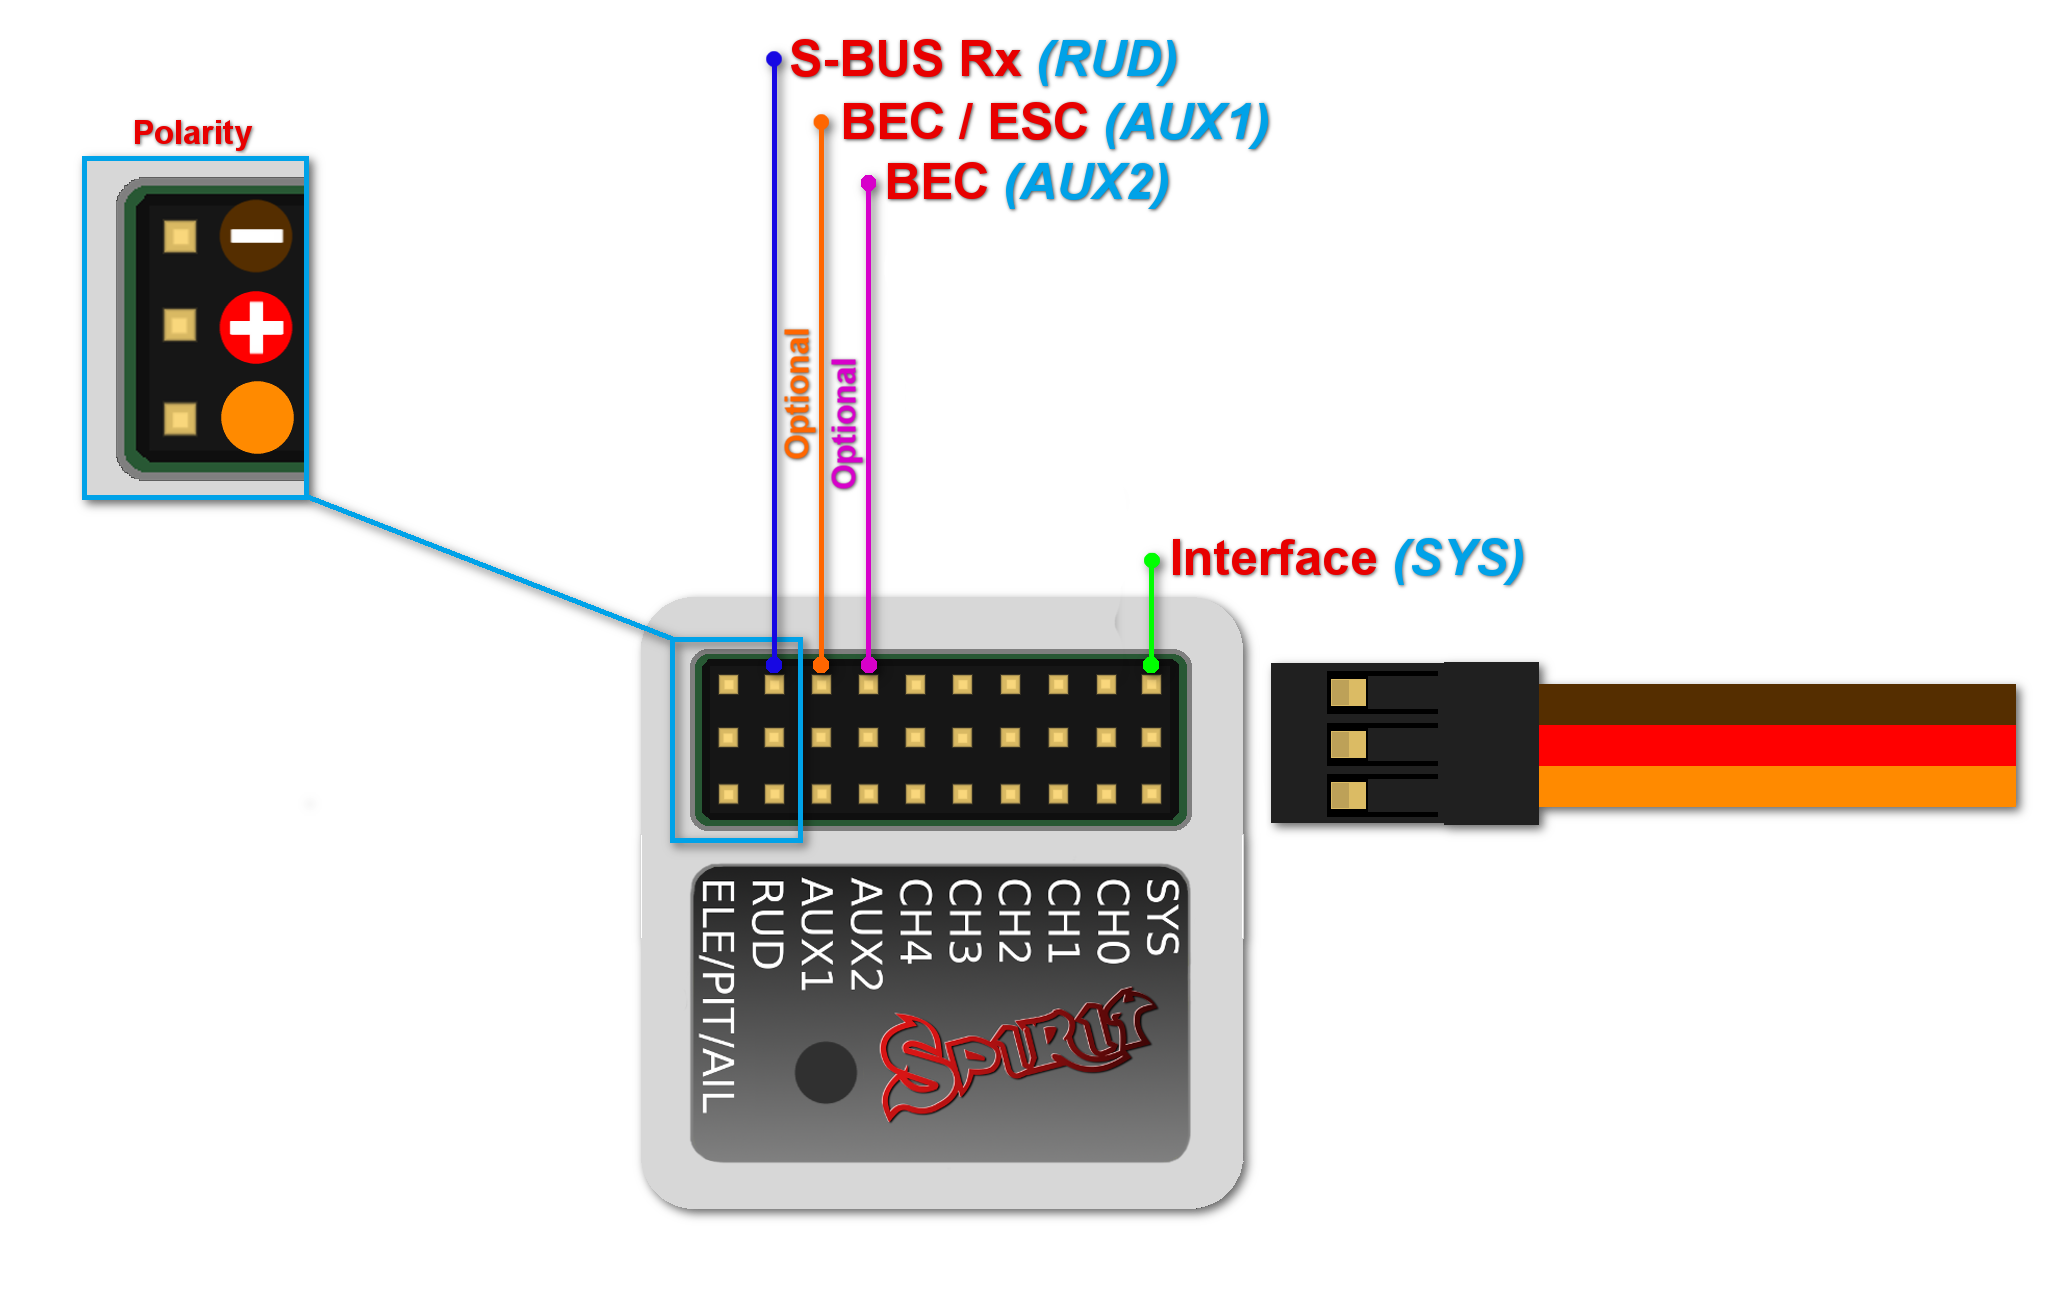
Connection to a BEC is optional. For models of 500 size and larger it is recommended to use dual power supply cables due to the increased power consumption. That means besides the S-BUS cable, an additional power supply cable should be connected to the AUX port.
When using this type of receiver you can connect the throttle cable directly to the receiver. Alternatively, you can assign the throttle channel in the software and use the AUX as throttle output from the unit.
Never plug a connector for powering the unit to SYS or ELE/PIT/AIL ports.
6 CONNECTION OF PPM RECEIVER
μSpirit – receiver type: PPM
Spirit – receiver type: PPM
Spirit Pro – receiver type: PPM
Connection to a BEC is optional. For models of 500 size and larger it is recommended to use dual power supply cables due to the increased power consumption. That means besides the communication cable, an additional power supply cable should be connected to the AUX port.
When using this type of receiver you can connect the throttle cable directly to the receiver. Alternatively, you can assign the throttle channel in the software and use the AUX as throttle output from the unit.
Never plug a connector for powering the unit to SYS or ELE/PIT/AIL ports.
7 CONNECTION OF JETI EX BUS RECEIVER
μSpirit – receiver type: Jeti EX Bus
Spirit – receiver type: Jeti EX Bus
Spirit Pro – receiver type: Jeti EX Bus
This connection type now supports the new integration with JETI Model transmitters. You can now fully configure the Spirit unit remotely through the JETI Model transmitter.
Remember to configure the receiver type through the software or the integration will not work. Also, it is necessary to download Spirit.bin file from the website. Move the file to the Devices directory in the SD card of your transmitter.
For futher instructions please check the Jeti Integration page.
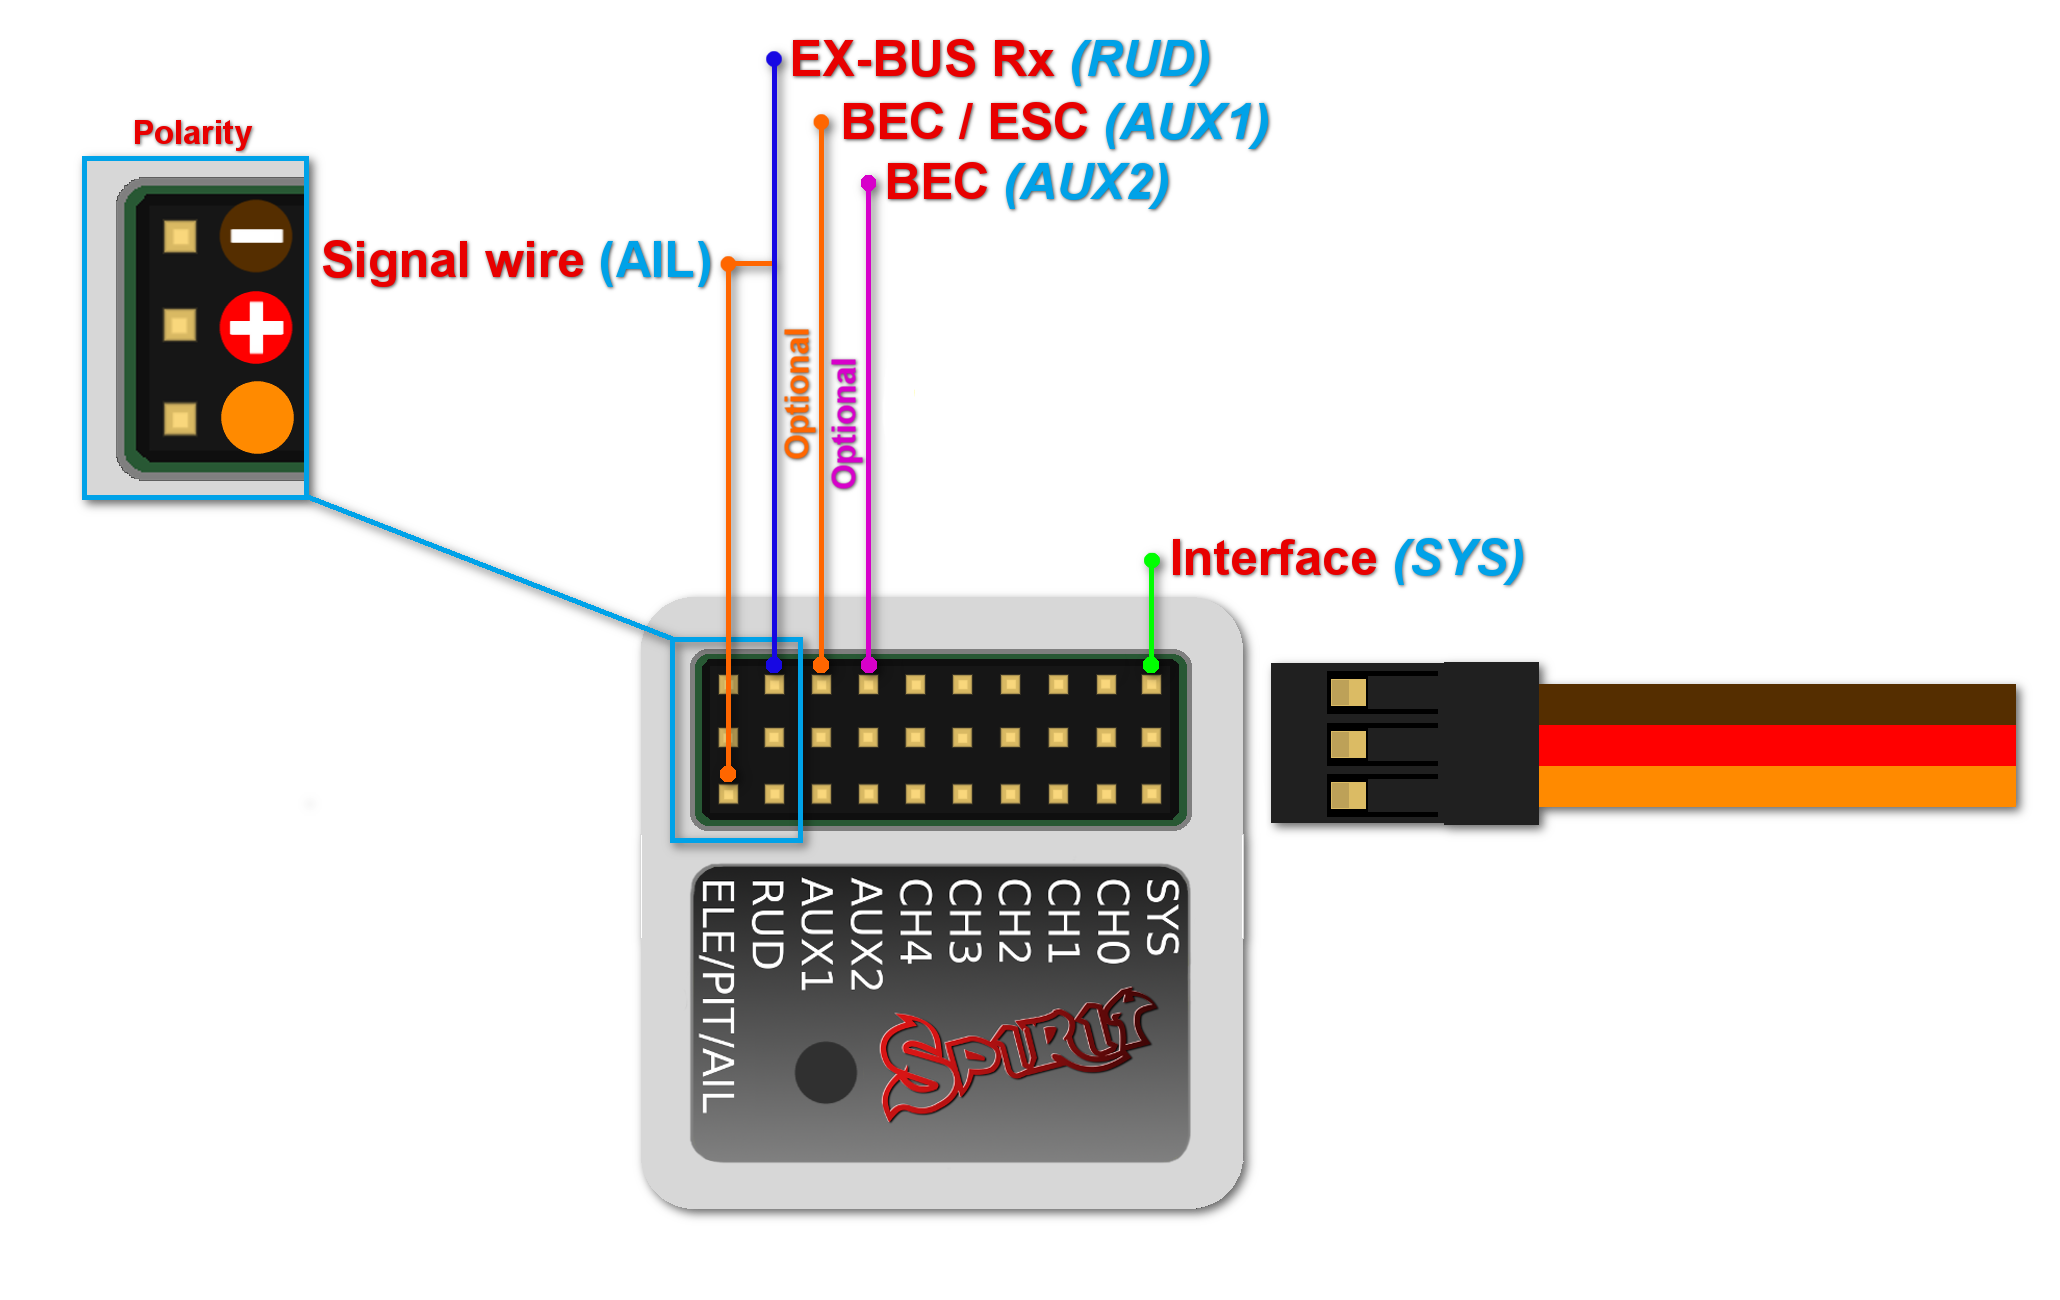
Connection to a BEC is optional. For models of 500 size and larger it is recommended to use dual power supply cables due to the increased power consumption. That means besides the EX Bus cable, an additional power supply cable should be connected to the AUX port.
When using this type of receiver you can connect the throttle cable directly to the receiver. Alternatively, you can assign the throttle channel in the software and use the AUX as throttle output from the unit.
A special cable is needed to enable this communication. Signal wire (Orange) is connected to the AIL pin, while power wires (Red and Brown) are connected to the RUD port in the unit. For JETI REX receivers, end of the special cable is connected to the EX1 or EX2 (depending on the receiver configuration). For EX receivers, please use EXT port.
Never plug a connector for powering the unit to SYS or ELE/PIT/AIL ports.
8 CONNECTION OF SRXL/SUMD RECEIVER
μSpirit – receiver type: SRXL/SUMD
Spirit – receiver type: SRXL/SUMD
Spirit Pro – receiver type: SRXL/SUMD
Connection to a BEC is optional. For models of 500 size and larger it is recommended to use dual power supply cables due to the increased power consumption. That means besides the communication cable, an additional power supply cable should be connected to the AUX port. This protocol family can work with a wide range of receivers. Thus you can use Multiplex SRXL, BeastX SRXL, Graupner SUMD, Jeti UDI, Spektrum SRXL and more.
When using this type of receiver you can connect the throttle cable directly to the receiver. Alternatively, you can assign the throttle channel in the software and use the AUX as throttle output from the unit.
Never plug a connector for powering the unit to SYS or ELE/PIT/AIL ports.
9 CONNECTOR ORIENTATION
All cables connected to the unit must be oriented so that the signal wire (Lightest color wire) is closer to the connector pin label, towards the center of the unit. This orients the negative (darkest color wire) toward the edge of the unit.


