Intégration Spektrum
"A partir de la version 2.4.3 vous pouvez utiliser l'intégration Spektrum!"
Cela veut dire que vous pouvez modifier toutes les options de configuration avec un émetteur Spektrum en temps réel sans l'utilisation d'un ordinateur
Contents
1 Pré-requis
Pour faire fonctionner le tout vous aurez besoin de:
- Un émetteur Spektrum: DX6e, DX6 Gen 2, DX6 Gen 3, DX7 Gen 2, DX8 Gen 2, DX9, DX10T, DX18 Gen 1, DX18 Gen 2, DX18T, DX18QQ or DX20
- Un récepteur avec option de télémétrie: "SPM4649T".
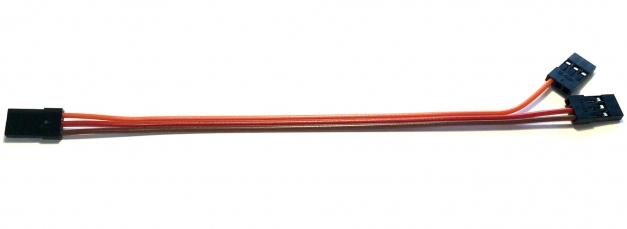
- Un câble d'intégration Jeti disponible dans notre boutique en ligne ( ou votre propre câble modifié selon les spécifications ).
- Spirit firmware: 2.4.3 (with the new Bootloader flashed - see the Troubleshooting section)
2 Câblage
2.1 SPM4649T receiver
Le récepteur est capable de transférer n'importe quelle donnée incluant les données des canaux et la télémétrie. Ce qui veut dire que vous n'aurez besoin de connecter rien d'autre que le récepteur.
By using the Jeti integration cable you will not need any additional modification to the receiver. In case you do not have this cable, you can make one easily with a needle and a spare servo plug.
In case that your SPM4649T receiver is not bound yet, you can do so by a Bind plug. Connect the Bind plug to the servo socket. Then power up the receiver (you can use BEC power supply and/or free port in the unit such as CH0 or AUX2). Optional satellites can be binded normally as described in the Manual.
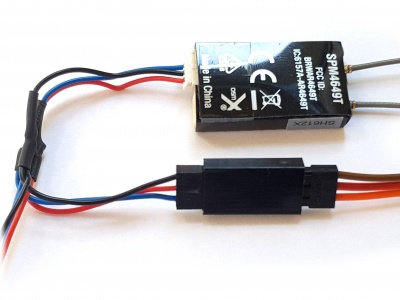
SPM4649T receiver Jeti integraction cable must be connected to the Servo socket. This socket is used also for Binding. Spirit unit Other end of the Jeti integration cable should be connected so that Orange wire is in the AIL pin. Powering plug with Red and Brown wires in the RUD port. (see the photo)
2.2 Spektrum satellites (optional)
To improve receiving capabilities you can connect additional Spektrum satellites. So the combination can be following:
- Spirit Pro - 1x SPM4649T + 0-2x Spektrum satellites
- Spirit - 1x SPM4649T + 0-1x Spektrum satellites
- µSpirit - 1x SPM4649T + 0-1x Spektrum satellites
Dans le cas ou la télémétrie ESC est utilisée ESC telemetry , le satellite primaire ne peux pas être connecté ! Toutefois si vous utiliser la télémétrie avec un ESC Castle Creation ou Kontronik kosmik/Jive Pro la connexion du satellite primaire peux être utilisée.
3 Préparation de l'émetteur
3.1 Firmware update
Update your transmitter to the latest firmware 1.20 from the Spektrum Airware portal. In the menu SETUPS/UPDATES - FIRMWARE UPDATES you will find the firmware for download. The SAX file must be stored on the SDCARD and inserted in your transmitter. In the System Setup/Transfer SD Card you can select Firmware update as Option.
- DX6e does not need update (version 1.00 will work).
3.2 Configuration
Power up the transmitter and in the Main menu enter the Telemetry.
Configure:
- 1: ESC
- 2: Text Gen
When adding Text Gen make sure that Display option is configured to Act or Roller (depending on radio).
At this point your transmitter is ready. You can return to the main screen.
4 Configuration du Spirit
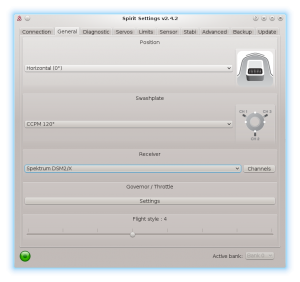
Maintenant vous êtes prêt a allumer l'unité. Si votre source d'alimentation n'est pas encore connecté Spirit recommande de la connecter dans un des ports suivant AUX,AUX2 ou CH0. Vous pouvez utiliser la connexion d'intégration Spektrum. C'est important de bien choisir l'option "Spektrum DSM2/X" dans la table général du programme fourni par Spirit. Svp démarrer le logiciel de configuration du Spirit et changer le type de receveur tel qu'illustré sur la photo. Ensuite enregistré les modifications (ex: raccourci clavier pesez "CTRL+S") ou aller dans l'onglet "Backup tab/Unit" et enregistrer. Ne pas oublier de redémarrer l'unité Spirit.
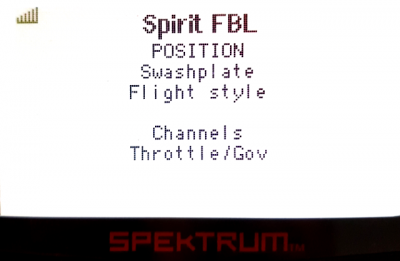
Une fois l'unité mise en marche il est possible en tout temps d'entrer dans le menu Intégration Spektrum, ou de visualiser les données de télémétrie.
Démarrer votre transmetteur utiliser la molette en tournant vers la droite jusqu'à ce que vous voyez dans l'écran principal un page vierge sans inscription.
A ce stade le menu d'intégration n'est pas ouvert donc vous ne pouvez pas modifier aucun paramètres accidentellement. Pour ouvrir le menu bougez sur le transmetteur le manche du "Rudder" complètement a droite et en même temps le manche "Aileron" a gauche et maintenir en position durant plus de 2 secondes. Une fois le menu ouvert vous verrez le message <READY> apparaître. Maintenant vous pouvez relâcher les 2 manches et vous êtes prêt a configurer tous les paramètres.
As soon as you will want to close the Integration menu (when you will want to fly) perform the same procedure with the sticks. Move and hold the sticks (Rudder to the right and Aileron to the left) for over 2 seconds. Menu is closed successfully when <CLOSED> is displayed even if you will return the sticks back to the center. If you will not close the integration menu, it will be temporarily disabled as soon as the Throttle curve will exceed 15%. But to minimize any risk we highly recommend to close it properly.
Dans le but d'avoir une navigation facile la nomenclature du menu est la même que dans l'interface du programme que vous utilisez avec votre ordinateur.
Cela fonctionne de la même manière que lorsque le logiciel PC est connecté. Cela signifie que lorsque le menu d'intégration est ouvert, vous pouvez même changer les paramètres de base qui peuvent affecter l'hélicoptère de manière importante.
Pour naviguer dans le menu déplacer, le manche Ailerons et Élévateur.
- Aileron Left - Back in the menu; Stop edit of a parameter' value.
- Aileron Right - Enter a Submenu; Edit selected parameter.
- Elevator Up - Go up in the menu or submenu; Increase value of selected parameter.
- Elevator Down - Go down in the menu or submenu; Decrease value of selected parameter.
When using the Bank Switching or Real-Time tuning features while the Integration is active, the menu will take full control over it. The unit will not react to a Switch position changes. For the Bank Switching there is a parameter Bank in the main menu where you can manually change the banks.
Ne pas oublier de cliquer sur Save Settings lorsque vous voulez enregistrer les modifications de façon permanente.
6 Données de télémétrie
Now it is a proper time for configuring the ESC telemetry (if you want to use this feature).
If the feature is not used, you will still get telemetry variables such as Vibration Level, Throttle percentage and possibly RPM readout as described below.
6.1 Displaying the data
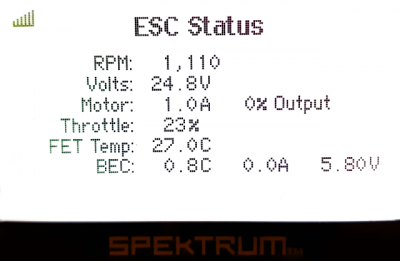
Pour afficher les données de télémétrie, bouger la molette sur votre transmetteur jusqu'à temps que vous voyez apparaître a l'écran principal "ESC Status".
If you can't see the ESC Status, please make sure you have performed necessary configuration.
List of available Telemetry variables:
- RPM [Head RPM] - RPM fourni par Senseur RPM ou ESC.
- Volts [V] - Télémétrie ESC | Voltage de la batterie
- Motor [A] - Télémétrie ESC | Ampérage de la pile
- Throttle [%] - Throttle percentage sent to the ESC.
- Output [%] - Niveau de vibration ( 0-10% est un niveau normal de vibration )
- FET Temp [°C] - Télémétrie ESC | Température FET
- BEC [C] - Télémétrie ESC | Nombre total de milliampère ("c") consommé par la pile (EX: 1234mah = 123.4C)
- BEC [V] - Télémétrie ESC | Voltage BEC
7 Résolution des problèmes
7.1 SPM4649T always in binding mode
This issue can be sorted so that you will re-flash the unit's Bootloader to the latest version. All units that were shipped with firmware older than 2.4.3 will need this.
It can be done easily so that you will perform the flashing process again (with the latest 4df file), but before clicking the Flash button, press CTRL+B keys. Once pressed, you will see Status: Bootloader Overwrite message. Then click the Flash button. The flashing will take little bit longer than usually (done in two stages).
Update the bootloader only if you are certain, that normal firmware flashing is working correctly on your computer.

