Bekötés
Spirit használható önálló farok giroszkópként vagy Fly-bar nélküli rendszerként. Az egység bekötése az alkalmazott vevő típusától függ.
Contents
- 1 ÖNÁLLÓ GIROSZKÓP ÉS FLYBAR
- 2 FLYBARLESS
- 3 CSATLAKOZÓK KIOSZTÁSA
- 4 A SZERVÓK BEKÖTÉSE
- 5 ESC/MOTOR BEKÖTÉS
- 6 CONNECTION OF STANDARD RECEIVER (PWM)
- 7 CONNECTION OF SPEKTRUM DSM2/X SATELLITE
- 8 CONNECTION OF FUTABA S-BUS RECEIVER
- 9 CONNECTION OF PPM RECEIVER
- 10 CONNECTION OF JETI EX BUS RECEIVER
- 11 CONNECTION OF SRXL/SUMD RECEIVER
1 ÖNÁLLÓ GIROSZKÓP ÉS FLYBAR
A vezérlő-karos (Hiller lapos) helikopterek tulajdonosai kihasználhatják az iránytartó giroszkópot, amely a heli farkát az adó által megadott irányban tartja, tekintet nélkül a szél vagy bármilyen külső erő hatására.
Csatlakoztassa az oldalkormány szervóját a Spirit egység CH4 portjához. Ha szabványos vevőt is használ, akkor a GEAR (vagy AUX) eszközt a vevőegységből a Spirit egység AUX portjához kell csatlakoztatnia. Ezenkívül csatlakoztatnia kell a vevő RUD portját a Spirit egység RUD portjához.
Még akkor is, ha Flybar-os (Hiller lapos) modellje van, ugyanolyan módon csatlakoztathatja az egységet, mint egy Flybar nélküli modellnél. Ez lehetővé teszi az egység teljes potenciáljának kihasználását, beleértve a stabilizációs és mentési módot is. Annak érdekében, hogy ez helyesen működjön, be kell jelölnie a Flybar mechanika paraméterét a Stabil (Stabi) fülön a telepítés során. Az összes többi paraméter ugyanúgy konfigurálható, mint a Hiller nélküli rotor fejeknél.
2 FLYBARLESS
Flybarless (vezérlő kar nélküli) helikopterek kihasználhatják a Spirit egység összes képességét. A Spirit minden tengelyen stabilizálja a modellt, és csökkenti a szél hatását is, meghosszabbítja a repülési időket és növeli a modell agilitását, gyorsaságát. Megfelelően beállítva a repülési jellemzőket, stabilabb lesz a modell, ami önbizalmat ad a legnehezebb manőverek végrehajtásához.
A Flybar nélküli rotorlapátok szintén különböznek a Flybar-os modellekhez tervezett lapátoktól. Az optimális repülési jellemzők érdekében ajánlott ezeket használni. Amikor a Spirit egységet, Flybar nélküli rendszerként használja, az összes szervót a megfelelő helyzetébe kell csatlakoztatni:
3 CSATLAKOZÓK KIOSZTÁSA
Mielőtt bármilyen csatlakoztatást elvégezne, kérjük, pontosan tartsa be az alábbi instrukciókat. Figyelje meg a csatlakozó helyes elhelyezkedését az ön Spiritjében.
3.1 μSpirit
A JST-ZH (R) csatlakozók érintkezőinek elrendezése különbözik a standard szervó csatlakozóktól. A barna (középső) vezeték GND (FÖLD) tűs. A narancs vezeték SIGNAL (JEL) tűs. A vörös vezeték + 5 V (BEC feszültség). A JST-Servo vezetékek segítségével a klasszikus Szervót és az összes Spirit perifériát csatlakoztathatja az µSpirit-hez, még szervó csatlakozókkal is.
3.2 Spirit és Spirit Pro
Az egységhez csatlakoztatott összes vezetéket úgy kell irányítani, hogy a jelvezeték (a legvilágosabb színű vezeték) legyen legközelebb a címkéhez, az egység közepe felé. A negatív (sötétebb színű vezetéket) az egység külső éle felé irányítsa.
3.3 Spirit 2
Minden bekötésre váró vezetéken a jel vezeték (NARANCS) az egység felső részén van. A negatív (BARNA) vezeték az egység alja felé nézzen.
4 A SZERVÓK BEKÖTÉSE
Spirit units have full support for all types of servos. Please proceed according the Setup Wizard in Spirit Settings software to see how to connect the servos properly.
Az Spirit előre be van programozva 1520 µsec-os szervó semleges impulzusra és 50Hz frekvenciára - kérjük, ellenőrizze, hogy a szervo gyártója által megadott módon helyesen választotta-e meg a szervó paramétereit!
Ha a szervójának semleges impulzusa különbözik a fentiektől, például a 760 µsec, ne csatlakoztassa még ezt a szervót, mert megsérülhet!
Néhány csatlakozó nem szabványos méretű, amely gátolhatja a szomszédos csatlakozók bekötését. Megoldásként javasoljuk ezeknek a csatlakozóknak a cseréjét JR vagy Futaba típusokra.
Soha ne csatlakoztasson feszültség alatt lévő csatlakozót az egység SYS vagy ELE/PIT/AIL Portjaihoz!
| μSpirit |
| CH1 – Kollektív/ Csűrő szervó |
| CH2 – Magassági szervó |
| CH3 – Csűrő/Kollektív szervó |
| CH4 – Farok (oldalkormány) szervó/Farok ESC |
| Spirit, Spirit 2 |
| CH1 – Kollektív/ Csűrő szervó |
| CH2 – Magassági szervó |
| CH3 – Csűrő/Kollektív szervó |
| CH4 – Farok (oldalkormány) szervó |
| Spirit Pro |
| CH1 – Kollektív/ Csűrő szervó |
| CH2 – Magassági szervó |
| CH3 – Farok (oldalkormány) szervó |
| CH4 – Farok (oldalkormány) szervó |
| CH0 – kisegítő (opcionális) ciklikus szervó CCPM 90 típusú imbolygó tárcsához |
A CH1 és a CH3 pozícióban lévő szervók az imbolygó tárcsa beállításától függnek A modellen a Csűrő szervó többnyire a jobb oldalon, míg a Kollektív szervó baloldalon van.
5 ESC/MOTOR BEKÖTÉS
Az elektromos motorok Elektronikus Fordulatszám-Szabályozói (ESC) vagy a belsőégésű motorokhoz tartozó porlasztó-szervók kétféle módon csatlakoztathatók:
- A vevőben - Gáz-csatlakozó (a Failsafe-ot a vevő kezeli)
- A Spirit egységben - AUX (AUX1) portban (a Failsafe-ot egységenként és/vagy kiegészítőként vevőegységgel kezelik).
Az egyes vevőkészülékek vezetékezésének részleteit mindig a vevőhöz adott séma tartalmazza, lásd a következő szakaszt.
A Spektrum DSM2 / X műholdaknál a gázt mindig csatlakoztatni kell az egységhez.
Alapértelmezés szerint az egység gáz-kimenete minden vevőtípusnál le van tiltva (a Spektrum DSM2 / X kivételével). Rendelje az 1. csatornát az Általános / Csatorna-porlasztó (General/Channels – Throttle) menüben.
In order to use Governor it is always required to use Throttle output from the unit.
Throttle frequency that can be configured in the unit can stay at default settings (60Hz). Only if Governor is used it is usefull to set as high frequency as possible. Recommended values are described in the Governor page.
5.1 Castle ESC
Ha Castle ESC-t használ, akkor konfigurálja az alábbi gáz-paramétereket az Általános-Gáz/Governor ablakban:
- Gáz-frekvencia: 60Hz.
- Gáz tartomány - Min. 1060 µsec.
- Gáz-tartomány - Max. 1940 µsec
Az összes többi ESC-nek helyesen kell működnie az alapértelmezett beállításokkal. Ha nem, kérjük, használja a gyári alapértelmezést.
5.2 Throttle Servo
For combustion helicopters it is required to set optimal travel range in order to prevent a binding. If the servo is connected in the unit, you can set absolute limits that can never be exceeded. These can be configured in the General - Throttle/Governor - Throttle Range.
It is also possible that Throttle Reverse will be necessary to get fully closed condition when Throttle Hold is engaged. This will change servo movement direction.
5.3 µSpirit and Rudder ESC/Motor
µSpirit unit has full support for motor driven tail rotors. These motors are usually driven by a dedicated ESC. To control the motor standard servo signal is used. Connect Rudder ESC at the CH4 port. In the Setup Wizard it is necessary to set Rudder - Control type to Motor.
Lastly make sure you will set Throttle range for this ESC. Please see description of the Rudder End-points in the Configuration/Limits tab section.
In order to turn off the Tail motor when Main motor is not running it is necessary to later assign the Throttle channel. See the Channels assignment in the Configuration/General - Channels section. This can be changed anytime after the basic configuration.
6 CONNECTION OF STANDARD RECEIVER (PWM)
μSpirit – receiver type: PWM
Spirit – receiver type: PWM
Spirit Pro – receiver type: PWM
Spirit 2– receiver type: PWM
For standard receivers it is necessary to use two normal and one special cable. Three connectors from the special cable should be plugged into the receiver and the end of these cables to the unit.
The unit is powered by two cables from the receiver. These are connected to the AUX and RUD positions. The Throttle (ESC or Throttle servo) should be connected to the receiver.
The easiest way you can start is to connect a cable between the RUD port with Rudder output of the receiver. Then continue with the AUX port which should be connected to the Gyro Gain channel output of the receiver. Next, connect the Aileron, Elevator and Pitch channels. If you are not sure whether you have the correct output or not, you can plug in one servo and power the unit to verify that your connection is correct. This can be repeated for each servo. The Diagnostic tab in the software is very helpful too, because you can see whether the connection is correct even without connected servos.
For Spektrum receivers you can view the Spektrum PWM connection scheme.
Spirit Pro, Spirit 2
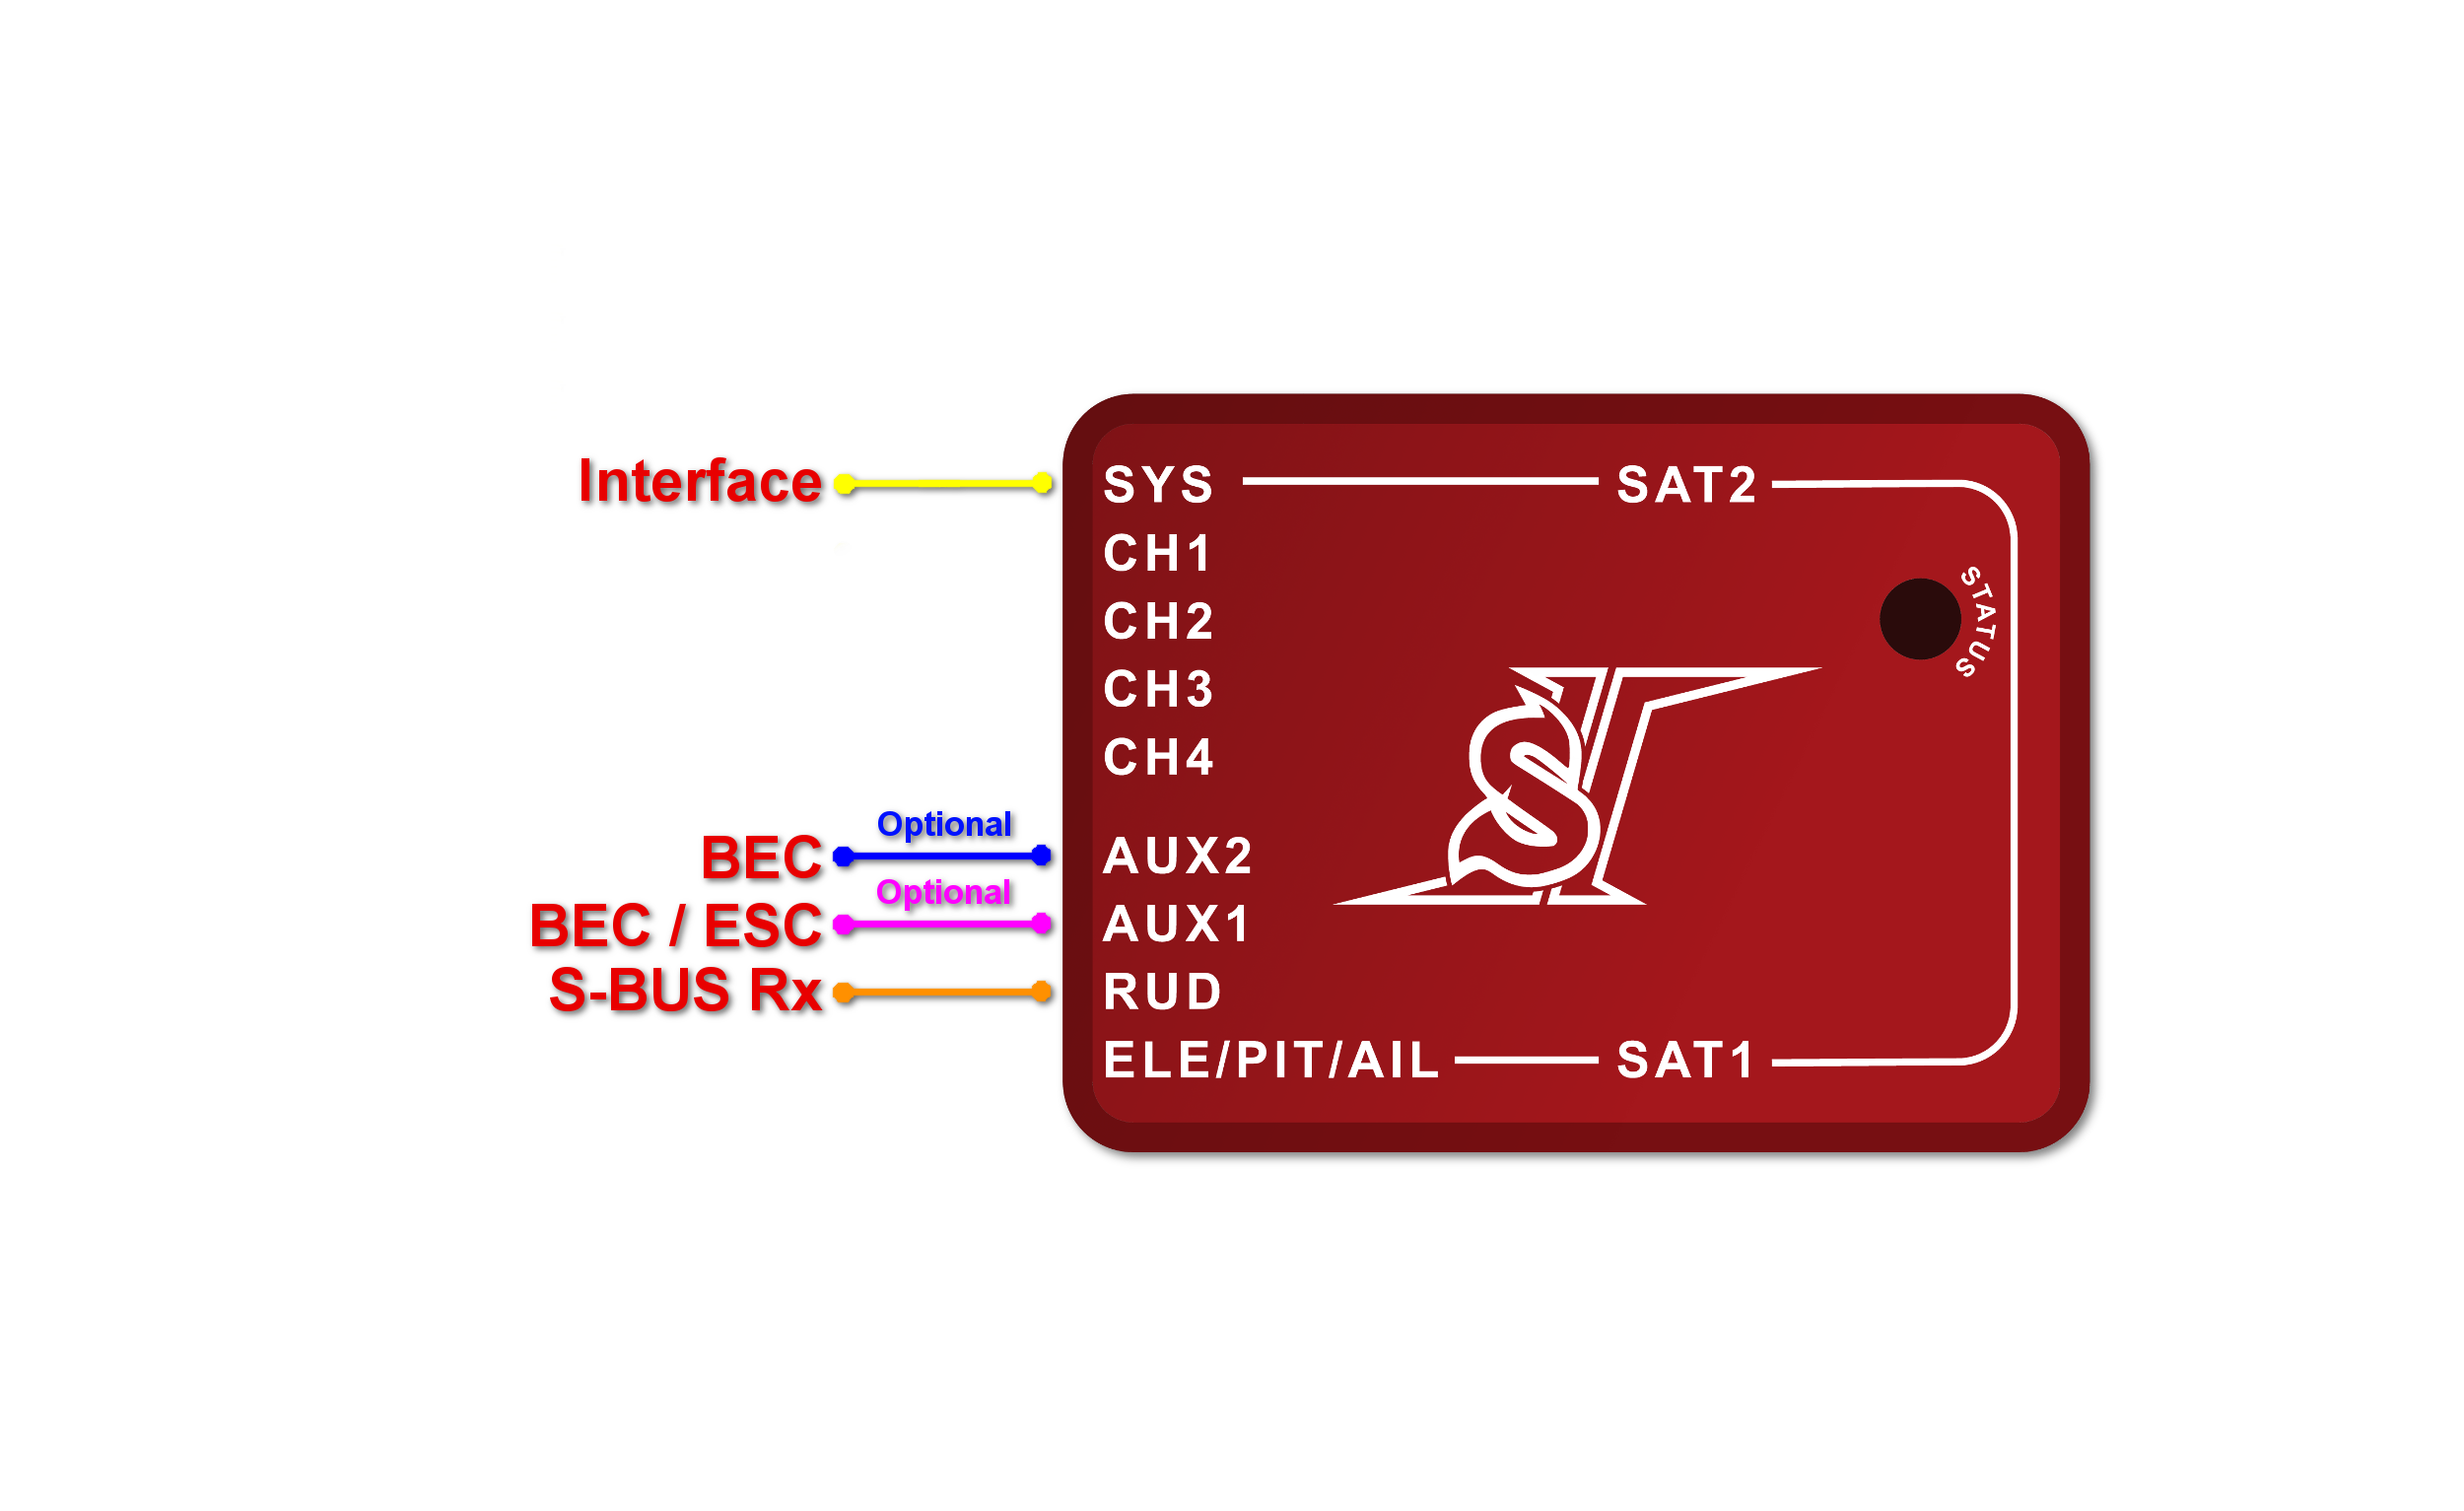
The unit is able to control Bank Switching by 7th channel of the receiver. Connect the cable to the AUX2 port and allow Bank Switching in the software.
Never plug a connector for powering the unit to SYS or ELE/PIT/AIL ports.
7 CONNECTION OF SPEKTRUM DSM2/X SATELLITE
μSpirit – receiver type: Spektrum DSM2/X
Spirit – receiver type: Spektrum DSM2/X
Spirit Pro – receiver type: Spektrum DSM2/X
Spirit 2 – receiver type: Spektrum DSM2/X
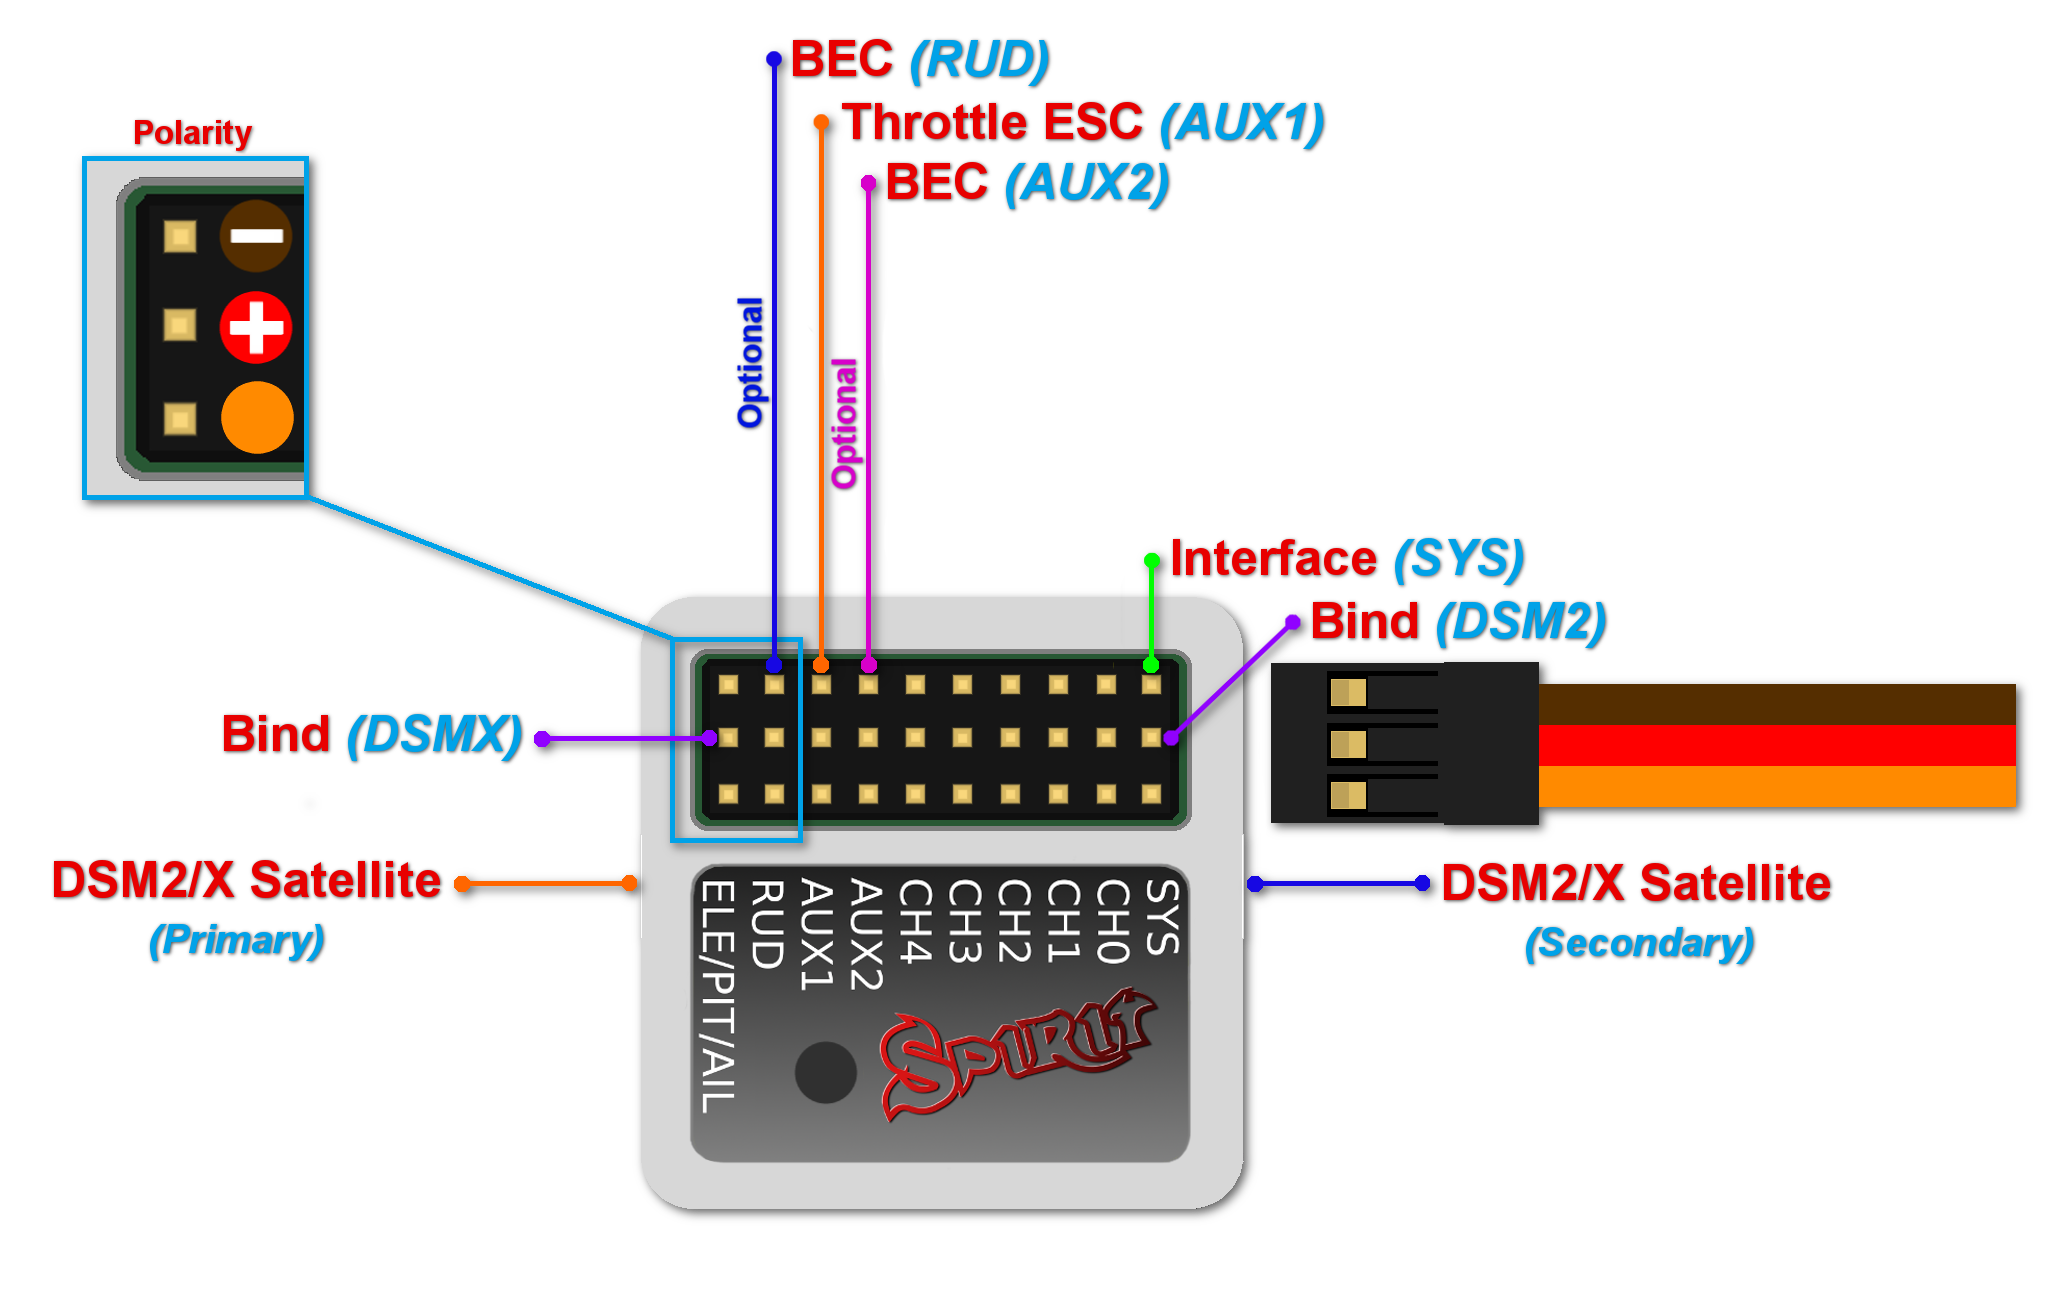
Connection to a BEC is optional. If the model is powered by an external BEC, this must be connected to the RUD port. Also the power lead from the ESCs internal BEC must be disconnected.
Spirit
A second satellite can be connected, but this can only be achieved via a special adapter connected to the RUD port. This adapter can be purchased separately. Before satellites can be used they must be bound to your transmitter, taking into account any failsafes that need to be set. To use both, two satellites and an external BEC, be sure to use a Y-harness made from large gauge wire to supply the high current that is needed.
Spirit Pro, Spirit 2
You can connect two satellites directly to the unit. If you want to use only one satellite, you have to use the Primary (SAT-1) connector.
To bind the satellites, insert a bind plug in the SYS port for DSM2 satellites or the ELE/PIT/AIL port for DSMX satellites. Power cycling the Spirit start the bind process. Once successfully bound, the STATUS LED will go out and the satellite LED will come on.
If the second satellite fails to bind, swap the satellites and repeat the bind process.
Be sure Receiver type in the software is configured to Spektrum DSM2/X otherwise binding process will not work. Never plug a connector for powering the unit to SYS or ELE/PIT/AIL positions.
7.1 Spektrum Multi Adapter
Spektrum Multi Adapter allows to connect additional 2 Spektrum DSM2/X satellites.
It is suitable for all Spirit units and is recommended when using GeoLink module and/or ESC telemetry that is using a satellite ports. Before usage please bind satellites that are intended to be connected at the adapter through primary and secondary ports.
Servo cable: RUD port
Orange wire: AIL pin
Spirit
With this adapter it is possible to connect up to 3x Spektrum satellites at the same time.
Spirit Pro, Spirit 2
With this adapter it is possible to connect up to 4x Spektrum satellites at the same time.
8 CONNECTION OF FUTABA S-BUS RECEIVER
μSpirit – receiver type: Futaba S-BUS
Spirit – receiver type: Futaba S-BUS
Spirit Pro – receiver type: Futaba S-BUS
Spirit 2 – receiver type: Futaba S-BUS
Spirit
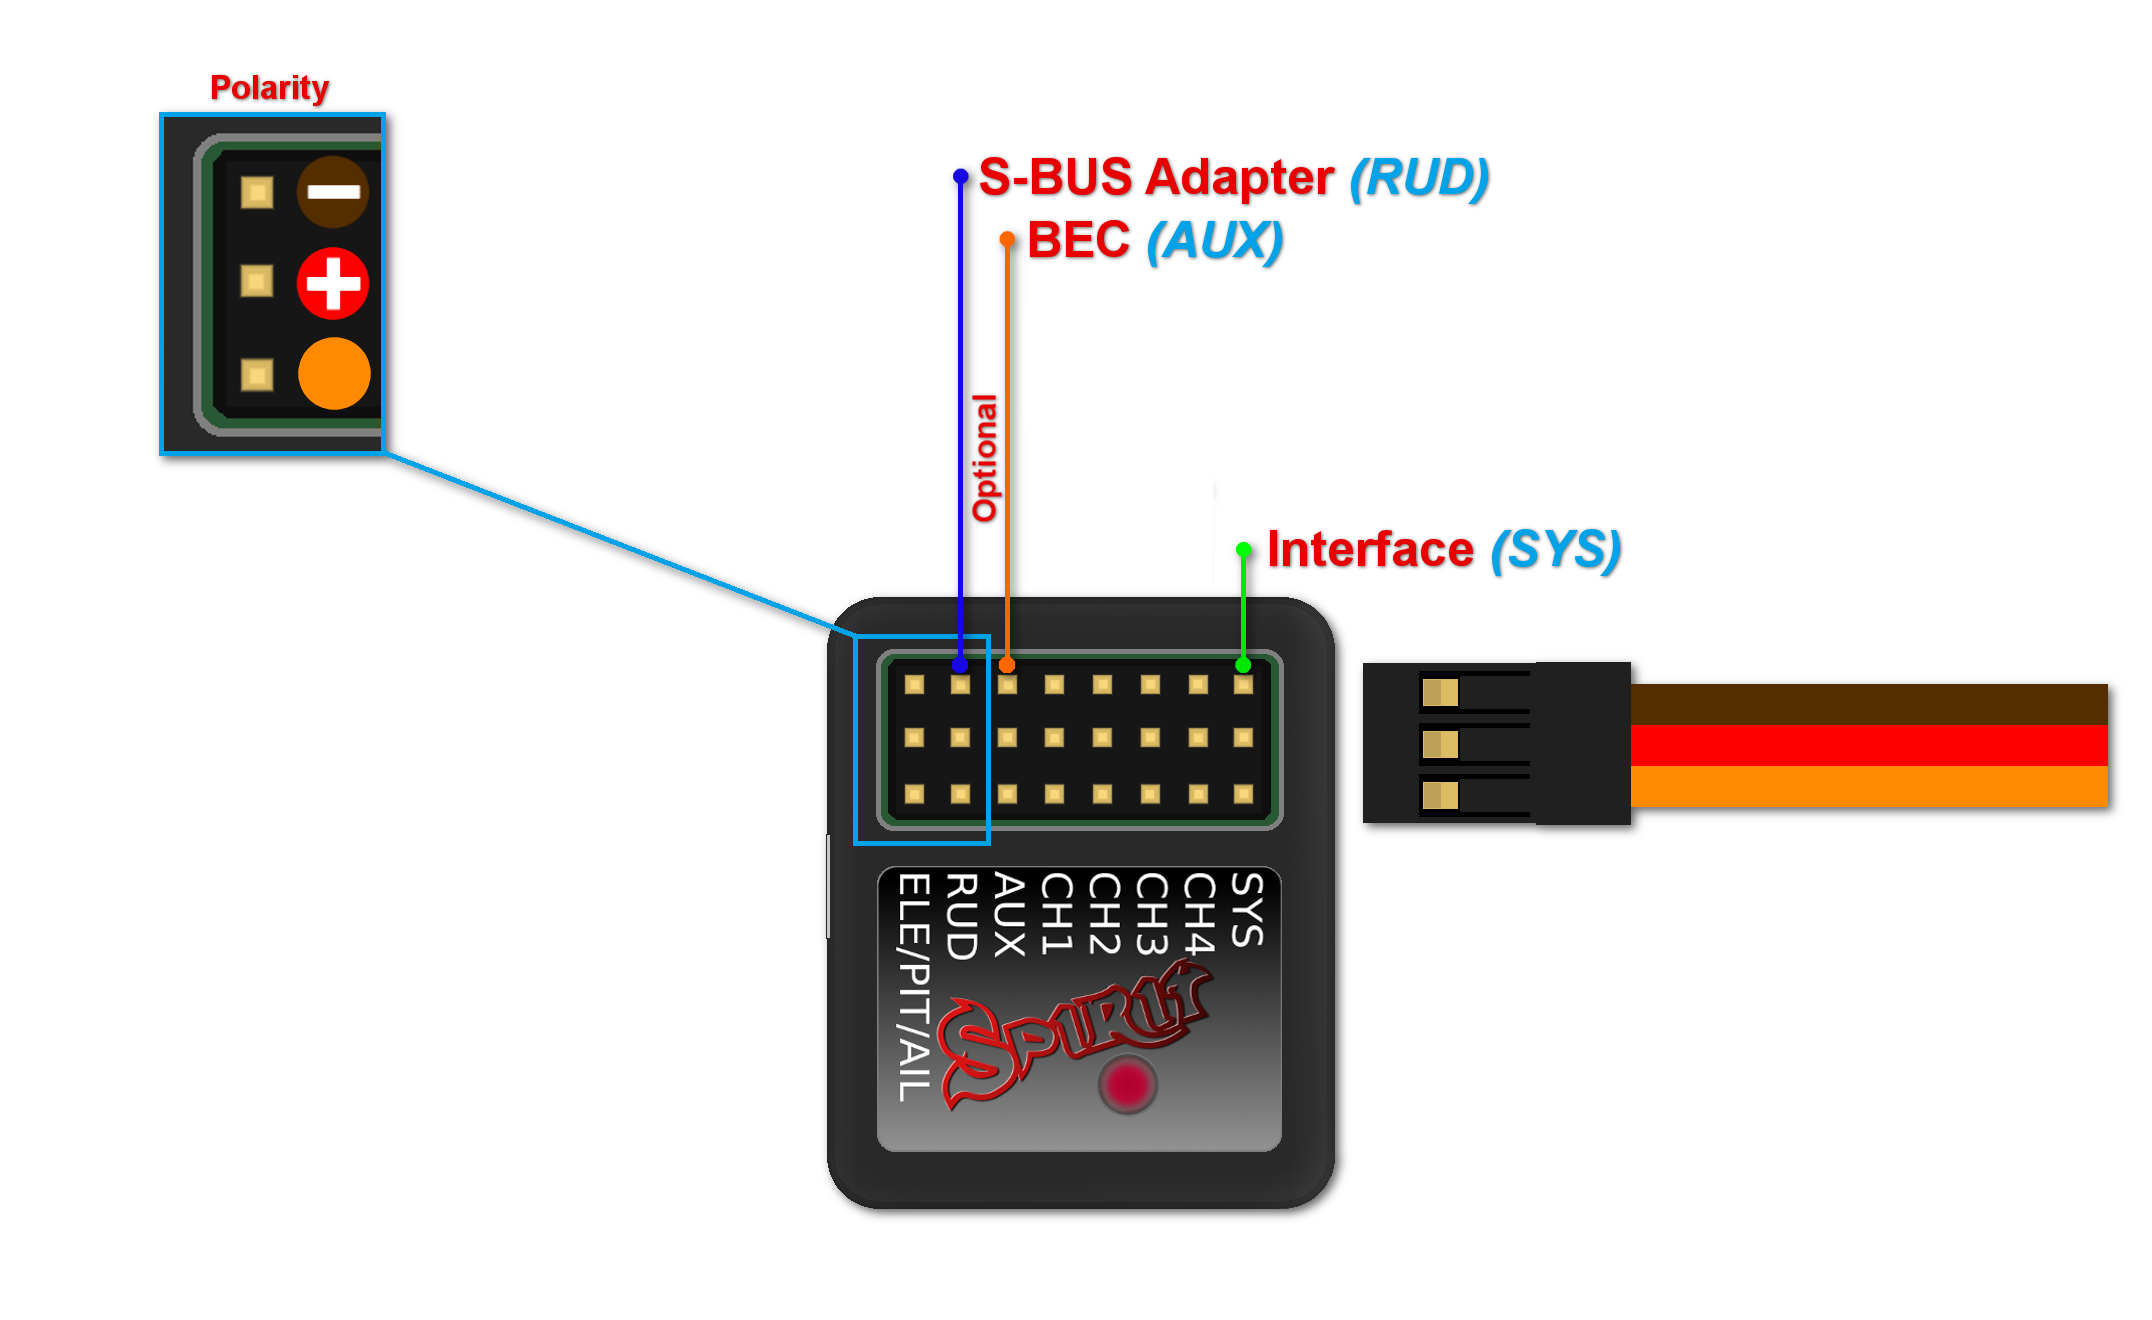
When using S-BUS it is necessary to use an inverter that replaces the cable between the receiver and the Spirit unit's RUD port. The inverter cable - called SBUS Adapter - can be purchased separately. The SBUS Adapter has to be connected in the way, that longer end is directed to the unit and shorter to the receiver. This apply for both Futaba and FrSky receivers.
μSpirit, Spirit Pro, Spirit 2
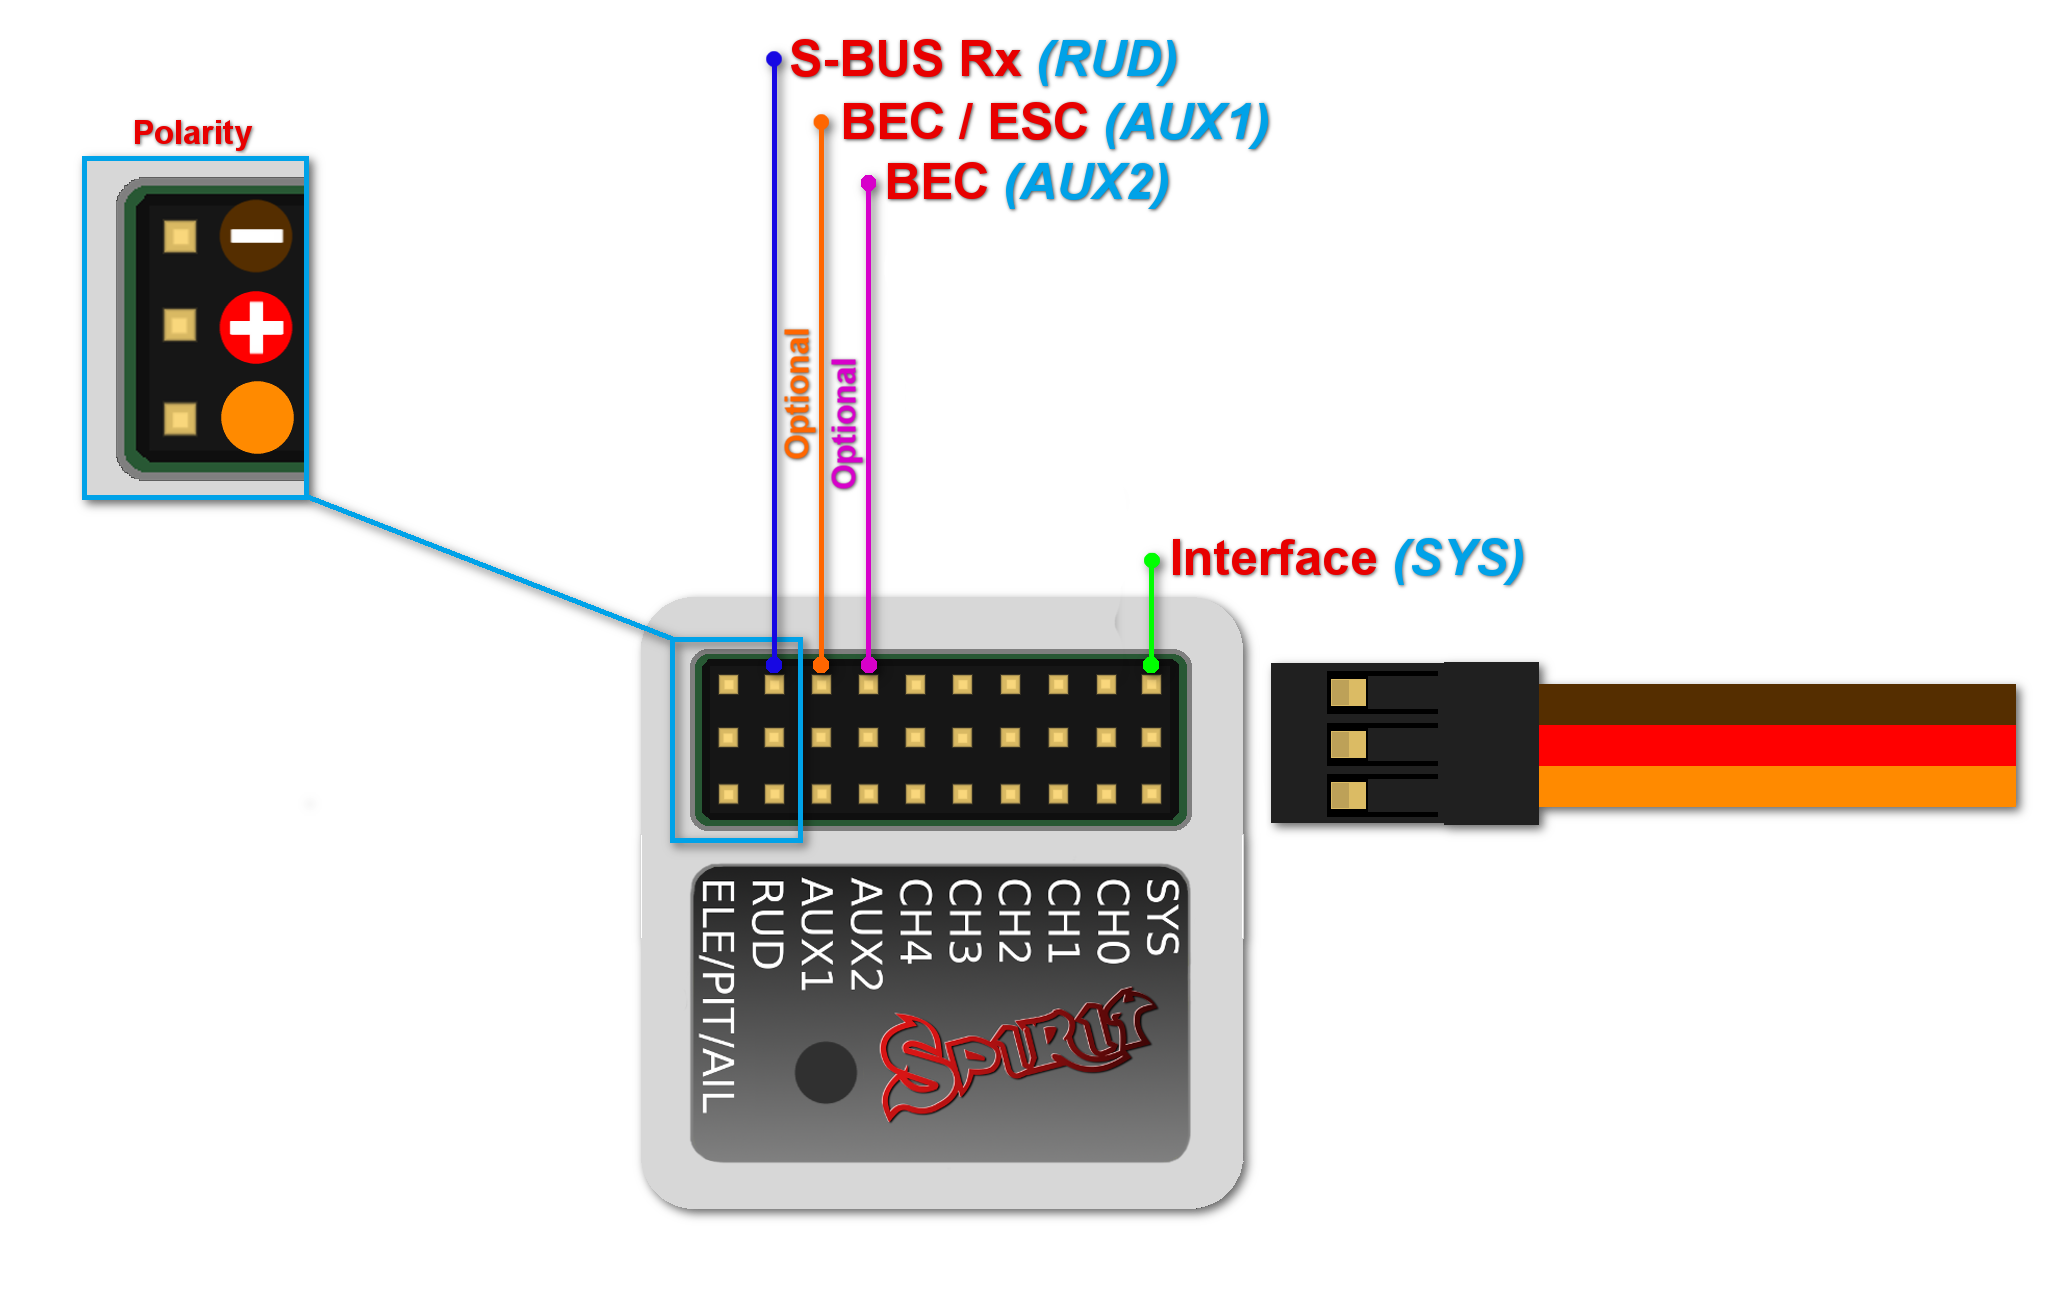
Connect the receiver with the unit by normal patch cable to the RUD port. You can use cable that is included in the package.
Connection to a BEC is optional. For models of 500 size and larger it is recommended to use dual power supply cables due to the increased power consumption. That means besides the S-BUS cable, an additional power supply cable should be connected to the AUX port.
When using this type of receiver you can connect the throttle cable directly to the receiver. Alternatively, you can assign the throttle channel in the software and use the AUX as throttle output from the unit.
Never plug a connector for powering the unit to SYS or ELE/PIT/AIL ports.
9 CONNECTION OF PPM RECEIVER
μSpirit – receiver type: PPM
Spirit – receiver type: PPM
Spirit Pro – receiver type: PPM
Spirit 2 – receiver type: PPM
Connection to a BEC is optional. For models of 500 size and larger it is recommended to use dual power supply cables due to the increased power consumption. That means besides the communication cable, an additional power supply cable should be connected to the AUX port.
When using this type of receiver you can connect the throttle cable directly to the receiver. Alternatively, you can assign the throttle channel in the software and use the AUX as throttle output from the unit.
Never plug a connector for powering the unit to SYS or ELE/PIT/AIL ports.
Futaba pilots with PPM receiver such as R6107SP will need to reconfigure channels according Futaba PPM page.
10 CONNECTION OF JETI EX BUS RECEIVER
μSpirit – receiver type: Jeti EX Bus
Spirit – receiver type: Jeti EX Bus
Spirit Pro – receiver type: Jeti EX Bus
Spirit 2 – receiver type: Jeti EX Bus
This connection type now supports the new integration with JETI Model transmitters. You can now fully configure the Spirit unit remotely through the JETI Model transmitter.
Remember to configure the receiver type through the software or the integration will not work. Also, it is necessary to download Spirit.bin file from the website. Move the file to the Devices directory in the SD card of your transmitter.
For futher instructions please check the Jeti Integration page.
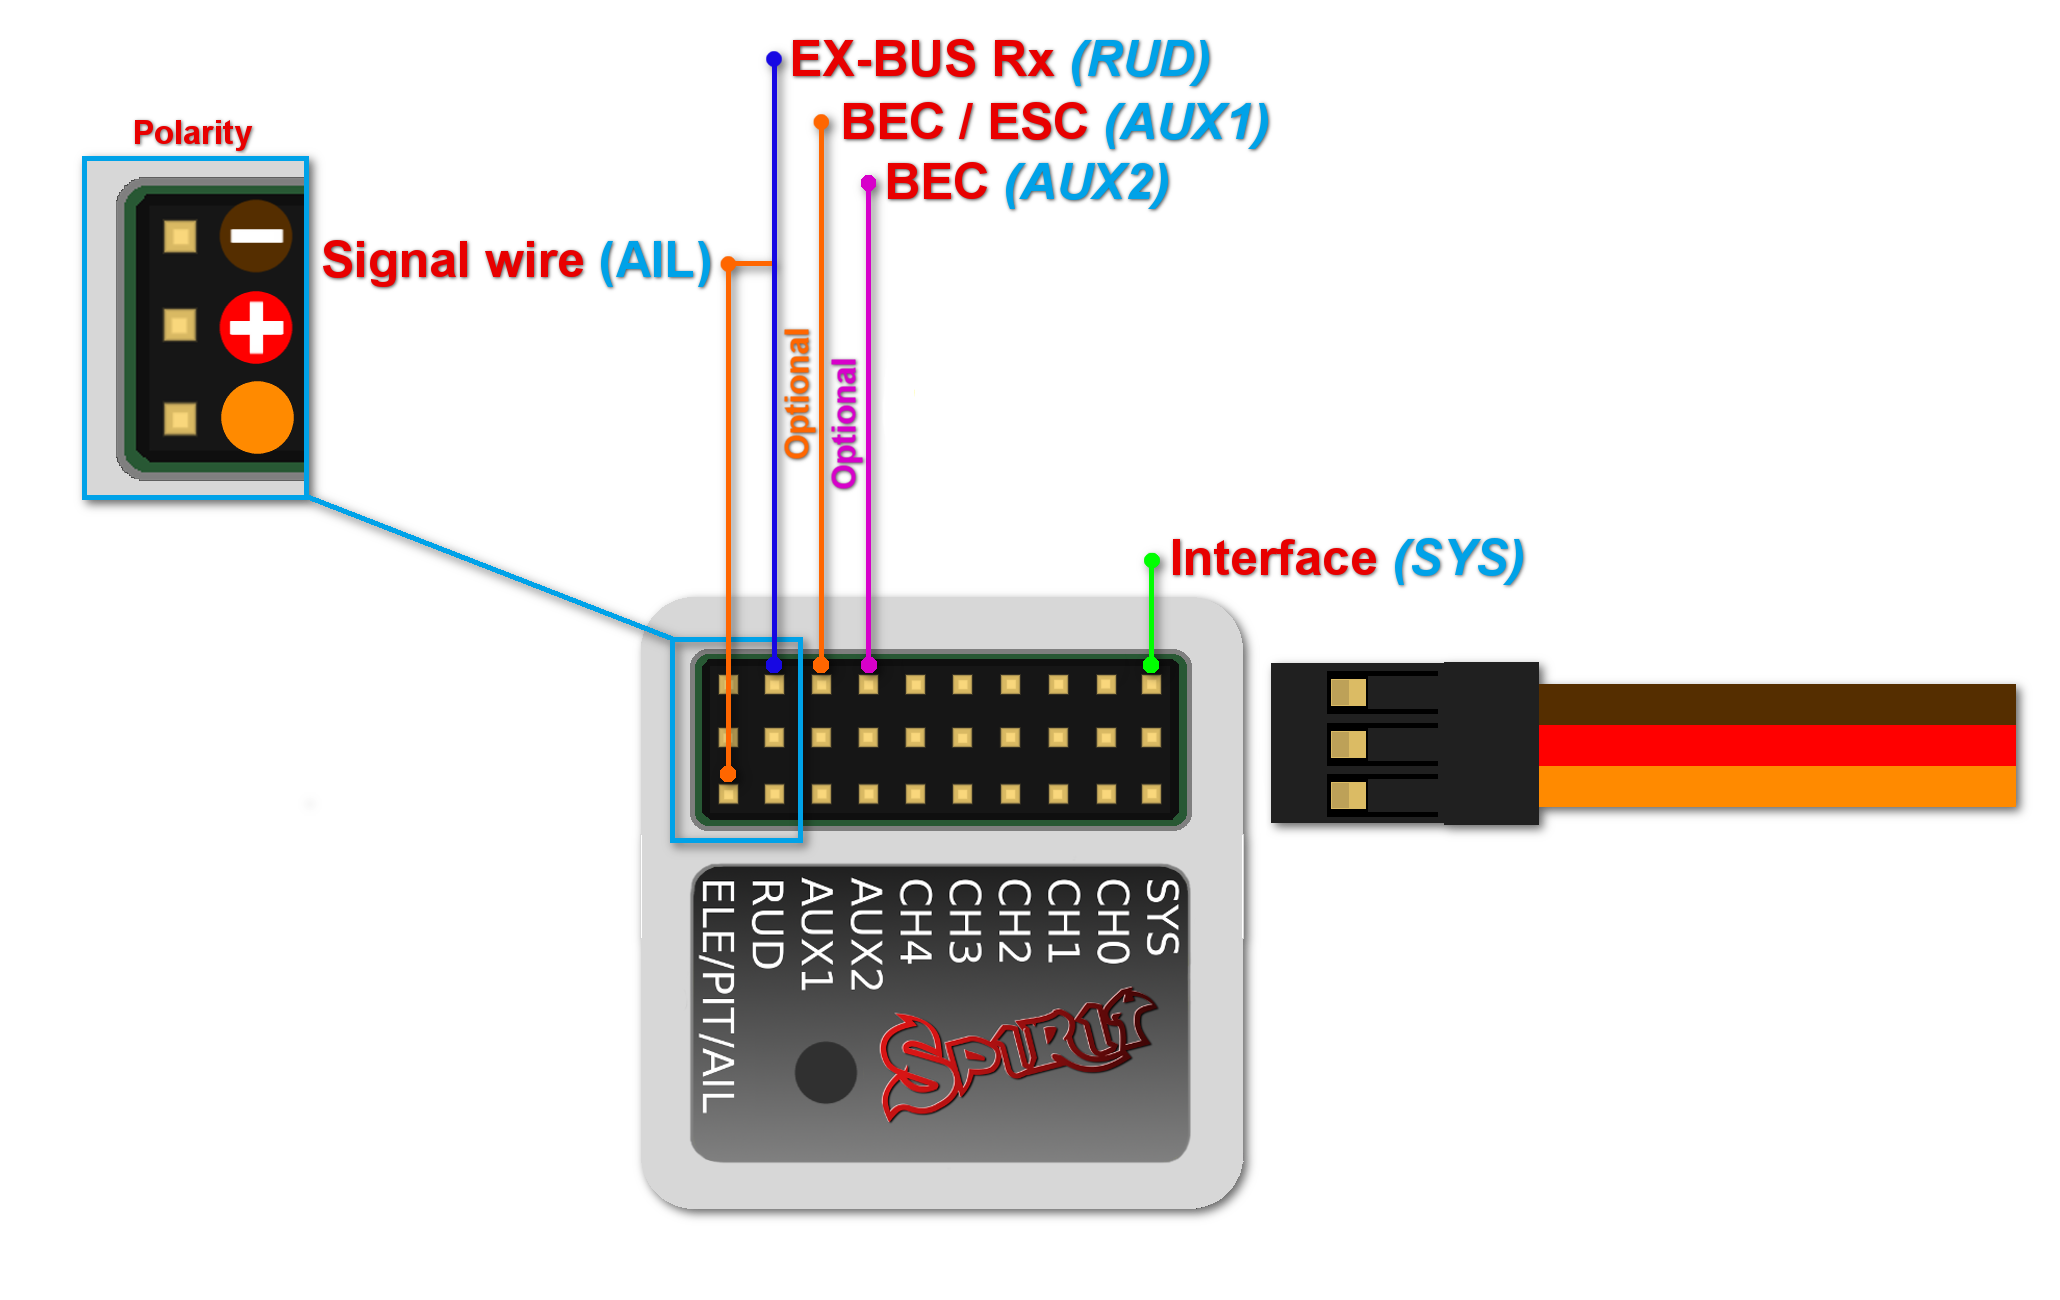
Connection to a BEC is optional. For models of 500 size and larger it is recommended to use dual power supply cables due to the increased power consumption. That means besides the EX Bus cable, an additional power supply cable should be connected to the AUX port.
When using this type of receiver you can connect the throttle cable directly to the receiver. Alternatively, you can assign the throttle channel in the software and use the AUX as throttle output from the unit.
A special cable is needed to enable this communication. Signal wire (Orange) is connected to the AIL pin, while power wires (Red and Brown) are connected to the RUD port in the unit. For JETI REX receivers, end of the special cable is connected to the EX1 or EX2 (depending on the receiver configuration). For EX receivers, please use EXT port.
Never plug a connector for powering the unit to SYS or ELE/PIT/AIL ports.
11 CONNECTION OF SRXL/SUMD RECEIVER
μSpirit – receiver type: SRXL/SUMD
Spirit – receiver type: SRXL/SUMD
Spirit Pro – receiver type: SRXL/SUMD
Spirit 2 – receiver type: SRXL/SUMD
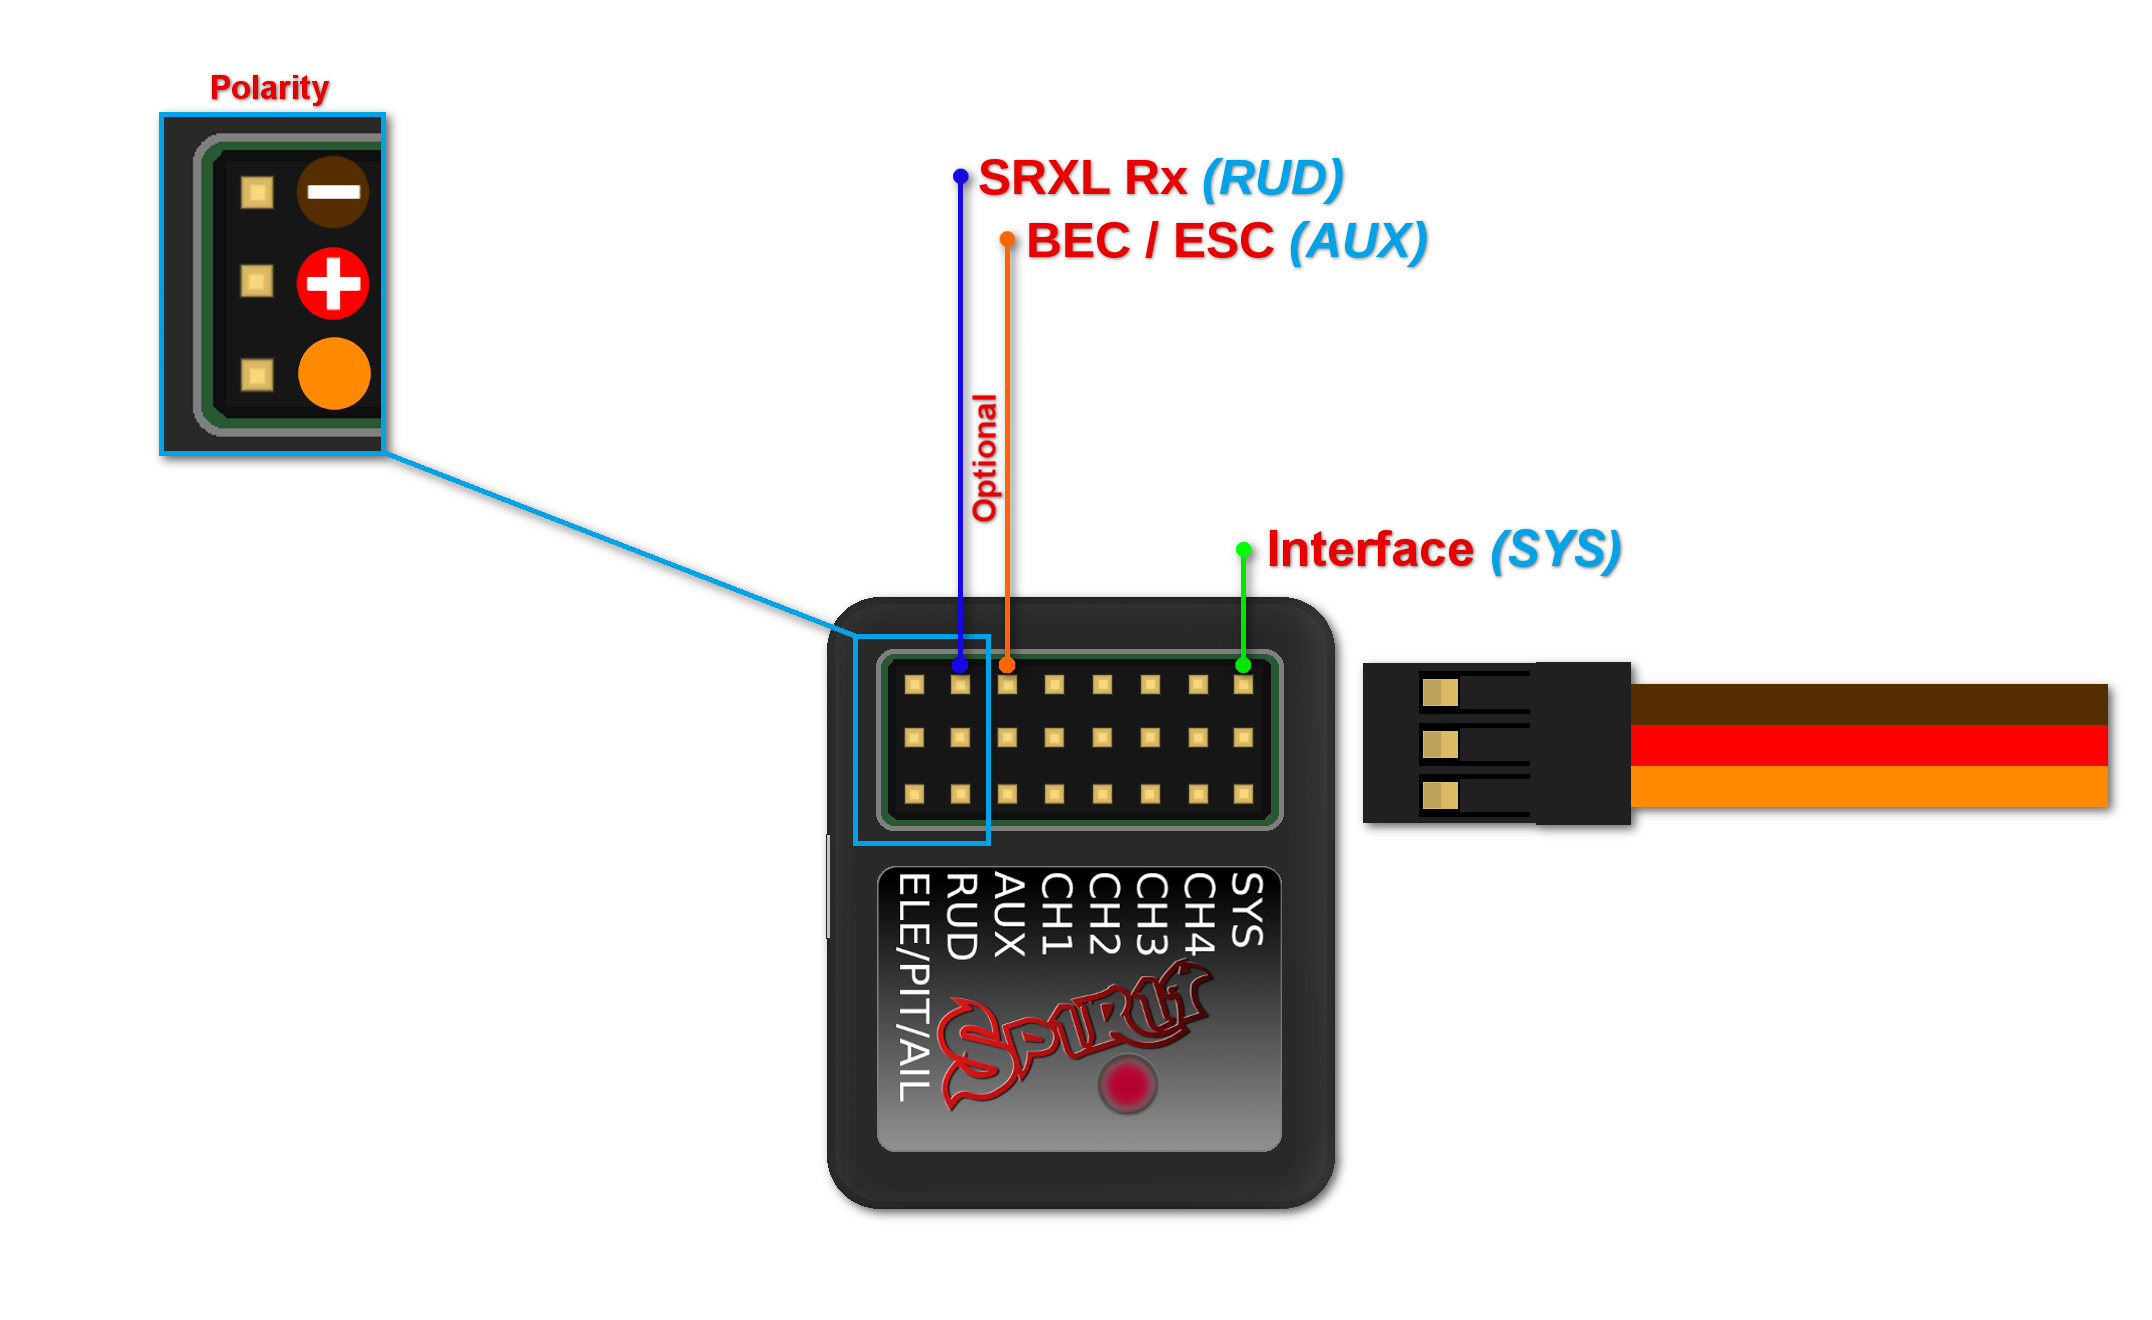
Connection to a BEC is optional. For models of 500 size and larger it is recommended to use dual power supply cables due to the increased power consumption. That means besides the communication cable, an additional power supply cable should be connected to the AUX port. This protocol family can work with a wide range of receivers. Thus you can use Multiplex SRXL, BeastX SRXL, Graupner SUMD, Jeti UDI, Spektrum SRXL, JR X-Bus (mode B) and more.
When using this type of receiver you can connect the throttle cable directly to the receiver. Alternatively, you can assign the throttle channel in the software and use the AUX as throttle output from the unit.
Never plug a connector for powering the unit to SYS or ELE/PIT/AIL ports.


