Konfigurace modulu
Contents
1 Podpora modulu GeoLink
GeoLink je podporován od verze firmware 2.5. Pro využití funkcí, které poskytuje, je nejprve nezbytné jej povolit v programu Spirit Settings - karta Obecné. Poté uložte nastavení a následně znovu připojte napájení.
2 Kalibrace kompasu
Každý modul GeoLink byl před odesláním zkalibrován a otestován. Pro správné fungovaní je pouze nezbytné, aby uživatel provedl kalibraci kompasu. Kompas je klíčový pro zjištění úhlu, v jakém je model natočen vůči zemi. Kompas snímá magnetické pole země a díky tomu může ziskat potřebné údaje kdykoli během letu. Naneštěstí se magnetické pole liší v závislosti na dané oblasti. Pokud bude model létat mimo Českou republiku, je nezbytné provést novou kalibraci kompasu. Modul je továrně zkalibrován pro oblast České republiky.
2.1 Prověření
Pro zjištění správné kalibrace modulu spusťte aplikaci Spirit Settings a okno nastavení GeoLink. Na kartě Informace je zobrazený aktuální úhel.
Please place the model or just GeoLink to the North as close as possible, so that flight direction of the model is front of the arrow. Ideally compare to an analogue compass.
DŮLEŽITÉ: Ujistěte se, že při čtení úhlu natočení z programu bude model přesně rovnoběžně s horizontem. To znamená, že při pohledu v kartě Modul bude odchylka 0°. Protože některé modely jako např. SAB Goblin, MSH Protos jsou mechanicky nakloněné, je nezbytné nejprve model naklonit tak, aby zde byla nulová odchylka.
Je-li model nasměrován na Sever, měl by být úhel 90 +/- 4°. Zobrazená hodnota by měla být v toleranci.
Doporučujeme nevyužívat chytré zařízení pro porovnání úhlu kompasu. To proto, že tyto zařízení často nemají kompas zkalibrován vůbec. Analogový kompas je proto nejvhodnější pro srovnávací test.
2.2 Zvláštní chování
Nesprávná kalibrace kompasu se projeví tak, že funkce jako Bezpečná oblast, Návrat domů a Držení pozice nebudou fungovat přesně. Např. po aktivaci funkce Návrat domů model může dosáhnout domovské polohy, avšak bude namísto stabilního visu provádět manévry podobné kroužení. Čím větší je okruh, ve kterém krouží, tím více se naměřený úhel kompasu odchyluje od správné hodnoty. Pokud se tento jev objevuje vždy, znamená to, že je nezbytné provést kalibraci kompasu.
2.3 Kalibrace kompasu
Pro provedení kalibrace je nezbytné v programu Spirit Settings - GeoLink - Modul kliknout na tlačítko Požadavek kalibrace. Poté odpojte napájení a USB interface z jednotky.
- Během následujícího připojení modelu k napájení proběhne série blikání stavové LED modulu (3x za sebou).
- Stavová LED bude dále indikovat stav kalibrace. Začněte pohybovat s modulem (přip. celým modelem) ve všech možných směrech tak, že model opíše tvar koule. Jakékoli další probliknutí LED znamená, že modul obdržel nová kalibrační data.
- Otáčejte s modulem tak dlouho, dokud nezačne stavova LED periodicky blikat. V této chvíli je kalibrace dokončena a modul je připraven k použití.
Pro modely helikoptér třídy 600+ doporučujeme provádět kalibraci, není-li GeoLink připevněn na modelu. Kalibrace se bude provádět jednodušeji.
Proces kalibrace je nejlepší provádět přímo v oblasti, kde model bude létat.
Proces kalibrace nelze dokončit předčasně. Pokud je odpojeno napájení v procesu kalibraci, začne při dalším připojení napájení celý proces znovu.
3 Konfigurace funkcí
Nejprve se musí pilot rozhodnout, které funkce modulu bude využívat. Více podrobností o jejich fungování naleznete v na stránce Funkce. Pilot může aktivovat i několik funkcí najednou.
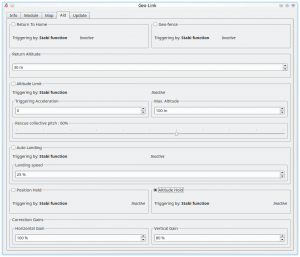
Zaškrtnutí se povolí na kartě Funkce v okně GeoLink daná funkce, která se bude využívat. Po povolení se zpřístupní také konfigurace parametrů, které jsou u ni dostupné. Lze tak přizpůsobit chování dle požadavků pilota.
3.1 Aktivace
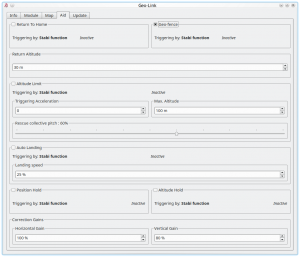
You can verify if triggering mechanism is working correctly even before actual flight by checking the Aid tab. If a feature is engaged you will see ACTIVE or in other case Inactive.
Z bezpečnostních důvodu doporučujeme neaktivovat jakoukoli funkci GeoLink, dokud není model v dostatečné letové výšce.
3.1.1 Stabi funkce
Ve výchozí konfiguraci jsou všechny povolené funkce GeoLink modulu aktivní ihned, jakmile je aktivní Stabi funkce. Např. pokud se aktivuje režim Koaxiál nebo Záchranný režim, je tímto aktivována i povolená funkce GeoLink a rozšiřuje tak dané funkce. Doporučujeme nastavit parametr Stabi/Funkce na režim Koaxiál pro funkce Bezpečná zóna, Návrat domů a Držení pozice.
3.1.2 Přiřazený kanál GeoLink
Alternativně lze pro aktivování funkcí využít jakýkoli volný kanál. Přiřazení je možné provést v okně Obecné/Kanály - na pravé straně okna lze zvolit funkci. (např. F: Návrat domů). Poté k dané funkci zvolte kanál, kterým se má aktivovat. Pro funkce GeoLink mohou být použity také identické kanály.
4 Bezpečná zóna
Pro povolení funkce zaškrtněte dané políčko v okně GeoLink, karta Funkce.
4.1 Usage
The feature can be engaged at any given time by a command from your radio. It is important to decide in which way the feature can be engaged as there are two options.
- To engage with Stabi function - in this case the feature is engaged when programmed Stabi function is engaged. This mean you do not need to assign any other switch than when used for e.g. Stabilisation mode
- To engage with assigned GeoLink channel - it is required to assign F: GeoLink Geo-fence function in the General/Channels to an available channel.
Please make sure that Geo-fence Area was defined in the Map tab.
5 Altitude Limit
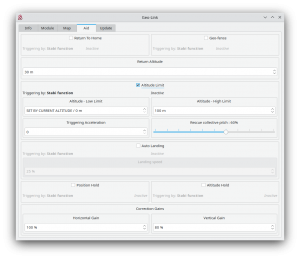
Pro povolení funkce zaškrtněte dané políčko v okně GeoLink, karta Funkce.
5.1 Usage
The feature can be engaged at any given time by a command from your radio. It is important to decide in which way the feature can be engaged as there are two options.
- To engage with Stabi function - in this case the feature is engaged when programmed Stabi function is engaged. This mean you do not need to assign any other switch than when used for e.g. Stabilisation mode
- To engage with assigned GeoLink channel - it is required to assign F: GeoLink Altitude Limit function in the General/Channels to an available channel.
6 Return to Home
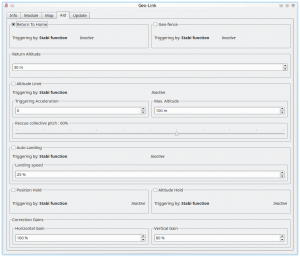
To enable this feature it is required to tick the CheckBox in the GeoLink window/Aid tab.
6.1 Usage
The feature can be engaged at any given time by a command from your radio. It is important to decide in which way the feature can be engaged as there are two options.
- To engage with Stabi function - in this case the feature is engaged when programmed Stabi function is engaged. This mean you do not need to assign any other switch than when used for e.g. Stabilisation mode
- To engage with assigned GeoLink channel - it is required to assign F: GeoLink Return to Home function in the General/Channels to an available channel.
6.2 Modes
If Return to Home is engaged by assigned GeoLink channel there is possibility to use tri-state switch also for programming of a new Home spot. In the Channels window you will be able to see Function as On (1), Off and On (2) which is corresponding to 100%, 0% and -100% channel value.
When On (1) is displayed it mean that at this point Return to Home is engaged and model will move at the Home spot.
When On (2) is displayed the unit is in a programming mode which allow to overwrite current Home spot to the new with position at which the model currently is. Please note that it will not work if model is flying or if GNSS signal is very weak.
6.3 New Home position
It is possible to program the Home position either with the Spirit Settings by selecting a point at the Map. Or there is possibility to use GeoLink channel to do so even if you are out of a computer.
If assigned GeoLink channel is used you have to set On (2) function state and keep it on for at least 2 seconds. At this period Status LED of the unit will turn off and after 2 seconds new Home position is programmed. Once finished the LED must turn On again.
7 Position Hold
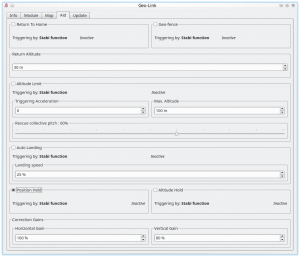
To enable this feature it is required to tick the CheckBox in the GeoLink window/Aid tab.
7.1 Usage
The feature can be engaged at any given time by a command from your radio. It is important to decide in which way the feature can be engaged as there are two options.
- To engage with Stabi function - in this case the feature is engaged when programmed Stabi function is engaged. This mean you do not need to assign any other switch than when used for e.g. Stabilisation mode
- To engage with assigned GeoLink channel - it is required to assign F: GeoLink Position Hold function in the General/Channels to an available channel.
8 Altitude Hold
To enable this feature it is required to tick the CheckBox in the GeoLink window/Aid tab.
8.1 Usage
The feature can be engaged at any given time by a command from your radio. It is important to decide in which way the feature can be engaged as there are two options.
- To engage with Stabi function - in this case the feature is engaged when programmed Stabi function is engaged. This mean you do not need to assign any other switch than when used for e.g. Stabilisation mode
- To engage with assigned GeoLink channel - it is required to assign F: GeoLink Altitude Hold function in the General/Channels to an available channel.
8.2 Modes
If Altitude Hold is engaged by assigned GeoLink channel there is possibility to use tri-state switch also for programming of a new Home spot. In the Channels window you will be able to see Function as On (1), Off and On (2) which is corresponding to 100%, 0% and -100% channel value.
When On (1) is displayed it mean that altitude in which the feature was engaged will be held. Pilot is still able to change Collective Pitch, but in a limited manner. Collective Pitch reaction will be slower than in a normal flight mode.
When On (2) is displayed it mean that altitude in which the feature was engaged will be held. Pilot is unable to change Collective Pitch by pitch stick. So that Collective Pitch steering is fixed and is changed only by GeoLink in order to hold right altitude.
9 Correction Gains
GeoLink features are doing a certain movements to achieve desired position of the model. These movements are small corrections which are dependent on parameters of the model. For very agile models these correction can be smaller. While for heavy and big models you might need bigger in order to reduce time required to achieve desired position.
9.1 Horiontal Gain
Horizontal gain affects features such as Geo-fence, Return To Home and Position Hold. For example if Return to Home feature is engaged and it takes too long to return at programmed home spot it is necessary to increase Horizontal correction. Too high value will result in excess (too visible) corrections even when model is maintaining spot on position.
9.2 Vertical Gain
Vertical gain affects features such as Altitude Limit and Altitude Hold.

